Tag: wall anchors

  • Concrete Anchor Selection Chart (Homeowner’s Quick Reference Guide)

    Concrete Anchor Selection Chart (Homeowner’s Quick Reference Guide)

    Choosing the right concrete anchor can feel overwhelming when you’re faced with multiple anchor types, load ratings, base materials, and installation rules. Using the wrong anchor isn’t just inconvenient—it can lead to cracked concrete, loose fixtures, or sudden anchor failure.

    This concrete anchor selection chart is designed as a homeowner-friendly reference that helps you quickly choose the correct anchor for common DIY and home-improvement projects—without guesswork.

    If you’ve worked through the guides in this cluster, this post brings everything together into one practical decision tool you can rely on before drilling your first hole.


    Why a Concrete Anchor Selection Chart Matters

    Concrete anchors are not one-size-fits-all fasteners. Each anchor is engineered for specific materials, loads, and installation conditions. When the wrong anchor is used, common problems include:

    • Loose or wobbling fixtures
    • Cracked concrete or masonry
    • Reduced load capacity
    • Anchor pull-out or sudden failure

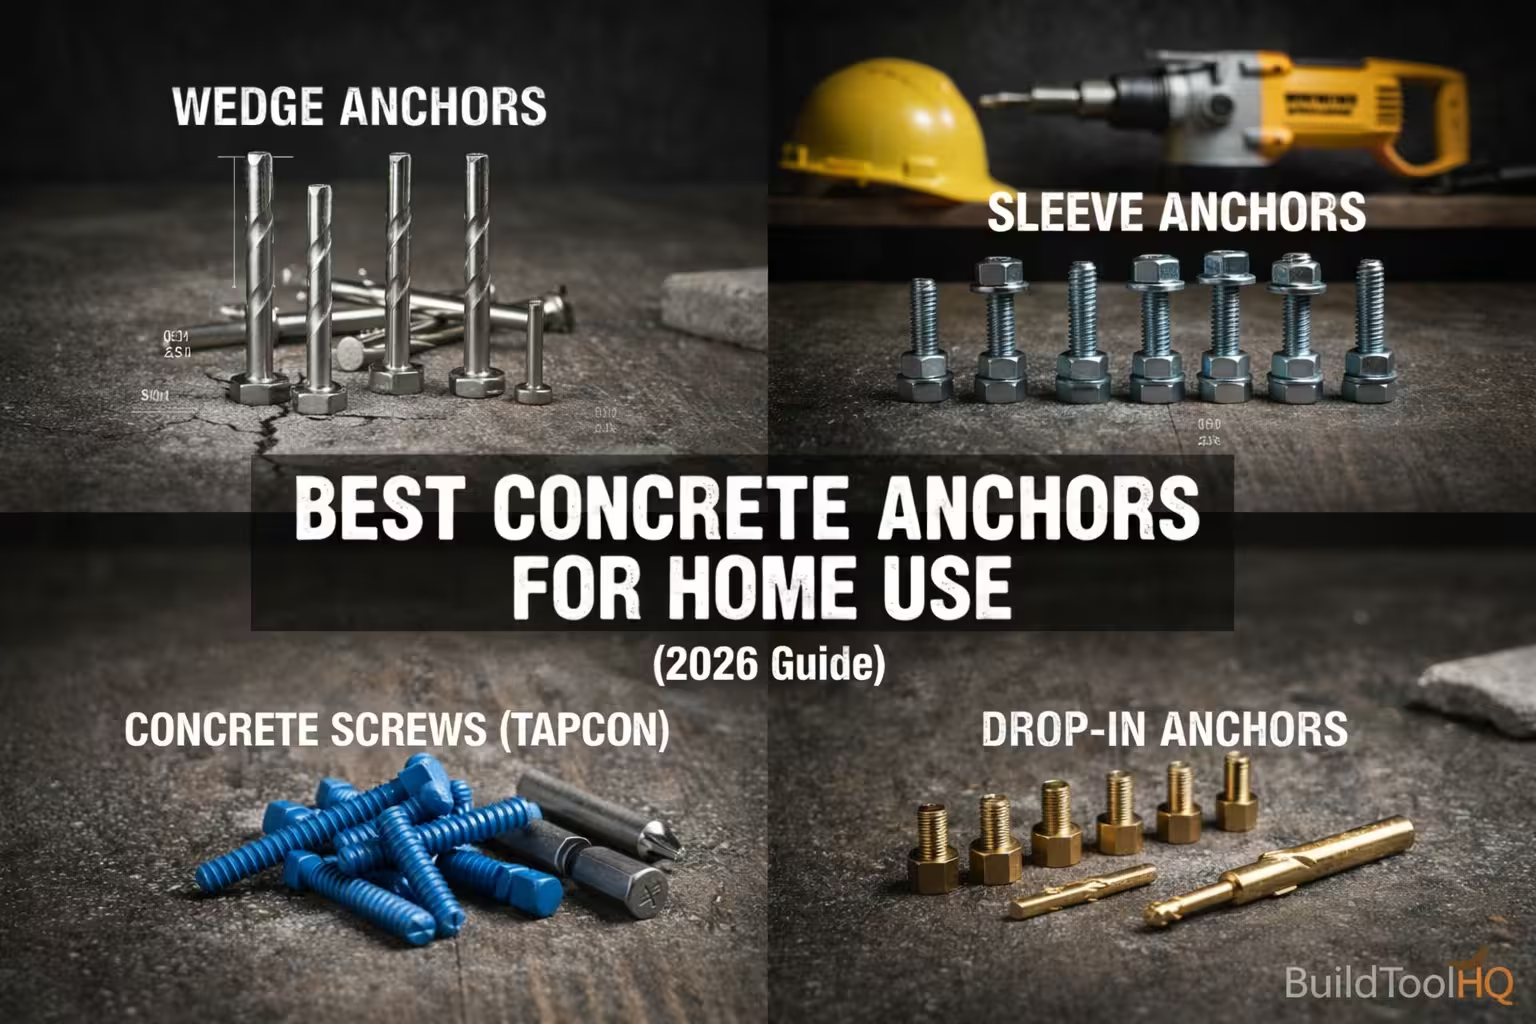
    Most anchor failures happen not because of poor-quality hardware, but because the anchor chosen wasn’t appropriate for the base material or load. For a deeper understanding of anchor categories, start with (Best Concrete Anchors for Home Use – 2026 Guide).


    Quick Concrete Anchor Selection Chart (Home Use)

    Project TypeBase MaterialRecommended Anchor
    TV mountPoured concreteWedge anchor
    Wall shelvingPoured concreteSleeve anchor
    Light fixturesConcrete / CMUTapcon screws
    Electrical panelSolid blockSleeve anchor
    Overhead pipesConcrete ceilingDrop-in anchor
    Brick wall fixturesBrick mortarMasonry screw
    Heavy equipmentStructural concreteWedge anchor

    ⚠️ Always verify manufacturer load ratings, anchor diameter, and local building code requirements.


    How to Choose the Right Anchor (Simple Decision Process)

    When selecting a concrete anchor, follow this order:

    1. Identify the base material (concrete, brick, block, or masonry)
    2. Determine the load (light, medium, heavy, or overhead)
    3. Check edge distance and spacing requirements
    4. Match the anchor type to both material and load

    Skipping any of these steps significantly increases the risk of anchor failure.


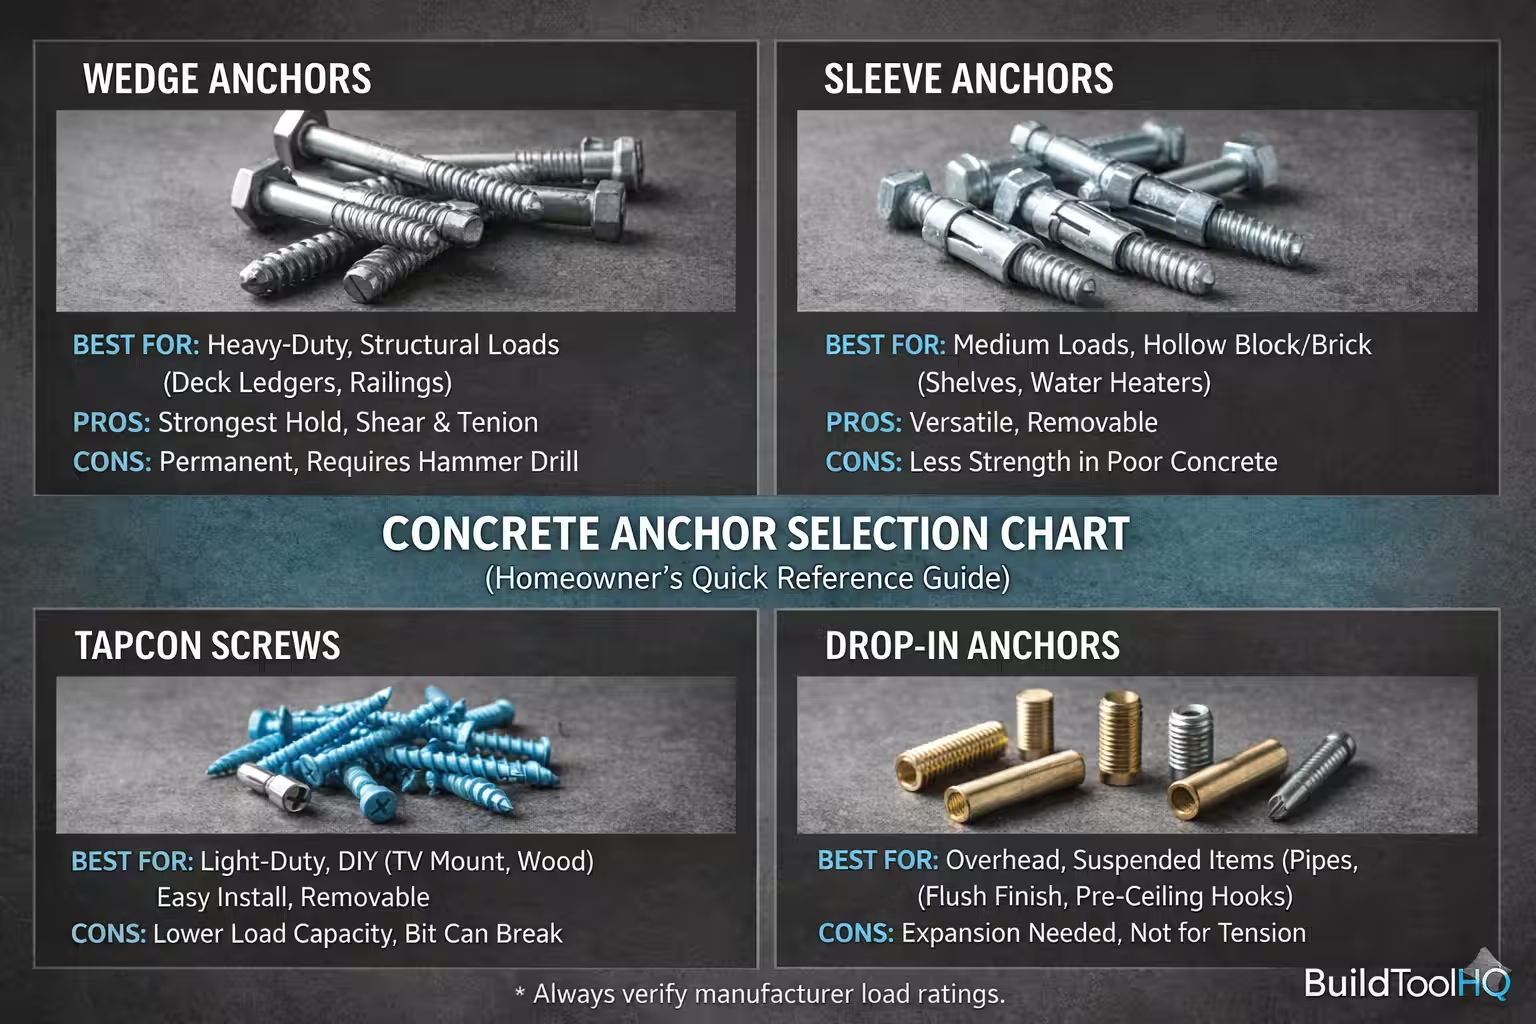
    Anchor Types Explained (Quick Decision Guide)

    Wedge Anchors

    Best for heavy-duty applications in solid, uncracked concrete. Wedge anchors provide the highest holding strength but require proper spacing and edge distance to avoid cracking.

    If spacing is a concern, review (Concrete Anchor Spacing & Edge Distance Guide) before installation.


    Sleeve Anchors

    A versatile option that works well in concrete, brick, and block. Sleeve anchors distribute expansion forces more evenly, making them more forgiving in masonry applications.

    If you’re installing into masonry, read (Can You Use Concrete Anchors in Brick or Block?) before choosing wedge anchors.


    Tapcon Screws

    Ideal for light- to medium-duty projects such as shelves, conduit straps, and light fixtures. Tapcon screws install quickly and are removable, but they have lower load capacity than expansion anchors.

    For a direct comparison, see (Tapcon Screws vs Concrete Anchors: Which Should You Use?).


    Drop-In Anchors

    Designed for flush-mounted and overhead installations. Drop-in anchors require precise drilling depth and thorough hole cleaning to achieve their rated strength.

    To understand their load limits, refer to (How Much Weight Can Concrete Anchors Hold?).


    Load Ratings: What Homeowners Often Miss

    Anchor load ratings depend on far more than anchor size alone. Holding power is influenced by:

    • Concrete strength and condition
    • Hole diameter and embedment depth
    • Edge distance and anchor spacing
    • Installation torque

    Improper installation can reduce anchor capacity by 30–50% or more. Always follow correct procedures outlined in (How to Install Concrete Anchors Correctly – Step-by-Step Guide).


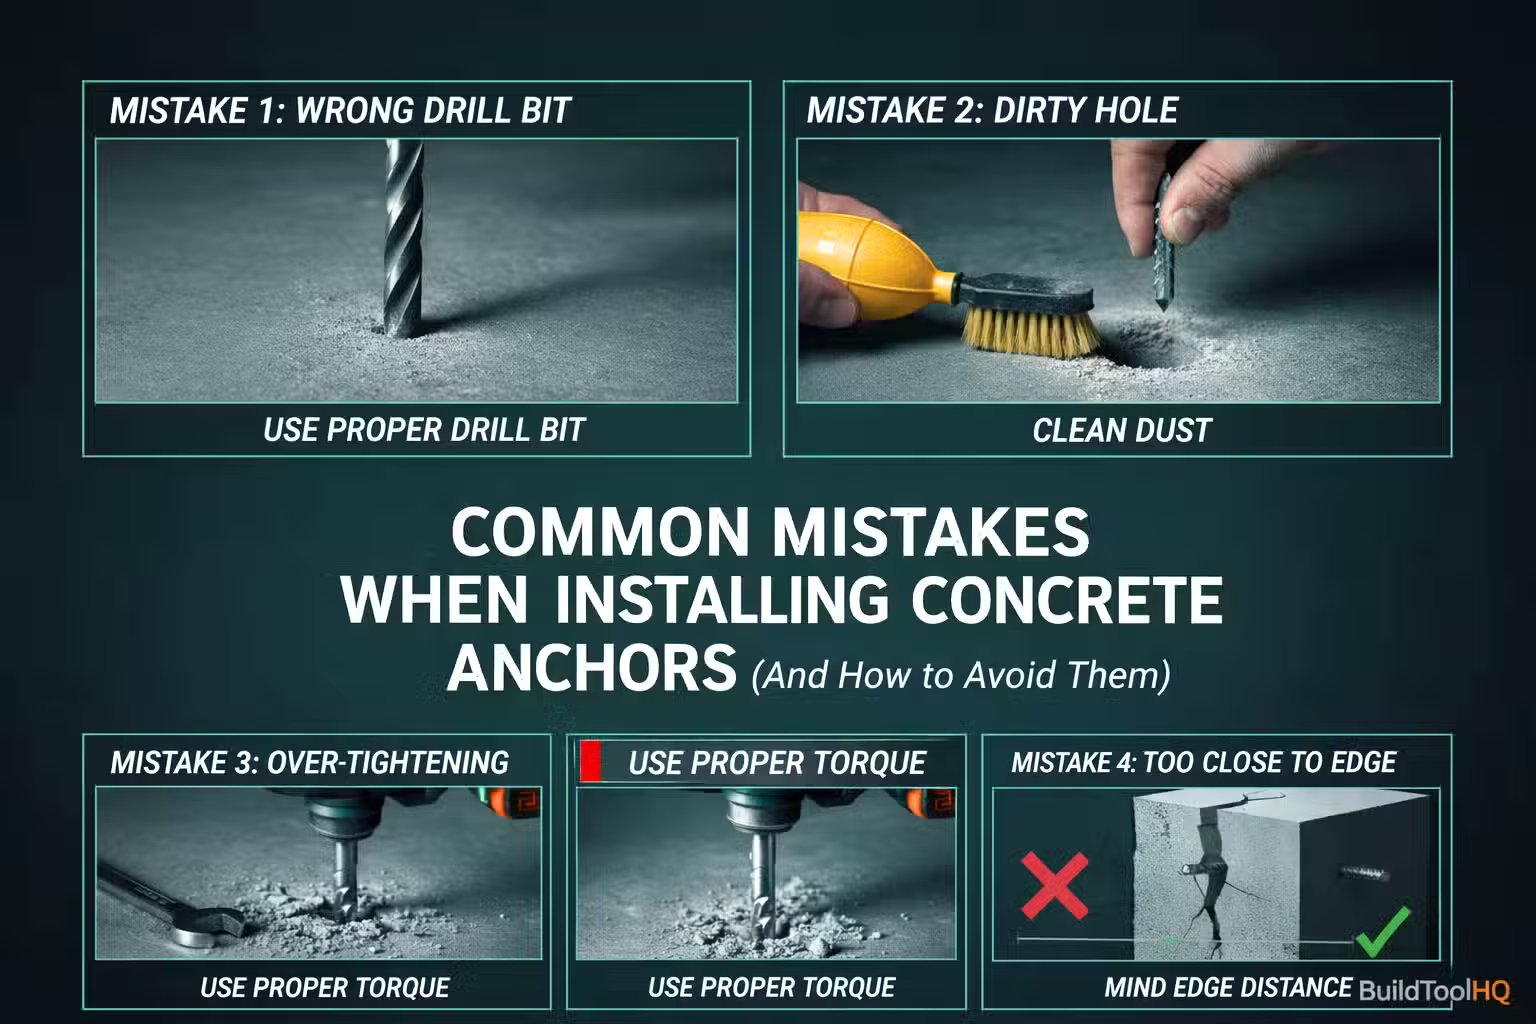
    Common Anchor Selection Mistakes

    Homeowners frequently make these errors:

    • Using concrete anchors in hollow block
    • Installing anchors too close to slab edges
    • Over-tightening anchors
    • Ignoring cracked or deteriorated concrete

    These mistakes—and how to avoid them—are explained in (Common Concrete Anchor Mistakes (And How to Avoid Them)).


    Tool Choice Also Matters

    Using the wrong drill or bit can compromise anchor performance before installation even begins. Proper drilling technique and tool selection reduce the risk of cracking and oversized holes.

    If you’re unsure your drill is suitable, review (Best Drill for Concrete Walls (2025 Guide)) or (Best Drill for Home Use (2026 Guide)) before starting.


    Final Homeowner Recommendation

    If you remember only one rule, remember this:

    Always match the anchor to the base material first—then verify the load.

    When in doubt:

    • Use sleeve anchors for masonry
    • Use wedge anchors for heavy loads in solid concrete
    • Use Tapcon screws for light-duty applications

    Before drilling, double-check bit size using (What Size Drill Bit for Concrete Anchors?).


    Save This Guide for Your Next Project

    This concrete anchor selection chart works best when paired with the full guides in this cluster. Together, they form a complete system for choosing, installing, spacing, and loading concrete anchors safely and confidently.


    Related Concrete Anchor Guides


  • How to Install Concrete Anchors Correctly (Step-by-Step Guide)

    How to Install Concrete Anchors Correctly (Step-by-Step Guide)

    Installing concrete anchors correctly is critical for safety, strength, and long-term durability. Even the best anchor can fail if it’s installed improperly. This step-by-step guide explains how to install concrete anchors correctly, whether you’re mounting shelves, TVs, electrical panels, or heavy equipment.

    If you haven’t chosen an anchor yet, start with (Best Concrete Anchors for Home Use (2026 Guide)) before drilling.


    Tools and Materials You’ll Need

    Before starting, gather the following:

    • Hammer drill or rotary hammer
    • Correct masonry drill bit
    • Concrete anchors (wedge, sleeve, drop-in, or Tapcon)
    • Vacuum, compressed air, or hole-cleaning brush
    • Wrench or torque wrench
    • Safety glasses and gloves

    If you’re unsure about drill bit sizing, review (What Size Drill Bit for Concrete Anchors?) first.


    Step 1: Mark Anchor Locations Carefully

    Begin by marking your anchor locations with a pencil or marker. Make sure anchors are spaced correctly and not too close to slab edges.

    Incorrect spacing is one of the most common causes of anchor failure. Always follow spacing guidelines in (Concrete Anchor Spacing & Edge Distance Guide) before drilling.


    Step 2: Drill the Hole to the Correct Size and Depth

    Use a hammer drill with the correct masonry bit. Drill straight and perpendicular to the surface.

    Key drilling tips:

    • Drill slightly deeper than the anchor embedment length
    • Do not wobble the drill bit
    • Avoid drilling into cracked or weak concrete

    If you’re unsure whether your drill is suitable, see (Best Drill for Concrete Walls (2025 Guide)).


    Step 3: Clean the Hole Thoroughly (Critical Step)

    Hole cleaning is not optional. Dust left inside the hole prevents anchors from expanding or gripping properly.

    Clean the hole using:

    • Compressed air
    • A vacuum
    • A wire hole-cleaning brush

    Skipping this step can reduce holding power by 30–50%. This mistake is explained in (Common Concrete Anchor Mistakes (And How to Avoid Them)).


    Step 4: Insert the Anchor Correctly

    Insert the anchor according to its type:

    Wedge Anchors

    Tap the anchor into the hole until fully seated, then tighten the nut to expand the wedge.

    Sleeve Anchors

    Insert the anchor through the fixture and into the hole, then tighten gradually.

    Drop-In Anchors

    Insert the anchor flush with the surface and use a setting tool to expand it.

    Tapcon Screws

    Drive the screw directly into the pre-drilled hole without over-tightening.

    For a breakdown of anchor types, see (Types of Concrete Anchors Explained (Wedge, Sleeve, Drop-In, Tapcon)).


    Step 5: Tighten to the Correct Torque

    Over-tightening is one of the fastest ways to damage concrete or strip anchors.

    • Tighten only to manufacturer specifications
    • Use a torque wrench when possible
    • Stop immediately if the anchor spins or cracks appear

    For strength limits, refer to (How Much Weight Can Concrete Anchors Hold?).


    Step 6: Inspect the Installation

    After tightening, check for:

    • No movement or wobble
    • No visible cracks in the concrete
    • Proper seating of the anchor head

    If the anchor spins or feels loose, remove it and install a new anchor in a different location.


    Special Considerations for Brick and Block

    Concrete anchors do not behave the same way in brick or block. Installing into the wrong area can cause bricks to crumble or hollow block to fail.

    If you’re working with masonry, read (Can You Use Concrete Anchors in Brick or Block?) before installing.


    Common Installation Mistakes to Avoid

    Avoid these frequent errors:

    • Using the wrong drill bit size
    • Skipping hole cleaning
    • Installing too close to edges
    • Over-tightening anchors
    • Anchoring into cracked concrete

    Each of these mistakes can significantly reduce holding power or cause sudden failure.


    Final Installation Tips for Homeowners

    If you remember only three rules:

    1. Drill the correct hole size
    2. Clean the hole thoroughly
    3. Do not over-tighten

    Following these steps ensures your anchors perform at their rated strength and remain secure over time.

    For a quick decision overview, bookmark (Concrete Anchor Selection Chart (Homeowner’s Quick Reference Guide)).


    When to Call a Professional

    For structural loads, overhead installations, or safety-critical equipment, consider hiring a licensed professional. Incorrect anchor installation in these cases can result in serious injury or property damage.

  • Common Mistakes When Installing Concrete Anchors (And How to Avoid Them)

    Common Mistakes When Installing Concrete Anchors (And How to Avoid Them)

    Common mistakes when installing concrete anchors can dramatically reduce holding strength or cause anchor failure, even when using high-quality fasteners. In most cases, anchor problems aren’t caused by the anchor itself—but by avoidable installation errors that compromise safety and performance.

    This guide covers the most common mistakes homeowners make when installing concrete anchors and explains how to avoid them using proven best practices.


    Why Installation Mistakes Matter

    Concrete anchors rely on precise drilling, correct embedment, and proper expansion to achieve their rated strength. Even anchors selected using (Best Concrete Anchors for Home Use – 2026 Guide) can fail prematurely if installation steps are skipped or done incorrectly.

    Common consequences of installation mistakes include:

    • Reduced load capacity
    • Anchor spinning or pull-out
    • Cracked or damaged concrete
    • Unsafe overhead installations

    Mistake #1: Using the Wrong Drill Bit Size

    One of the most frequent—and damaging—errors is drilling the wrong hole diameter.

    • Oversized holes prevent proper expansion
    • Undersized holes cause binding or concrete cracking

    Always match the drill bit exactly to the anchor size, as explained in (What Size Drill Bit for Concrete Anchors?).

    ✅ How to avoid it

    Never “eyeball” drill bits. Verify the anchor diameter and use the manufacturer-specified bit.


    Mistake #2: Skipping Hole Cleaning

    Dust and debris left inside the hole reduce friction and prevent anchors from gripping properly. This mistake is especially common with expansion-style anchors.

    This issue is frequently seen with anchors outlined in (Types of Concrete Anchors Explained (Wedge, Sleeve, Drop-In, Tapcon)).

    ✅ How to avoid it

    Vacuum, blow out, or brush the hole thoroughly before inserting the anchor.


    Mistake #3: Drilling Too Shallow or Too Deep

    Incorrect hole depth directly affects anchor performance:

    • Too shallow → anchor won’t seat fully
    • Too deep → anchor may not expand as designed

    This impacts load capacity and long-term reliability.

    ✅ How to avoid it

    Drill slightly deeper than the anchor length (usually about ¼″) and keep the drill straight.


    Mistake #4: Overtightening the Anchor

    Many DIYers assume tighter is stronger—but overtightening can:

    • Strip threads
    • Crack surrounding concrete
    • Reduce holding strength

    This mistake is especially common with Tapcon screws and wedge anchors.

    ✅ How to avoid it

    Tighten until snug and stop when resistance becomes firm. Use hand tools instead of high-torque impact drivers whenever possible.


    Mistake #5: Installing Anchors Too Close to Concrete Edges

    Concrete edges are weaker and more prone to cracking. Anchors placed too close to edges increase the risk of:

    • Concrete spalling
    • Anchor pull-out

    Correct spacing is critical and often overlooked.

    ✅ How to avoid it

    Follow edge distance and spacing rules outlined in (Concrete Anchor Spacing & Edge Distance Guide).


    Mistake #6: Using the Wrong Anchor for the Load

    Not all anchors are designed to handle the same loads. For example:

    • Tapcon screws → light-duty applications
    • Sleeve anchors → medium loads
    • Wedge anchors → heavy structural loads

    Using the wrong anchor can result in failure even if installed correctly.

    ✅ How to avoid it

    Match the anchor type to the application using (Concrete Anchor Selection Chart (Homeowner’s Quick Reference Guide)) and verify load limits before installation.


    Mistake #7: Installing Anchors in Weak or Damaged Concrete

    Cracked, old, or crumbly concrete dramatically reduces anchor performance. Even properly installed anchors may fail if the base material itself is compromised.

    ✅ How to avoid it

    Inspect the surface carefully. If concrete crumbles during drilling, consider relocating the anchor or using alternative mounting methods.


    Mistake #8: Ignoring Manufacturer Instructions

    Anchor specifications vary by:

    • Brand
    • Diameter
    • Material
    • Installation method

    Relying on “experience” instead of instructions is a common cause of failure.

    ✅ How to avoid it

    Always follow manufacturer guidelines and compare them with the step-by-step process in (How to Install Concrete Anchors Correctly – Step-by-Step Guide).


    When Installation Mistakes Become Safety Hazards

    Installation errors are especially dangerous for:

    • Overhead anchors
    • Wall-mounted TVs and furniture
    • Garage storage systems
    • Structural attachments

    These applications require strict adherence to load limits and best practices.


    Final Thoughts

    Most concrete anchor failures are completely preventable. By avoiding common mistakes—wrong drill bit size, poor hole cleaning, overtightening, improper spacing, and incorrect anchor selection—you can achieve the full rated strength of your anchors and ensure long-term safety.

    For anchor selection, installation, spacing, and load guidance, refer back to (Best Concrete Anchors for Home Use – 2026 Guide).


    Related Concrete Anchor Guides

  • Best Concrete Anchors for Home Use (2026 Guide)

    Best Concrete Anchors for Home Use (2026 Guide)

    Best concrete anchors for home use are essential when mounting shelves, TVs, cabinets, and heavy fixtures into concrete, brick, or block walls. Choosing the wrong anchor can lead to loose mounts, cracked masonry, or unsafe installations — which is why selecting the right anchor type matters for every home project.

    In this guide, you’ll learn which concrete anchors are best for home use, how to choose the right type for your project, and how they connect with proper drilling techniques covered in our other guides.


    What Are Concrete Anchors?

    Concrete anchors are fasteners designed to secure objects into hard masonry surfaces such as concrete, brick, or concrete block. Unlike wood screws or drywall anchors, concrete anchors expand, grip, or thread directly into masonry to create a strong mechanical hold.

    Before choosing an anchor, it’s important to understand:

    • The type of wall (solid concrete, brick, block)
    • The weight of the item
    • The hole size and depth required

    If you’re not sure how drilling affects anchor strength, start with How Deep Can You Drill Into Concrete? and How to Drill Into Concrete Safely – Step-by-Step Guide


    Types of Concrete Anchors (Quick Overview)

    There are several common anchor types used by homeowners. Each has a specific use case.

    For a full breakdown, see (Types of Concrete Anchors Explained – Sleeve, Wedge, Drop-In, Tapcon).

    Common anchor types:

    • Sleeve anchors – versatile, good for brick and block
    • Wedge anchors – extremely strong, concrete only
    • Drop-in anchors – flush-mounted, professional-grade
    • Concrete screws (Tapcon-style) – removable and easy to install
    • Plastic masonry anchors – light-duty only

    Best Concrete Anchors for Common Home Projects

    🧱 Best for Shelves & Light Fixtures

    Concrete screws (Tapcon-style)

    • Easy installation
    • Removable
    • Ideal for shelves, towel bars, small cabinets

    Make sure your hole size is correct — see (What Size Drill Bit Should You Use for Concrete Anchors?).


    📺 Best for TV Mounts & Heavy Wall Loads

    Sleeve anchors or wedge anchors

    • High load capacity
    • Strong expansion grip

    If you’re comparing tools, (Hammer Drill vs Regular Drill: Which One Do You Need?) explains why hammer drills are often required for these anchors.


    🧰 Best for Brick or Block Walls

    Sleeve anchors

    • Even expansion prevents cracking
    • Works well in hollow materials

    Avoid wedge anchors in brick — this mistake is covered in (Common Mistakes When Drilling Into Concrete – And How to Avoid Them).


    🔩 Best for DIY Homeowners

    Concrete anchor kits

    • Multiple sizes included
    • Ideal for mixed projects

    We review the best options in (Best Concrete Anchor Kits for Homeowners – 2026 Review).


    How Much Weight Can Concrete Anchors Hold?

    Anchor strength depends on:

    • Anchor type
    • Diameter and embedment depth
    • Concrete quality
    • Installation accuracy

    For real-world numbers and safety margins, read (How Much Weight Can Concrete Anchors Hold? – Load Ratings Explained).

    ⚠️ Tip: Always derate manufacturer ratings by 25–30% for home projects.


    Concrete Anchors vs Wall Plugs

    Many homeowners confuse concrete anchors with plastic wall plugs.

    Here’s the rule:

    • Wall plugs → light-duty, masonry or brick
    • Concrete anchors → medium to heavy-duty loads

    We break this down clearly in (Types of Concrete Anchors Explained (Sleeve, Wedge, Drop-In, Tapcon).


    Drill Bits Matter More Than You Think

    The anchor is only as strong as the hole it’s installed in.

    Always use:

    • Carbide-tipped masonry bits
    • Correct diameter (never oversize)
    • Clean holes (dust reduces grip)

    If you’re unsure which bit to buy, see (Best Drill Bits for Concrete and Masonry).


    How to Install Concrete Anchors Correctly (Summary)

    Correct installation prevents anchor failure.

    Basic steps:

    1. Mark and level
    2. Drill to correct depth
    3. Clean out dust
    4. Insert anchor
    5. Tighten gradually

    For a full walkthrough, follow (How to Install Concrete Anchors Correctly – Step-by-Step Guide).


    Common Concrete Anchor Mistakes to Avoid

    Avoid these frequent errors:

    • Using the wrong anchor type
    • Drilling too shallow or too deep
    • Overtightening
    • Installing anchors too close to edges

    We cover these in detail in (Common Concrete Anchor Installation Mistakes – And How to Avoid Them).


    Best Tools for Installing Concrete Anchors

    For most home projects:

    • Hammer drill for concrete
    • Standard drill for light masonry
    • Cordless drills for small anchors

    Compare your options in:


    Final Recommendation: Which Concrete Anchor Should You Choose?

    Quick decision guide:

    • Shelves / fixtures → Concrete screws
    • TV mounts → Sleeve anchors
    • Structural loads → Wedge anchors
    • Mixed DIY jobs → Anchor kits

    If you’re still deciding between fastening methods, see (Tapcon Screws vs Concrete Anchors: Which Should You Use?).


    Next Steps

    Now that you understand concrete anchors, continue with:

    These guides will ensure your installations are safe, strong, and long-lasting.