Machining plastics like acrylic, HDPE, or PVC is a paradox. These materials often cut beautifully, yielding an optically clear edge directly off the machine—until they don’t. The moment friction generates excessive heat, the plastic transitions from a crisp solid to a viscous molten state. This molten plastic instantaneously “welds” itself into the flute valley of your expensive carbide tool, effectively destroying the cutting geometry and usually snapping the bit.
The entire challenge of cutting plastics on a CNC router is heat management. While correct speeds and feeds are vital, the foundational solution starts with selecting the right tool geometry. If you are struggling with melted Plexiglass or gummed-up HDPE, you need to switch from standard wood bits to a dedicated O-flute bit, arguably the best CNC bit for cutting acrylic.
Choosing the best CNC bit for cutting acrylic can significantly impact your project outcomes, especially when dealing with the heat generated during the cutting process. It is a core component of your overarching shop strategy, which we detail extensively in [The Ultimate Guide to CNC Router Bits: Selection, Speeds, and Materials].
1. The Plastic Paradox: Why Standard Bits Fail
A standard router bit, such as those discussed in our [Upcut vs. Downcut vs. Compression Bits: When to use each for edge finish] guide, typically features two, three, or even four flutes. These multiple flutes work beautifully in wood because they produce small, fine dust particles. The goal in woodworking is dust evacuation.
The Melting Point Trap
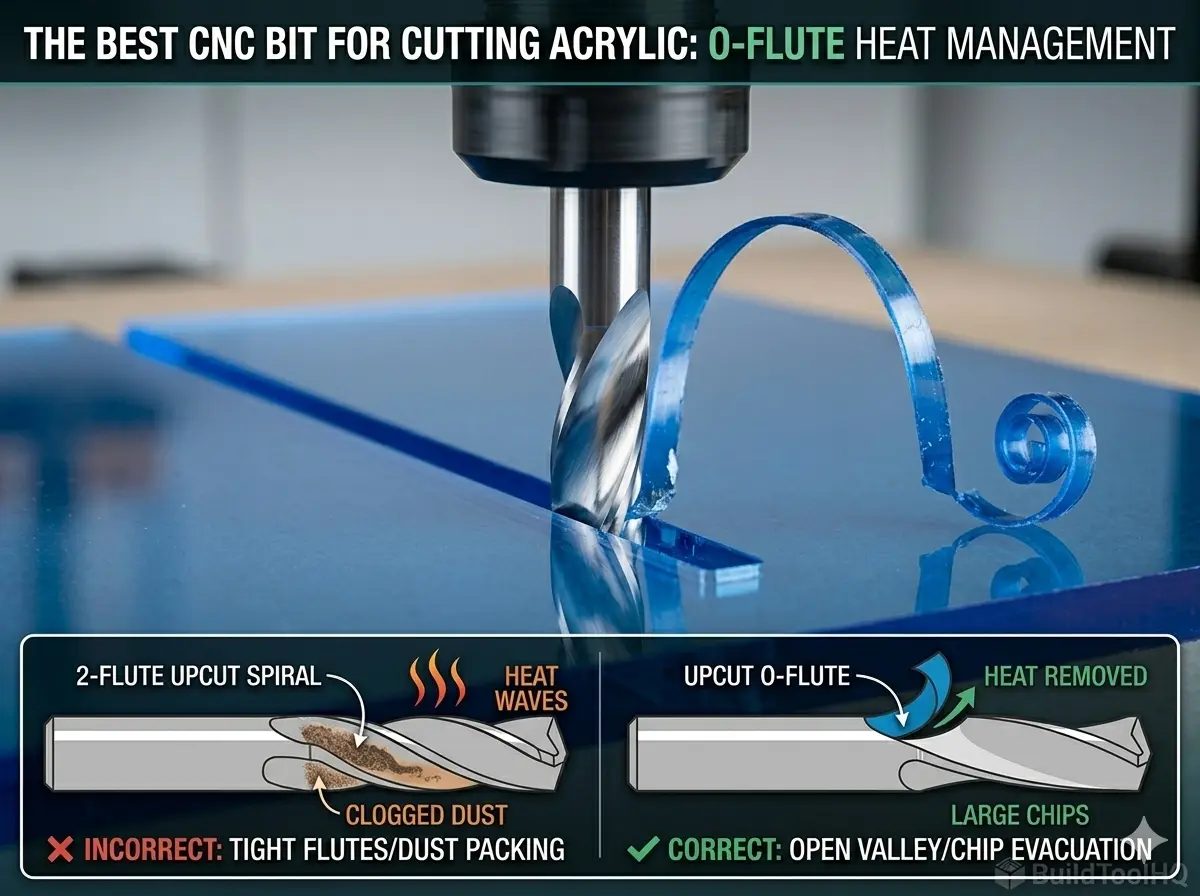
Plastics behave differently. The friction created by multiple flutes dwelling in the cut generates rapid heat buildup. Unlike wood, which dissipates some heat, plastic traps it. The dust produced by multiple flutes cannot carry the heat away fast enough. It becomes trapped in the tight flute valleys, melts instantly, and welds to the carbide, causing catastrophic tool failure.
Choosing the right tool is crucial; the best CNC bit for cutting acrylic offers superior heat management compared to standard bits. This is where the O-flute geometry (often a single-flute design) shines.
2. Anatomy of the O-Flute (Where Geometry Meets Physics)
The “O” in O-flute refers to the shape of the flute valley itself. If you look at the cross-section of a high-quality single-flute plastic bit, you will see a massive, open, crescent-shaped curve (an “O” or “U” shape). This is an engineering solution for chip load. Considering the best CNC bit for cutting acrylic is essential for anyone looking to enhance their CNC machining capabilities.
Chip Load is Heat Management
When cutting acrylic, you do not want to produce dust; you want to produce chips. Specifically, you want to produce continuous, curled “shavings” or “strings” of plastic. These large, continuous chips are the primary mechanism for carrying heat away from the cutting zone.
O-flute geometry provides a massive, unobstructed path for these curled chips to eject instantly. By removing the massive chip immediately, the heat is carried out of the cut, leaving the workpiece cool. In contrast, standard multi-flute tools often recut their chips in plastic, which guarantees melting; O-flutes eject them perfectly.
3. Upcut vs. Downcut O-Flutes (Managing the Surface Finish)
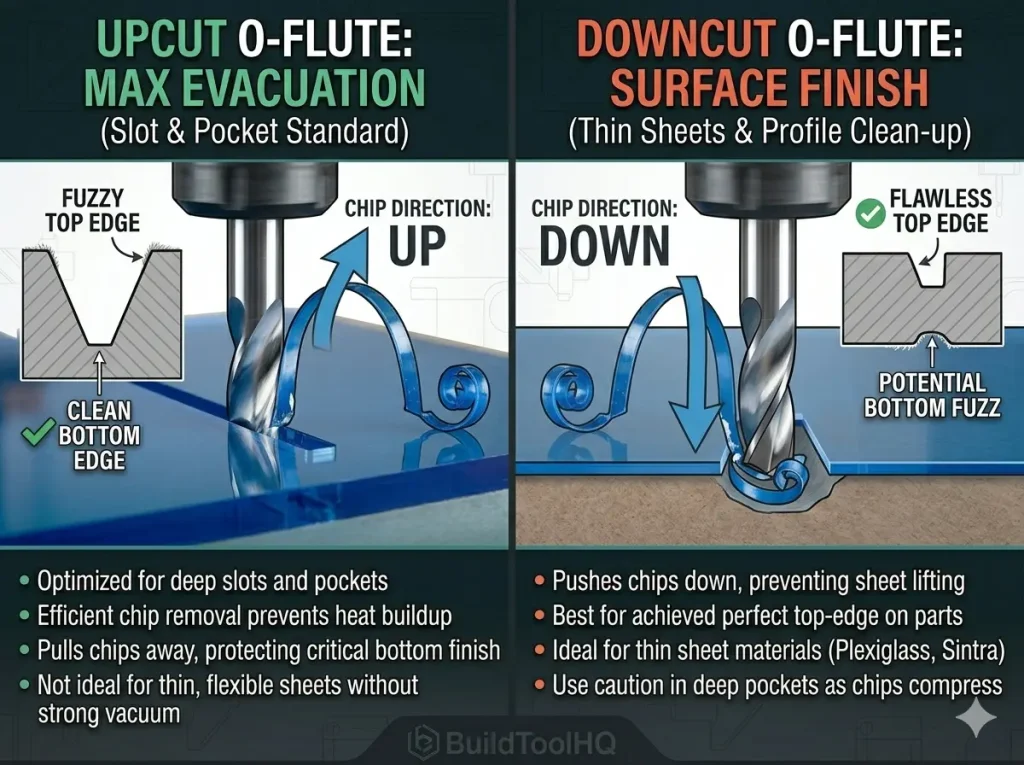
Understanding Chip Direction: This comparison proves how Upcut O-flute geometry (left) pulls large chips UP and OUT for pockets, while Downcut geometry (right) compresses chips DOWN, achieving a perfect top edge on thin acrylic. A crucial step when choosing the best CNC bit for cutting acrylic.Like all spiral bits, O-flutes come in both upcut and downcut configurations, and your choice here determines your final part finish. Utilizing the best CNC bit for cutting acrylic not only improves the quality of the cut but also enhances the overall workflow of your CNC operations.
Upcut O-Flutes (The Standard Choice)
A single-flute upcut O-flute is the default best CNC bit for cutting acrylic. It pulls chips up and out of the cut with massive efficiency. Because this bit is designed to handle the unique challenges posed by plastic, it provides a much smoother cutting experience than a standard upcut spiral bit used for wood.
- Best Use: Essential for slots, pockets, and deep cutouts where chip packing is a hazard.
- Surface Outcome: Leaves a flawless finish on the bottom edge but can “lift” thin sheets.
Downcut O-Flutes (Thin Sheet Specialist)
A downcut O-flute pushes the chips downward into the spoilboard. This is often the best CNC bit for cutting acrylic when working with thin sheets (e.g., 1/8″ or less) because the downward force prevents the material from lifting.
Best Use: Excellent for profile cuts where the top edge finish is critical. It is the preferred choice when your project requires the same clean entry edge found in high-end [Best CNC Bits for Plywood and Hardwoods: A deep dive into wood-specific geometry] applications.
4. Pro-Tips for Managing Heat in Acrylic (BuildToolHQ Expert Advice)
For complex 3D projects that may inlay detailed plastic parts into wood, the strategy changes. We recommend reviewing our guide on [Ball Nose vs. Tapered Ball Nose: The nuances of 3D carving and finishing passes], which handle finishing detail and contours very differently than a dedicated plastic cutout bit.
Furthermore, if the acrylic is being inset into a sign, ensure your pocketing matches the precision of your [V-Carve Bits and Sign Making: Achieving crisp detail and sharp corners] to ensure a seamless fit. To see how these specialized tools fit into a complete workshop inventory, check our [The Ultimate Guide to CNC Router Bits: Selection, Speeds, and Materials].
5.Pro-Tips for Managing Heat (BuildToolHQ Expert Advice)
Selecting the best CNC bit for cutting acrylic is only 50% of the puzzle. The remaining 50% is implementation and strategy.
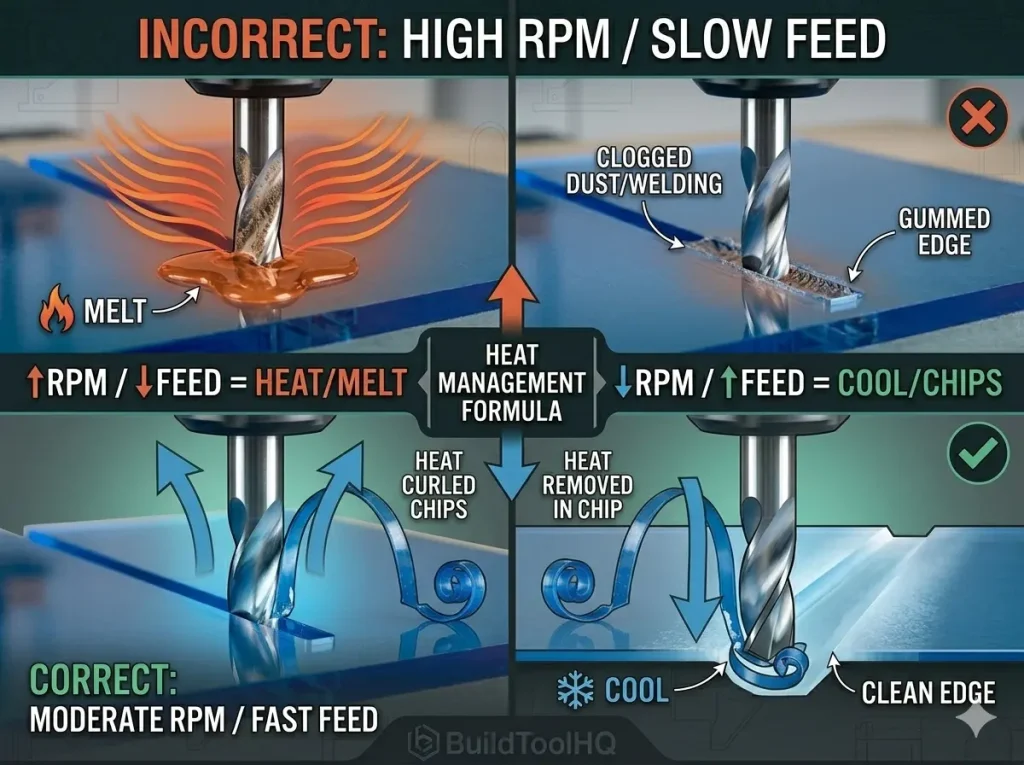
A. The Golden Rule: FAST Feed, SLOW RPM
This is counter-intuitive to most new CNC users. High RPM with a slow feed rate generates friction and melting. Instead, follow this formula: Moderately Slow Spindle RPM (12,000–16,000 RPM) + VERY Fast Feed Rate (150–300+ IPM). You want that single-flute O-bit taking massive bites to keep it cool.
B. “Ramp” Into the Cut (Never Plunge)
Plunging straight down creates instant friction on the tip of the bit. Always set your CAM software to use a “ramp” entry toolpath, which moves the bit simultaneously in X, Y, and Z. This is as vital as the precision leveling techniques found in the [Surfacing bit for CNC router] guide.
C. The Conventional Cleanup Pass
To achieve an optically clear edge, run your part using a “Roughing” pass, leaving about $0.01″$ ($0.25mm$) of material. Then, perform a final light “Finish” pass using a Conventional milling direction (counter-clockwise). This removes the minor marks left by the roughing pass, leaving a flawless surface ready for flame polishing.
6.Maintenance and Specialized Durability
Carving plastics and acrylics for long durations can still lead to buildup. Ensure you are cleaning your bits according to our [CNC Bit Maintenance: Sharpening, cleaning, and storage for longevity] protocols. For projects involving abrasive composites or resin-heavy hybrids, you may need to step up to [Diamond Coated & Specialized Bits: For composites and abrasive materials] to maintain a sharp edge.
Finally, never forget that a clean cut starts with a level bed. Run a surfacing pass with a [Surfacing and Slab Leveling Bits: Mastering large-area clearing] to ensure your depths are consistent across the entire acrylic sheet.
Conclusion: Clean Cuts, Not Melted Messes
Understanding the characteristics of the best CNC bit for cutting acrylic is vital for efficient machining.
By consistently using the best CNC bit for cutting acrylic, your projects will maintain a high standard of quality.
Don’t let melting plastic ruin your projects or destroy expensive tooling. By focusing on efficient chip evacuation using O-flute geometry, you can transform your plastic routing from a messy failure into a professional operation. By choosing the best CNC bit for cutting acrylic and implementing the right speeds and feeds strategy, BuildToolHQ ensures you achieve clean, polished results every time.
The best CNC bit for cutting acrylic can help you achieve optimal results with less trial and error.
Frequently Asked Questions (FAQ)
What is the best CNC bit for cutting acrylic without melting?
Without question, a solid carbide single-flute upcut O-flute bit is the best CNC bit for cutting acrylic. Its massive, open flute valley is designed specifically to evacuate large, curled chips that carry heat away from the workpiece.
Can I use a regular wood upcut spiral bit on acrylic?
While possible, it is highly inefficient and risks tool failure. A standard [Upcut vs. Downcut vs. Compression Bits: When to use each for edge finish] has multiple tight flutes that trap plastic dust, leading to instant “welding” and bit breakage.
How do I get optically clear edges on acrylic?
Use a sharp O-flute bit and run a two-pass strategy: a roughing pass followed by a $0.01″$ conventional milling finish pass. This is the BuildToolHQ secret to a professional, frosty edge.
Is there a bit better suited for aluminum?
While O-flutes can sometimes cut non-ferrous metals, you should refer to our dedicated guide on [Aluminum Cutting with CNC: Single-flute secrets and lubrication] for metal-specific geometry.