In the world of precision manufacturing, your CNC machine is only as capable as the few millimeters of carbide meeting the workpiece. For the BuildToolHQ community, understanding CNC router bits isn’t just about knowing which shape to buy—it’s about mastering the intersection of material science, geometry, and mechanical physics.
Choosing the wrong CNC router bits doesn’t just result in a “bad cut.” It leads to workholding failure, shortened spindle life, and potentially dangerous tool breakage. This guide is designed to transform you from a “user” into a “technician,” covering everything from basic flute geometry to the advanced math of chip loads.
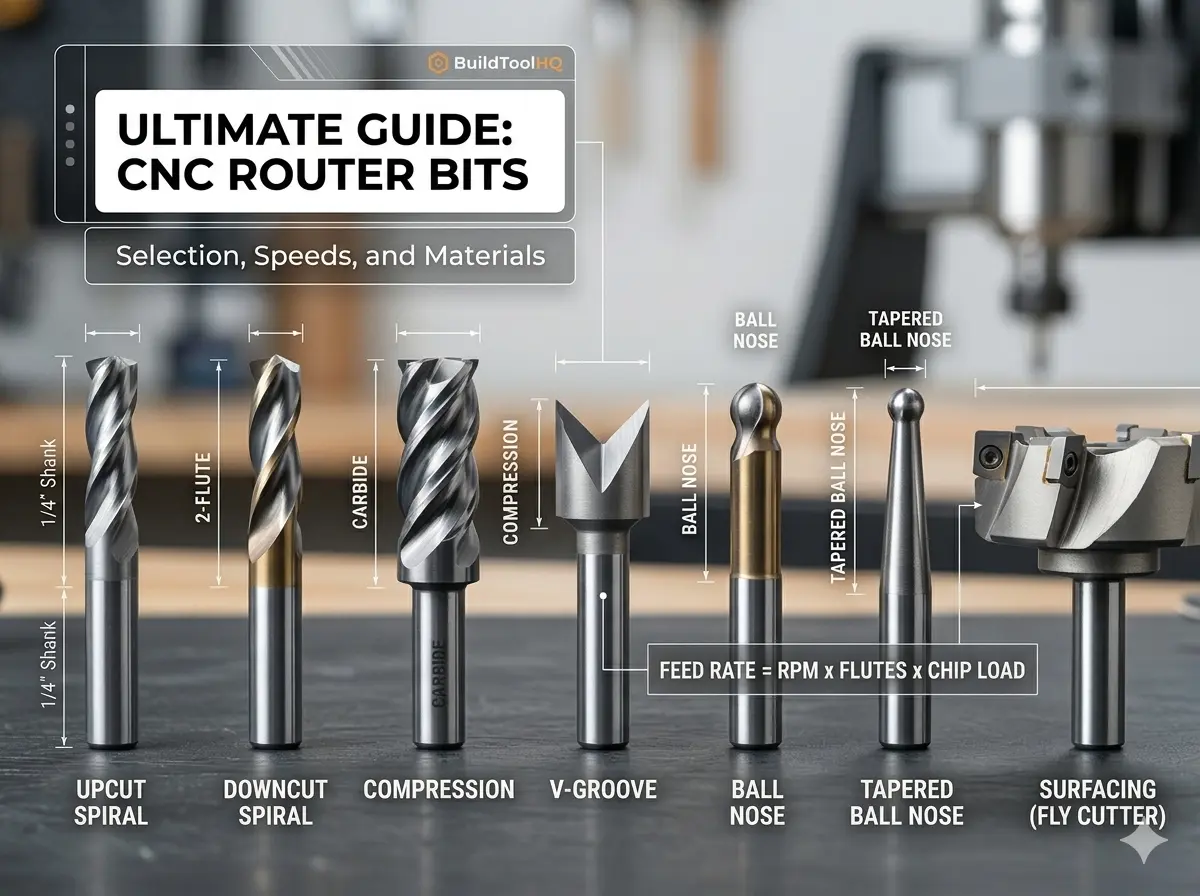
1. Understanding CNC Router Bits: Anatomy, Shanks, and Flutes
To master the CNC, you must first speak the language of the tool. Every bit is a balance of trade-offs between rigidity, chip clearance, and finish quality.
The Shank: The Foundation of Rigidity
The shank is the un-ground part of the router bits held by the collet. While standard sizes like $1/4″$ and $1/2″$ are ubiquitous, the physics of deflection are often overlooked.
- The Rule of Rigidity: Tool deflection increases by the cube of the length it protrudes from the collet.
- BuildToolHQ Advice: Always seat your router bits as deeply into the collet as possible (leaving just a tiny gap before the flutes start) to minimize vibration and “chatter.”
Flute Count and Performance
The flutes are the helical channels that evacuate waste.
- Single Flute: These are the “secret weapon” for plastics and soft metals. Because there is only one cutting edge, you can run higher feed rates at lower RPMs, preventing the material from melting. Learn more about it here : (best CNC bit for cutting acrylic)
- Two Flutes: The industry standard for woodworking They provide a balance between a high feed rate and a smooth finish.
- Three or Four Flutes: Primarily used for finishing passes in hardwoods or machining non-ferrous metals like Aluminum. They offer a superior finish but require massive feed rates to avoid “rubbing.”
2. Types of CNC Router Bits: Upcut, Downcut, and Compression

The most frequent question we see is: “Which way should the chips go?” The answer depends entirely on your material’s “skin.” Selecting the right CNC router bits for the job requires understanding directional physics.
Upcut CNC Router Bits: The Clearing Specialist
Upcut bits pull chips toward the spindle.
- Pros: Excellent chip evacuation; perfect for deep mortises or slotting.
- Cons: They tend to lift the material and “fuzz” the top grain of plywood or veneers.
Downcut CNC Router Bits: The Surface Master
Downcut bits push chips into the cut.
- Pros: They provide a perfectly clean top surface and help push the material down into the wasteboard.
- Cons: They pack sawdust into the bottom of deep grooves, which can cause heat buildup in your CNC router bits.
Compression CNC Router Bits: The Professional’s Choice
A compression bit features a downcut spiral on the top and an upcut spiral on the very tip.
- The Magic Moment: When the transition point is buried, the bit “sandwiches” the wood toward the center. This results in a “chip-free” edge on both the top and bottom of laminated sheets.
Internal Resource: For a visual breakdown of these geometries, see our guide: [Upcut vs. Downcut vs. Compression Bits: A Visual Comparison].
3. Material Science of CNC Router Bits: Carbide vs. HSS
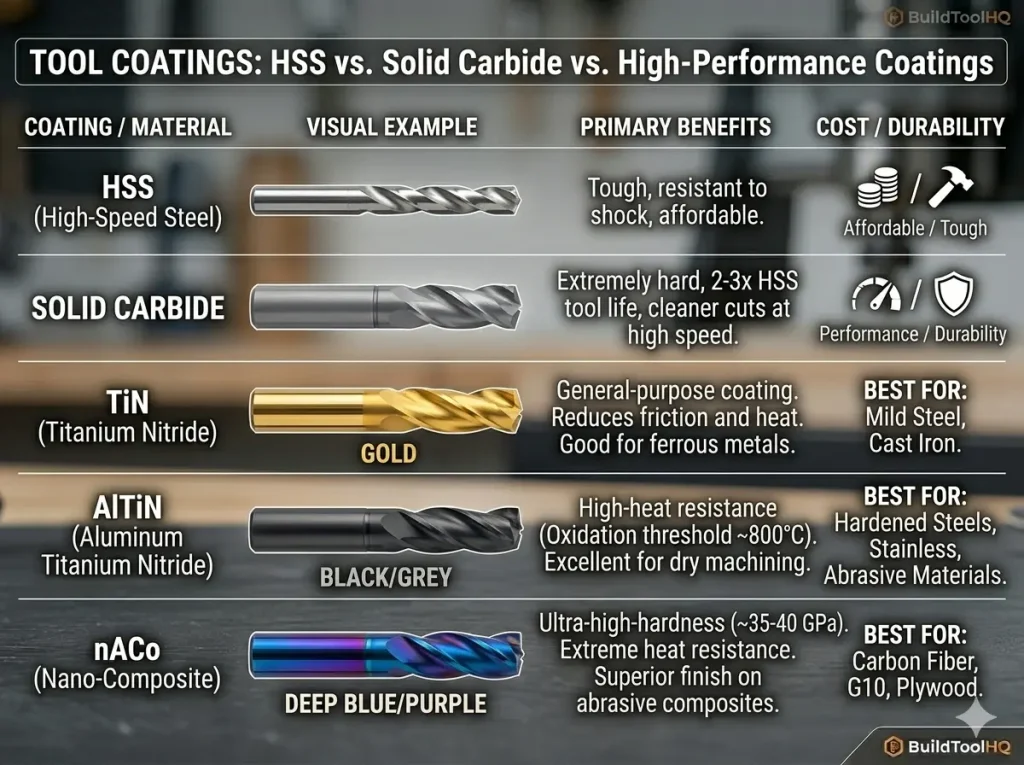
While High-Speed Steel (HSS) bits remain common in hand-held routing due to their lower price point, professional CNC operations almost exclusively demand Solid Carbide. According to technical standards for industrial tooling, carbide provides the extreme thermal stability required to withstand the high-speed friction generated by modern spindles.
| Feature | High-Speed Steel (HSS) | Solid Carbide CNC Bits |
| Heat Resistance | Moderate | Extreme |
| Edge Retention | Low | High (up to 50x longer) |
| Flexibility | Higher (Vibration dampening) | Low (Brittle/Rigid) |
| Best For | Softwoods / Short runs | Hardwoods, Composites, Metals |
At BuildToolHQ, we always recommend investing in high-quality carbide CNC router bits. While the initial cost is higher, the “cost per linear foot of cut” is significantly lower because carbide maintains a razor-sharp edge longer. This is especially critical when moving into high-performance fabrication; for example, standard carbide fails quickly in abrasive materials like carbon fiber or G10, requiring the elite durability found in our guide on ( diamond coated CNC bits ) And (aluminum cutting with CNC) guide.
4. Calculating Chip Load for CNC Router Bits

This is where most hobbyists fail and pros excel. If you hear your machine “screaming” or see smoke, your chip load is wrong, and you are killing your CNC router bits.
Chip Load is the actual thickness of the chip each flute removes per revolution.
- Too Small: The bit “rubs” the wood, causing friction heat that kills the tool’s temper.
- Too Large: You risk snapping your CNC router bits or “missing steps” on your stepper motors.
The Formula for Success
Use this formula to calculate your starting points for any new CNC router bits:
$$Feed\ Rate\ (IPM) = RPM \times Number\ of\ Flutes \times Chip\ Load$$
Target Technical Specs:
- Hardwood: $0.003″ – 0.005″$ chip load.
- Softwood: $0.004″ – 0.006″$ chip load.
- Aluminum: $0.002″ – 0.004″$ chip load.
5. Specialty CNC Router Bits for Precision Tasks
A well-stocked workshop needs more than just end mills. Specialized CNC router bits allow for complex 3D geometry and professional sign-making.
V-Carve Bits and Sign Making
Used for “V-carving” text and intricate patterns. The angle (usually $60°$ or $90°$) determines the depth and detail of the carve.
- Learn more in our guide: [V-Carve Bits and Professional Sign Making].
Ball Nose vs. Tapered Ball Nose
Essential for 3D contouring and organic shapes. The tapered variety offers the detail of a small radius with the strength of a thicker shank, making them some of the most versatile CNC router bits in your drawer.
- Learn more in our guide: [3D Carving: Ball Nose vs. Tapered Ball Nose].
Slab Leveling and Surfacing
If you are working with live-edge slabs, these wide-diameter CNC router bits are your best friend. They often feature replaceable carbide inserts for cost-effectiveness.
- Learn more in our guide: [Mastering Large Area Clearing with Surfacing Bits].
6. Best Practices for CNC Router Bits Maintenance

A dull bit is a dangerous bit. To make your CNC router bits last, you must manage “Pitch” and heat.
- The Solvent Soak: After cutting resinous woods like Pine, soak your CNC router bits in a pitch remover. Resin acts as an insulator, keeping heat trapped in the carbide cutting edge.
- Collet Cleaning: A dirty collet introduces Runout (the bit spinning slightly off-center). Even $0.001″$ of runout can significantly reduce the life of your CNC router bits.
- Storage: Never let carbide CNC router bits touch each other. Use a dedicated bit tray or the original plastic packaging.
Internal Resource: See our step-by-step on [CNC Bit Maintenance: Cleaning and Sharpening].
New to CNC and overwhelmed by bit choices? These 5 essential CNC bits will help you achieve cleaner cuts, reduce tear-out, and maximize efficiency without wasting money on unnecessary tools. Whether you’re cutting wood, engraving, or surfacing, this guide covers the best CNC bits for beginners

7. FAQ: Common Questions About CNC Router Bits
Why is my bit burning the wood?
Burning is almost always caused by an RPM that is too high for your Feed Rate. Increase your speed or lower your RPM to help your CNC router bits carry the heat away in the chips.
When should I replace my CNC router bits?
If you notice increased noise, visible burning, or a “fuzzy” finish that wasn’t there before, your bit is likely dull. If you have to slow down your feed rate to get a clean cut, it’s time for new tooling.
How many flutes do I need for Aluminum?
Always start with a single-flute O-flute. Aluminum is “gummy” and likes to stick to the tool; a single flute gives the chip plenty of room to escape.
Final Thoughts for the BuildToolHQ Community
Mastering CNC router bits is a journey of trial and error, but starting with the right technical knowledge puts you miles ahead of the competition. By matching your bit geometry to your material and dialing in your chip load, you’ll achieve the professional results your projects deserve.
Explore our specialized cluster posts to master every specific material in your shop.
Leave a Reply