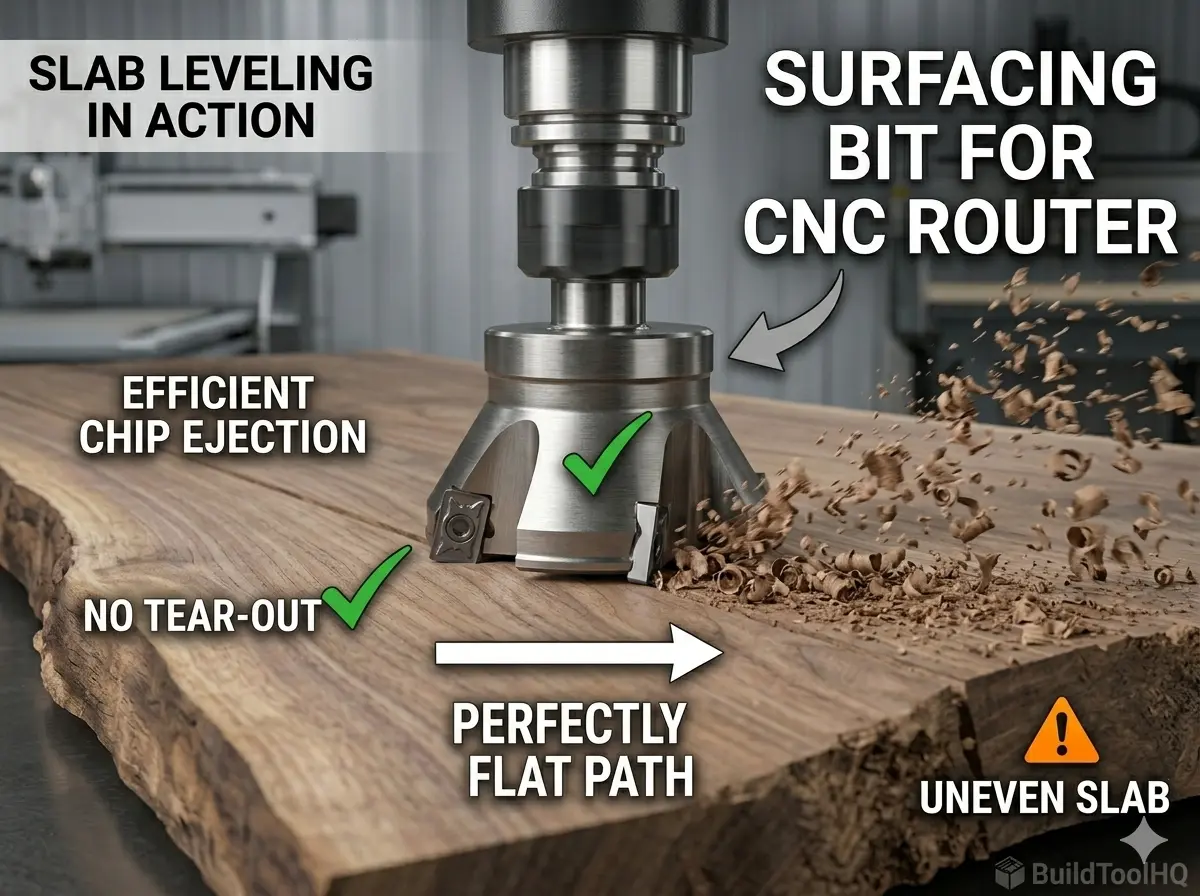
Choosing the right surfacing bit for CNC router tasks is the secret to mastering large-scale projects like live-edge slab leveling and high-end epoxy production. When you face a twisted 8-foot slab of walnut or a messy spoilboard, a standard $1/4″$ spiral bit is an exercise in futility. To dominate these challenges, you must understand the specialized geometry of Surfacing and Slab Leveling Bits.
1. The Large-Area Challenge: Why Surfacing Bits Rule
The primary limitation of a standard CNC bit is its Surface Feet per Minute ($SFM$). A small $1/2″$ bit at 18,000 RPM is cutting a finite amount of wood. To clear a wide area efficiently, you need the massive diameter of Surfacing and Slab Leveling Bits to cover more ground with every rotation.
A specialized surfacing bit for CNC router machines solves the area challenge through three critical design elements:
Large Effective Diameter (Typically 1.5″ to 3″+): To maximize facing area per pass.
Indexable Carbide Inserts: Unlike a brazed spiral, high-quality surfacing bits use replaceable cutters.
High Shear Angle Geometry: The cutters are angled to slice through the wood rather than “plow,” significantly reducing chatter and improving finish quality.
This geometry makes them ideal for two distinct jobs: CNC slab leveling and spoilboard surfacing. While often sold under different names, they use the same engineering principles as the high-speed geometries discussed in [Upcut vs. Downcut vs. Compression Bits: When to use each for edge finish].
2. Best Bits for CNC Slab Leveling: The Technical Choices
When you are tackling expensive lumber with significant “twist” or “cupping,” your tool choice is critical. Your selection impacts both the time you spend flattening and the hours you spend sanding afterward.
Indexable Insert Surfacing Bits (The Professional Standard)
These are the undisputed champions of large-scale surfacing. They use solid tungsten carbide inserts secured by screws. When a cutting edge becomes dull or chipped, you simply loosen the screw and rotate the insert to a fresh edge.
The E-E-A-T Secret: Insert tooling allows you to change the material-specific geometry. For harder woods like Maple, you can install an insert with a negative rake to reduce tear-out.
These bits have solid carbide wings welded onto a steel body. They are significantly cheaper but are disposable—when they are dull, you must replace the entire bit. They lack the specialized durability we cover in [Diamond Coated & Specialized Bits: For composites and abrasive materials], making them poor choices for abrasive resin work.
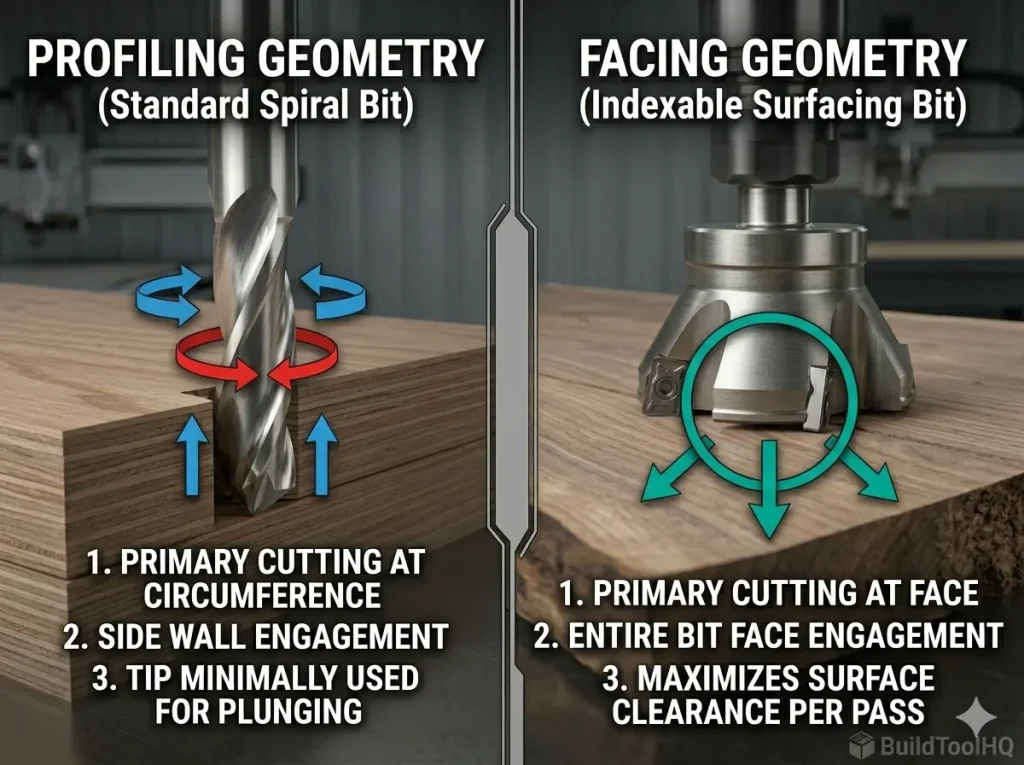
3. Mastering the Geometry: Face Cutting vs. Peripheral Cutting
Understanding the fundamental geometry shift: Standard spiral bits cut primarily with their vertical circumference (peripheral cutting). Indexable surfacing bits (like the 3" model shown) are designed for exclusive **face cutting**, leveraging the massive surface area of the tool's end to clear material quickly.
To truly understand surfacing, you must grasp the difference between how a spiral bit cuts and how Surfacing and Slab Leveling Bits cut. A standard bit is a peripheral cutter; its helical flutes cut around the circumference.
A surfacing bit is a face cutter. The entire engaged surface of the tool is in constant contact with the material, creating massive friction. Because the diameter is so large, the “Surface Feet per Minute” at the edge of a $3″$ bit is much higher than a $1/4″$ bit at the same RPM.
The Calculation: $SFM = \frac{Diameter \times \pi \times RPM}{12}$.
If you run a $3″$ surfacing bit at 18,000 RPM, the edge is moving at over 14,000 feet per minute—this will ignite wood instantly. You must lower your RPM to manage this heat.
4. Maintenance: Keeping the Facing Edge True
In surfacing, your machine’s rigidity is the ultimate constraint. A wide-diameter tool amplifies any flex in your gantry. If your machine isn’t perfectly rigid, you will see visible “ridges” or a “washboard effect.” This is far more pronounced in surfacing than in the precision detail work of [V-Carve Bits and Sign Making: Achieving crisp detail and sharp corners].
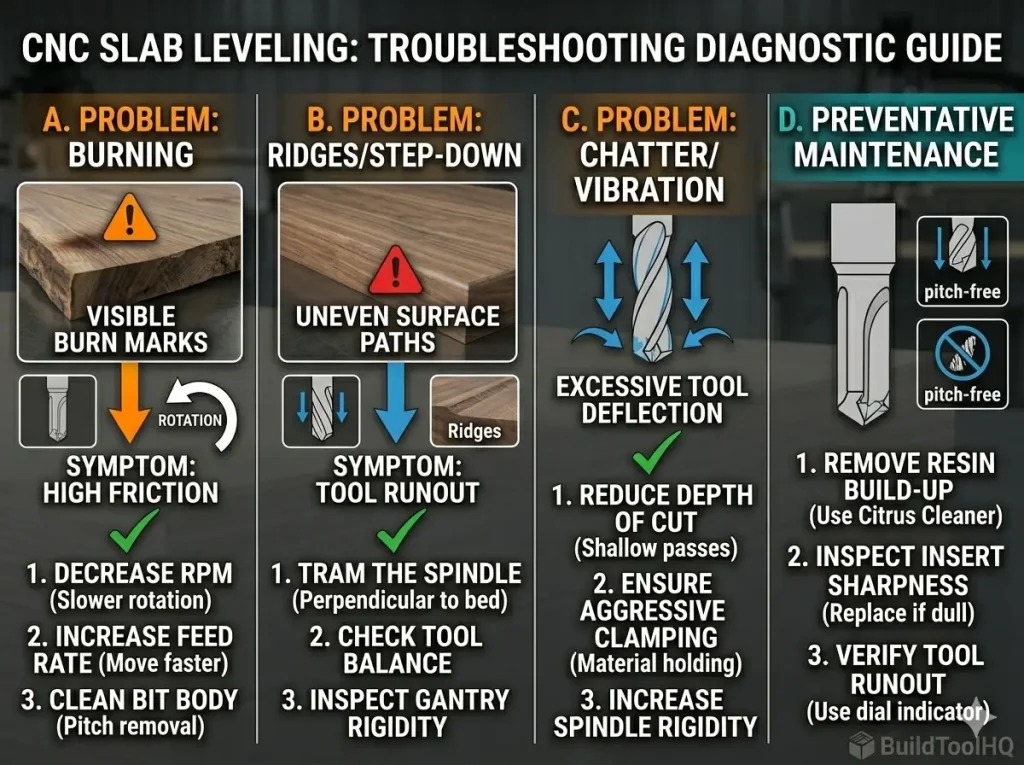
A professional diagnostic guide to solving common surfacing failures: Burning (RPM/Feed), Ridges (Tramming/Deflection), and Chatter (Depth/Rigidity). By focusing on these indicators, you achieve high-performance results for **surfacing bits for CNC router** operations.
Surfacing and Slab Leveling Bits work harder than almost any other tool. Their geometry, which maximizes wood contact, is also highly prone to accumulation of pitch and sap.
Clean Your Bits: After every major surfacing operation, soak the bit body in a citrus-based pitch cleaner. Built-up resin increases friction and heat.
Inspect Insert Sharpness: Don’t wait until you see smoke. A surfacing operation should produce clean, uniform chips (like shaved coconut), not fine dust.
7.Diagnostic: Troubleshooting Your Flattening Passes
If your Surfacing and Slab Leveling Bits are leaving poor results, use this checklist:
Visible Ridges? Your machine is not properly trammed. The spindle must be $90^\circ$ to the bed.
Wood is Burning? Your RPM is too high. Decrease your RPM and increase your feed rate. We cover the exact mathematics of determining this in our section on [Aluminum Cutting with CNC: Single-flute secrets and lubrication] (thermal principles remain the same).
Violent Vibration? Your depth of cut is too aggressive. Decrease your “step-down” to $0.5mm$.
Final Summary for BuildToolHQ Readers
To win the fight against large, warped slabs, you must use the correct weapon:
For High-Value Live-Edge Slabs: Use a 2.5″ – 3″ Indexable Insert Surfacing Bit for the best finish.
For General Spoilboard Surfacing: Use a 1.5″ – 2″ Brazed TCT Surfacing Bit.
For Complex Hardwood Contouring: Use Ball Nose or V-Bits (Not surfacing bits).
By understanding the unique “facing” geometry of these tools, you transform a time-consuming chore into a satisfying foundation for your finest woodworking projects.
Frequently Asked Questions (FAQ)
What is the best RPM for a CNC surfacing bit?
Unlike small 1/4″ bits, large surfacing bits must be run at lower speeds. For a 2.5″ diameter bit, you should set your spindle between 10,000 and 12,000 RPM. High RPMs on a large tool create excessive surface speed, which leads to immediate wood burning and dulls your carbide edges prematurely.
How deep can I cut with a surfacing bit in one pass?
For most CNC machines, you should limit your depth of cut to 0.5mm to 1.0mm (0.02″ to 0.04″) per pass. Because surfacing bits have such a large diameter, cutting too deep creates massive leverage on your spindle and gantry. Shallow passes are the secret to preventing the “washboard” ridges caused by machine flex.
Can I use a surfacing bit on a handheld router?
No. Using a large-diameter (2″+) surfacing bit in a handheld router is extremely dangerous. These bits are engineered for the rigid, controlled movement of a CNC gantry. The high torque and “kickback” potential of such a wide tool can easily cause you to lose control of a handheld machine.
How do I know when to rotate the carbide inserts?
You should rotate your inserts if the bit begins producing fine dust instead of clean, shaved wood chips. Other warning signs include visible “fuzzing” on the wood surface, burn marks appearing on the material, or a noticeable increase in spindle “screaming” or vibration.
Will a surfacing bit work on epoxy resin?
Yes. Indexable surfacing bits are excellent for leveling epoxy river tables. However, epoxy is very abrasive. Ensure you are using a high feed rate to keep the bit moving; if the bit dwells too long in one spot, it will melt the resin rather than cutting it.
Choosing the right tool for the job is the difference between a professional finish and a wasted sheet of expensive Baltic Birch. While many beginners treat CNC bits as “one-size-fits-all,” experienced makers know that wood-specific geometry is the secret to high-speed, high-quality production.
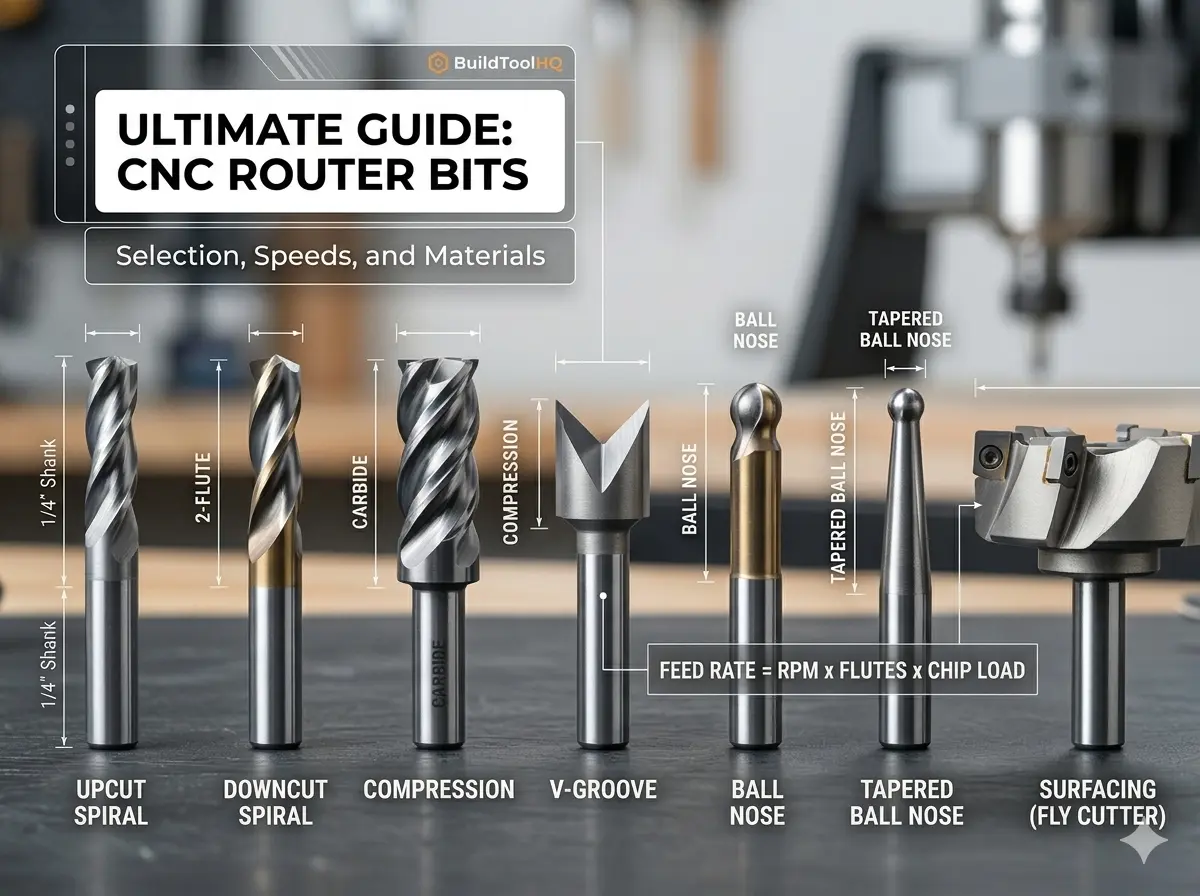
In this guide, we are breaking down the best CNC bits for plywood and hardwoods, explaining the mechanical physics of why certain geometries succeed where others fail. If you are just getting started, make sure to bookmark our [The Ultimate Guide to CNC Router Bits: Selection, Speeds, and Materials] as your foundational reference for all tooling terminology and chip load formulas.
1. The Plywood Physics: Why Standard Bits Fail
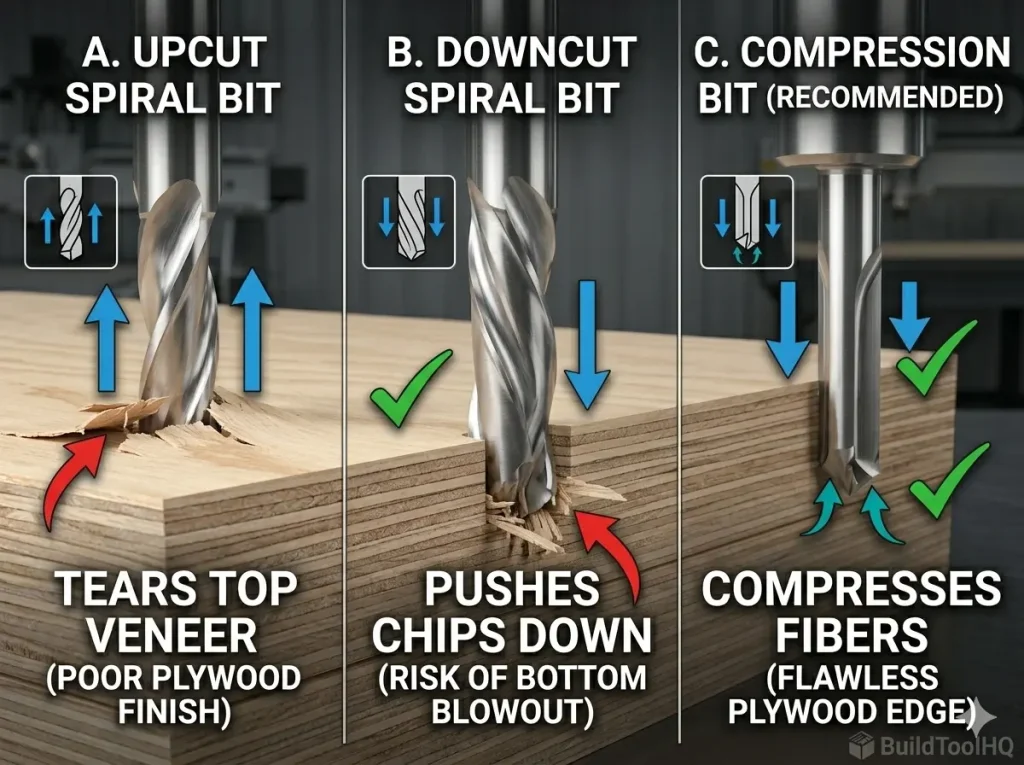
Understanding the “why” behind the geometry: Standard bits either pull up or push down. Compression geometry (C) uniquely shears in both directions toward the center, protecting fragile plywood veneers from tear-out and blowout.
Plywood is a “composite” material made of alternating layers of Plywood is a “composite” material made of alternating layers of wood grain and glue. This creates two distinct challenges for a CNC router that solid lumber does not present: inter-laminar shear and veneer fragility.
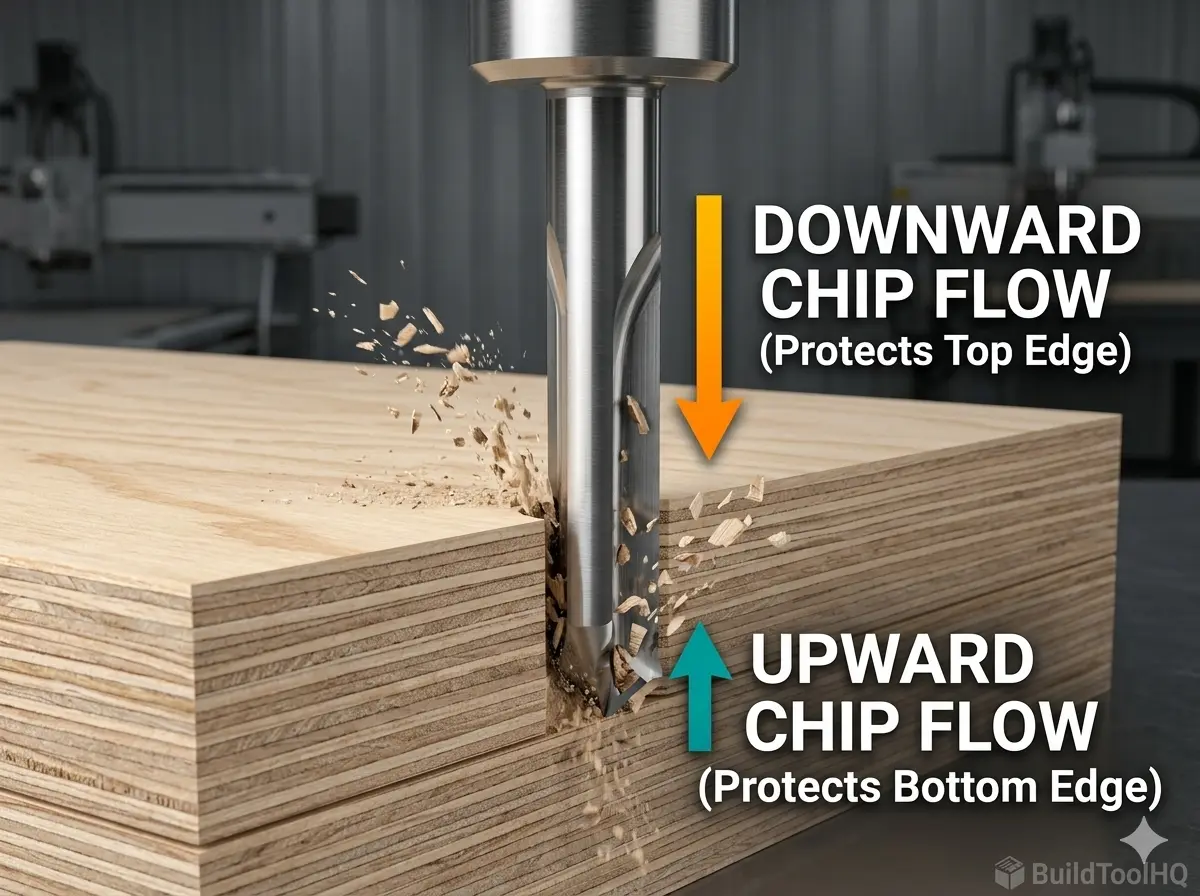
Top-Layer Tear-out: The fragile veneer on the top surface is prone to lifting because it has no support from above.
Bottom-Layer Splintering: As the bit exits the material, the downward force of the tool can blow out the bottom veneer.
Standard upcut bits act like a hook on plywood veneers, pulling them upward and away from the core. Conversely, a downcut bit protects the top but can cause “blowout” on the bottom as it pushes chips into the wasteboard. To solve this, we move toward Compression Geometry. If you haven’t seen the visual difference in action, check out our deep dive on [Upcut vs. Downcut vs. Compression Bits: When to use each for edge finish].
2. Top Recommendations for the Best CNC Bits for Plywood
For high-volume production or high-end cabinetry, these three tools are essential in your kit to ensure a zero-sanding finish.
A. The Compression Bit (The Gold Standard)
This is the undisputed king of plywood. By combining an upcut tip with a downcut shank, it “compresses” the wood fibers toward the center of the board.
The Secret: It creates a “shearing” action from both the top and the bottom simultaneously. This results in a “butter-smooth” edge that is ready for edge-banding immediately after the cut.
B. The Mortise Compression Bit (For Thin Sheets)
Standard compression bits often have an upcut section (the “toe”) that is too long for $1/4″$ ($6mm$) or $12mm$ plywood. This causes the upcut portion to reach the top surface, causing the very tear-out you were trying to avoid.
The Solution: A Mortise Compression bit has a significantly shorter upcut section (usually around $3mm$ to $5mm$). This allows the downcut portion of the bit to engage the top veneer even on thin material.
C. The Straight Flute Bit (The Cost-Effective Workhorse)
While spiral flutes are popular for high-speed clearing, straight flute bits are excellent for plywood because they exert zero vertical force. They don’t pull up, and they don’t push down. While they struggle with chip evacuation compared to [O-Flute Bits for Plastics and Acrylics: Managing heat and preventing melting], they are a fantastic, budget-friendly choice for simple profile cuts and nesting.
3. Mastering Hardwoods: Oak, Maple, and Walnut
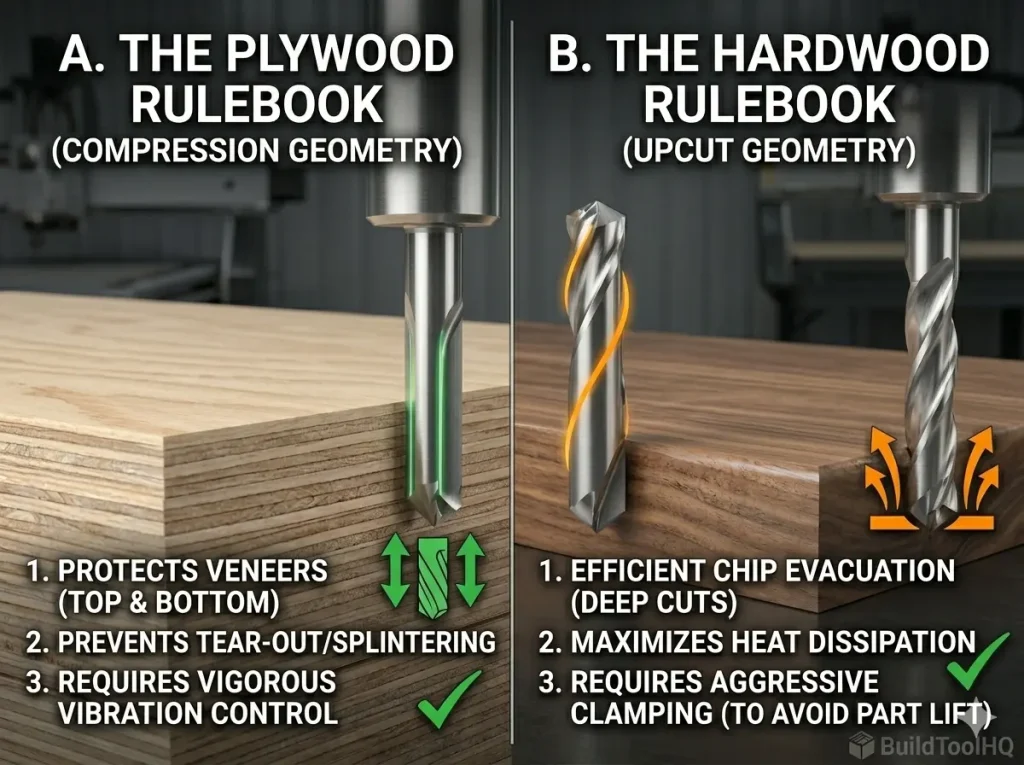
Understanding the material shift: Plywood (Left) demands compression geometry to safeguard delicate layers. Solid Hardwood (Right) prioritizes upcut spirals for heat management and rapid chip clearance—a trade-off that risks surface quality for tool life.
While plywood requires compression to save the veneers, solid hardwoods demand heat management and grain awareness. Solid wood is a cellular structure, and the way your bit interacts with those cells determines your finish quality.
Chip Evacuation in Deep Pockets
When carving deep mortises in hardwood, heat is your primary enemy. An Upcut Spiral bit pulls chips out of the hole rapidly. This prevents the bit from “re-cutting” sawdust. Re-cutting chips is the primary cause of friction, which leads to tool burn and ruins the temper of your carbide.
Roughing vs. Finishing Strategies
For complex hardwood projects, we recommend a two-tool strategy:
The Roughing Pass: Use a large $1/4″$ or $1/2″$ Upcut Spiral to clear bulk material quickly.
Burning on Hardwood? Your feed rate is too slow. The bit is rubbing instead of cutting. This is common when using the same speeds for wood as you would for [Aluminum Cutting with CNC: Single-flute secrets and lubrication]. You must increase your IPM (Inches Per Minute) to keep the carbide cool.
Fuzzing on Plywood Top? Your upcut “toe” is reaching the top surface. Switch to a Mortise Compression bit or increase your depth of cut on the first pass.
6. Maintenance: Protecting Your Carbide Investment
Even the best bits will fail if they are covered in “pitch” (dried sap and resin). Pitch buildup increases friction, which increases heat, which kills the razor edge of your tool.
Clean After Every Run: Use a dedicated citrus-based cleaner or a blade-and-bit soak.
Check for “Blueing”: If your bit looks blue or rainbow-colored, it has overheated. This softens the carbide.
Building a “topical authority” in your workshop means matching thBuilding a “topical authority” in your workshop means matching the tool to the fiber:
For Cabinetry & Plywood: Invest in a high-quality $1/4″$ Compression bit.
For Solid Hardwood Furniture: Use Upcut Spirals for bulk removal and Ball Nose for detail.
For Thin Veneered Panels: Always reach for the Mortise Compression.
By understanding wood-specific geometry, you drastically reduce your post-processing time. Remember: Five minutes of tool selection saves five hours of sanding.
Can I use a compression bit for every plywood cut?
While compression bits are the gold standard, they have a “minimum depth” requirement. For the compression effect to work, the upcut portion (the tip) must be fully buried in the material so the downcut portion can engage the top veneer. If you are doing shallow decorative grooves, a compression bit will act like an upcut bit and cause tear-out. For shallow work, reach for a dedicated downcut spiral.
Why does my hardwood keep burning even with a sharp bit?
Burning is usually a symptom of a low chip load. If your RPM is too high and your feed rate is too slow, the bit “rubs” the wood fibers instead of slicing them. This friction generates heat that chars the wood. The Solution: Increase your travel speed (IPM) or lower your spindle RPM. For the exact math, revisit our [The Ultimate Guide to CNC Router Bits: Selection, Speeds, and Materials].
What is the difference between a “Mortise” compression and a standard one?
A Mortise Compression bit has a much shorter upcut “toe” (usually $3mm$ to $5mm$). This is designed specifically for thin sheet goods ($1/4″$ or $1/2″$). If you use a standard compression bit on thin plywood, the upcut flutes will reach the top surface and splinter the veneer.
Should I use a single-flute or double-flute bit for hardwood?
For most woodworking, a two-flute bit is the standard as it provides a cleaner finish. However, if you are cutting extremely “gummy” woods or need to move very fast, a single-flute (similar to what we use in [Aluminum Cutting with CNC: Single-flute secrets and lubrication]) can help with heat dissipation.
Is it okay to use “Downcut” bits for deep pockets in Oak or Maple?
We generally advise against this. Because downcut bits push chips into the bottom of the cut, they can cause heat to build up rapidly in deep pockets, which may lead to smoke or even fire. For deep clearing in hardwoods, always use an upcut spiral to ensure chips are evacuated safely.
How do I prevent “fuzzies” when cutting softwoods like Pine?
Softwoods have long, flexible fibers that tend to bend rather than cut cleanly. Using a downcut bit is the best way to “trap” those fibers against the grain and shear them off. If you’re still seeing fuzz, ensure you aren’t using a bit meant for harder materials, like those found in [Diamond Coated & Specialized Bits: For composites and abrasive materials], as they may not be sharp enough for soft fibers.
In the world of precision manufacturing, your CNC machine is only as capable as the few millimeters of carbide meeting the workpiece. For the BuildToolHQ community, understanding CNC router bits isn’t just about knowing which shape to buy—it’s about mastering the intersection of material science, geometry, and mechanical physics.
Choosing the wrong CNC router bits doesn’t just result in a “bad cut.” It leads to workholding failure, shortened spindle life, and potentially dangerous tool breakage. This guide is designed to transform you from a “user” into a “technician,” covering everything from basic flute geometry to the advanced math of chip loads.
1. Understanding CNC Router Bits: Anatomy, Shanks, and Flutes
To master the CNC, you must first speak the language of the tool. Every bit is a balance of trade-offs between rigidity, chip clearance, and finish quality.
The Shank: The Foundation of Rigidity
The shank is the un-ground part of the router bits held by the collet. While standard sizes like $1/4″$ and $1/2″$ are ubiquitous, the physics of deflection are often overlooked.
The Rule of Rigidity: Tool deflection increases by the cube of the length it protrudes from the collet.
BuildToolHQ Advice: Always seat your router bits as deeply into the collet as possible (leaving just a tiny gap before the flutes start) to minimize vibration and “chatter.”
Flute Count and Performance
The flutes are the helical channels that evacuate waste.
Single Flute: These are the “secret weapon” for plastics and soft metals. Because there is only one cutting edge, you can run higher feed rates at lower RPMs, preventing the material from melting. Learn more about it here : (best CNC bit for cutting acrylic)
Two Flutes: The industry standard for woodworking They provide a balance between a high feed rate and a smooth finish.
Three or Four Flutes: Primarily used for finishing passes in hardwoods or machining non-ferrous metals like Aluminum. They offer a superior finish but require massive feed rates to avoid “rubbing.”
2. Types of CNC Router Bits: Upcut, Downcut, and Compression
Notice how the direction of the flutes (indicated by the arrows) dictates whether the tear-out occurs on the top or bottom of the workpiece
The most frequent question we see is: “Which way should the chips go?” The answer depends entirely on your material’s “skin.” Selecting the right CNC router bits for the job requires understanding directional physics.
Upcut CNC Router Bits: The Clearing Specialist
Upcut bits pull chips toward the spindle.
Pros: Excellent chip evacuation; perfect for deep mortises or slotting.
Cons: They tend to lift the material and “fuzz” the top grain of plywood or veneers.
Downcut CNC Router Bits: The Surface Master
Downcut bits push chips into the cut.
Pros: They provide a perfectly clean top surface and help push the material down into the wasteboard.
Cons: They pack sawdust into the bottom of deep grooves, which can cause heat buildup in your CNC router bits.
Compression CNC Router Bits: The Professional’s Choice
A compression bit features a downcut spiral on the top and an upcut spiral on the very tip.
The Magic Moment: When the transition point is buried, the bit “sandwiches” the wood toward the center. This results in a “chip-free” edge on both the top and bottom of laminated sheets.
3. Material Science of CNC Router Bits: Carbide vs. HSS
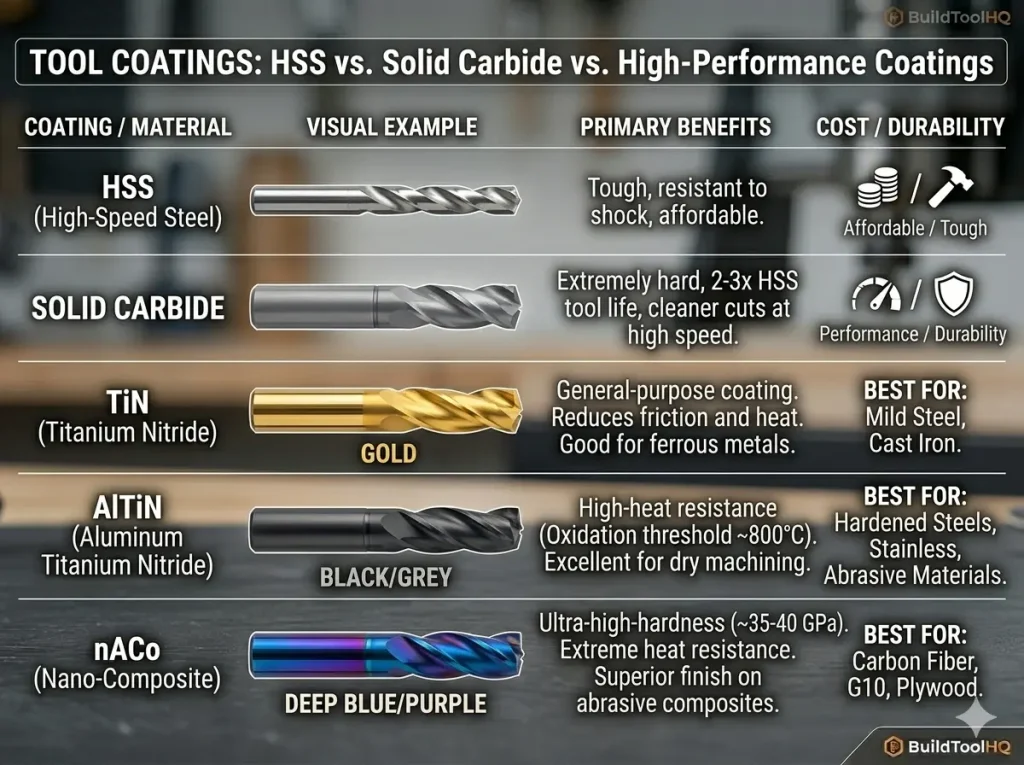
This technical chart visually compares tool life and application best practices for standard HSS, Solid Carbide, and high-performance TiN, AlTiN, and nACo coatings.
While High-Speed Steel (HSS) bits remain common in hand-held routing due to their lower price point, professional CNC operations almost exclusively demand Solid Carbide. According to technical standards for industrial tooling, carbide provides the extreme thermal stability required to withstand the high-speed friction generated by modern spindles.
Feature
High-Speed Steel (HSS)
Solid Carbide CNC Bits
Heat Resistance
Moderate
Extreme
Edge Retention
Low
High (up to 50x longer)
Flexibility
Higher (Vibration dampening)
Low (Brittle/Rigid)
Best For
Softwoods / Short runs
Hardwoods, Composites, Metals
At BuildToolHQ, we always recommend investing in high-quality carbide CNC router bits. While the initial cost is higher, the “cost per linear foot of cut” is significantly lower because carbide maintains a razor-sharp edge longer. This is especially critical when moving into high-performance fabrication; for example, standard carbide fails quickly in abrasive materials like carbon fiber or G10, requiring the elite durability found in our guide on ( diamond coated CNC bits ) And (aluminum cutting with CNC) guide.
4. Calculating Chip Load for CNC Router Bits
Proper chip load isn’t just about speed; it’s the primary way heat is removed from the cutting edge. Notice the flying chips on the right versus the burn marks on the left
This is where most hobbyists fail and pros excel. If you hear your machine “screaming” or see smoke, your chip load is wrong, and you are killing your CNC router bits.
Chip Load is the actual thickness of the chip each flute removes per revolution.
Too Small: The bit “rubs” the wood, causing friction heat that kills the tool’s temper.
Too Large: You risk snapping your CNC router bits or “missing steps” on your stepper motors.
The Formula for Success
Use this formula to calculate your starting points for any new CNC router bits:
Essential for 3D contouring and organic shapes. The tapered variety offers the detail of a small radius with the strength of a thicker shank, making them some of the most versatile CNC router bits in your drawer.
If you are working with live-edge slabs, these wide-diameter CNC router bits are your best friend. They often feature replaceable carbide inserts for cost-effectiveness.
Regular inspection and proper maintenance are key to ensuring safe cuts and maximizing the life of your expensive CNC tooling investment
A dull bit is a dangerous bit. To make your CNC router bits last, you must manage “Pitch” and heat.
The Solvent Soak: After cutting resinous woods like Pine, soak your CNC router bits in a pitch remover. Resin acts as an insulator, keeping heat trapped in the carbide cutting edge.
Collet Cleaning: A dirty collet introduces Runout (the bit spinning slightly off-center). Even $0.001″$ of runout can significantly reduce the life of your CNC router bits.
Storage: Never let carbide CNC router bits touch each other. Use a dedicated bit tray or the original plastic packaging.
New to CNC and overwhelmed by bit choices? These 5 essential CNC bits will help you achieve cleaner cuts, reduce tear-out, and maximize efficiency without wasting money on unnecessary tools. Whether you’re cutting wood, engraving, or surfacing, this guide covers the best CNC bits for beginners
7. FAQ: Common Questions About CNC Router Bits
Why is my bit burning the wood?
Burning is almost always caused by an RPM that is too high for your Feed Rate. Increase your speed or lower your RPM to help your CNC router bits carry the heat away in the chips.
When should I replace my CNC router bits?
If you notice increased noise, visible burning, or a “fuzzy” finish that wasn’t there before, your bit is likely dull. If you have to slow down your feed rate to get a clean cut, it’s time for new tooling.
How many flutes do I need for Aluminum?
Always start with a single-flute O-flute. Aluminum is “gummy” and likes to stick to the tool; a single flute gives the chip plenty of room to escape.
Final Thoughts for the BuildToolHQ Community
Mastering CNC router bits is a journey of trial and error, but starting with the right technical knowledge puts you miles ahead of the competition. By matching your bit geometry to your material and dialing in your chip load, you’ll achieve the professional results your projects deserve.
Explore our specialized cluster posts to master every specific material in your shop.
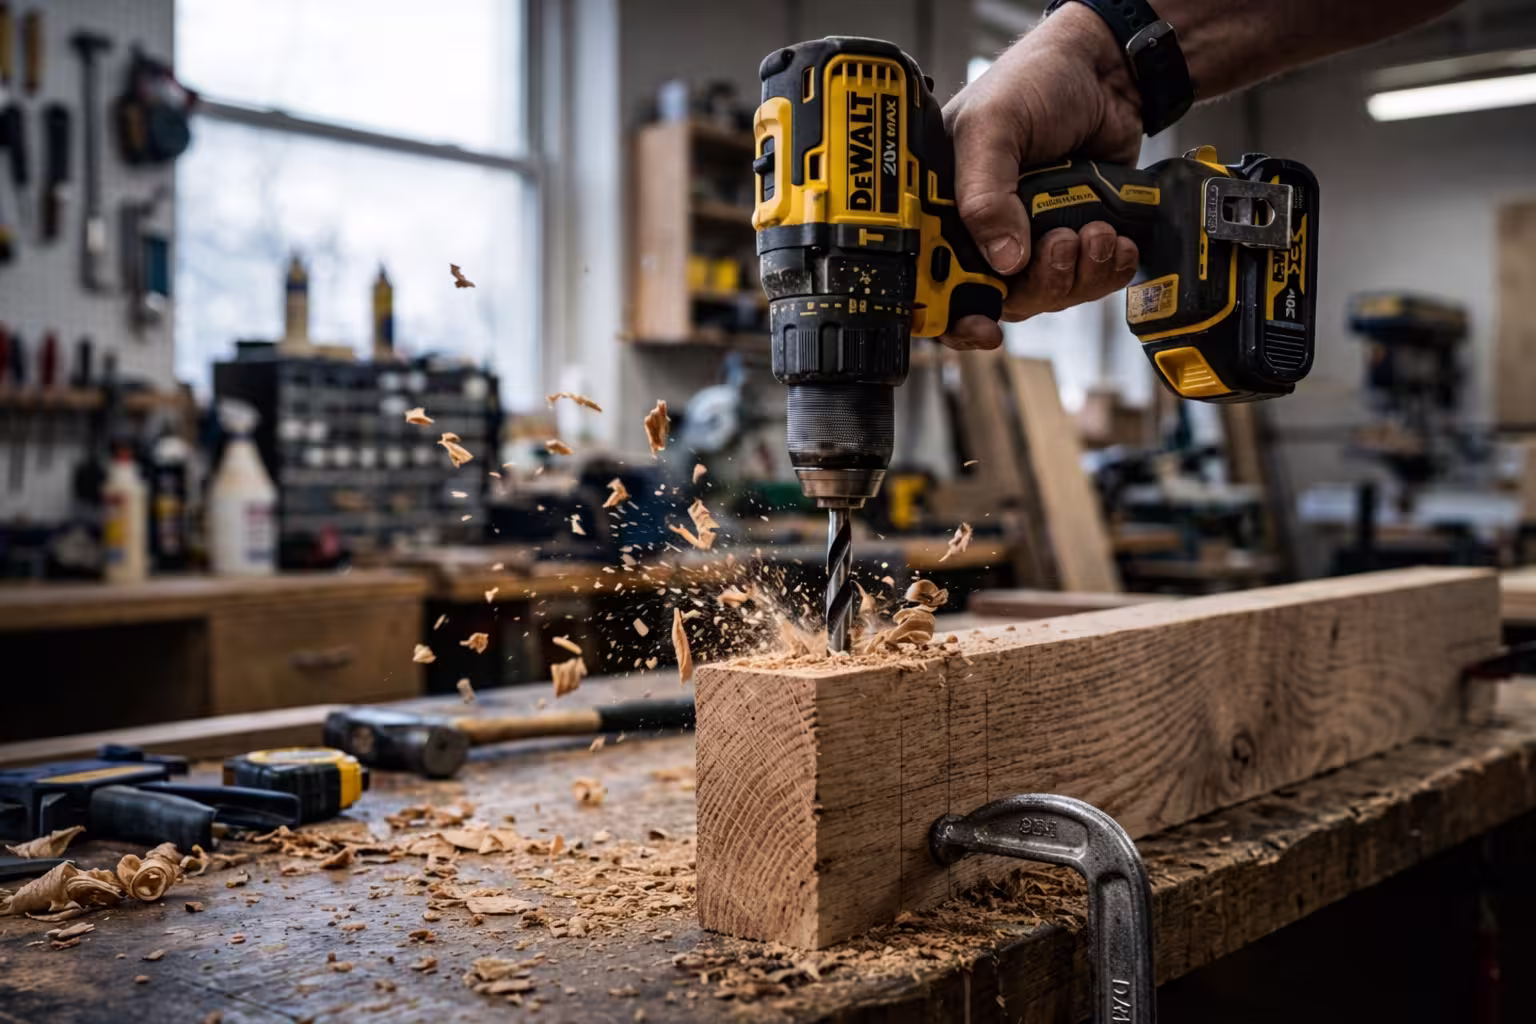
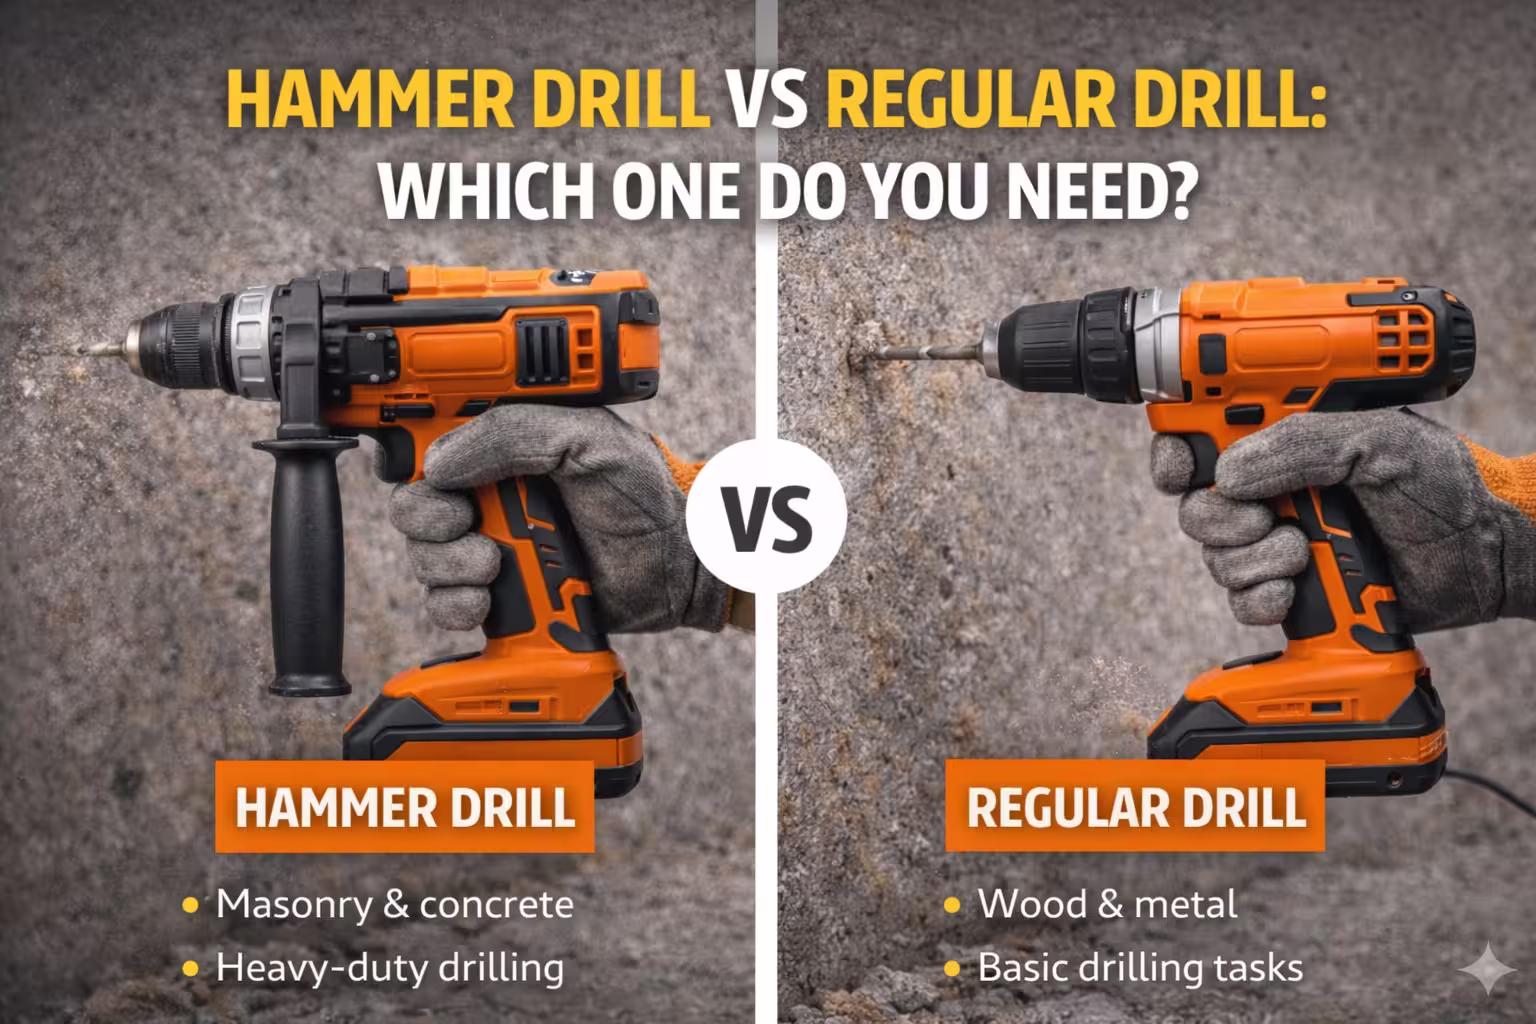
Why drill bits burn or break is one of the most common problems DIYers face when drilling into materials like steel, concrete, or hardwood. Burnt or broken drill bits are extremely common for DIYers and homeowners, but in most cases the cause is simple and preventable.
Drill bits are designed to handle significant friction and pressure, but when the wrong technique or equipment is used, heat builds up quickly and the bit can fail.
In this guide, you’ll learn the most common reasons drill bits burn or break, how to prevent these issues, and how to extend the life of your tools.
There are several factors that can cause drill bits to fail. Most of them relate to heat, pressure, or improper technique.
The most common causes include:
Excessive drilling speed
Too much pressure
Using the wrong drill bit type
Lack of lubrication
Dull drill bits
Poor quality materials
Understanding these problems can help you avoid damaging your tools.
1. Excessive Drilling Speed
One of the biggest causes of burnt drill bits is drilling too fast.
When drilling into hard materials like steel or concrete, high speed generates extreme friction. This heat can quickly damage the cutting edge of the drill bit.
Signs of overheating include:
The bit turning blue or purple
Smoke coming from the drilling area
Reduced drilling performance
Hard materials require slower drilling speeds to allow the bit to cut effectively.
Burnt or broken drill bits are usually the result of improper speed, pressure, or drill bit selection.
By using the correct drill bits, controlling drilling speed, and applying proper technique, you can significantly extend the life of your tools and achieve cleaner, faster drilling results.
Taking the time to understand why drill bits fail will not only save money on replacements but also make your drilling projects easier and more efficient.
Drill Bit Troubleshooting FAQs
Frequently Asked Questions About Burnt or Broken Drill Bits
Why do drill bits burn while drilling?
Drill bits usually burn because of excessive heat caused by high drilling speed, dull drill bits, or too much pressure. When friction builds up, the bit overheats and can leave burn marks on wood or metal surfaces.
Why do drill bits turn blue?
Drill bits often turn blue or purple when they overheat during drilling. This color change indicates that the metal has been exposed to very high temperatures, which can weaken the cutting edge and reduce the bit’s lifespan.
Why do drill bits break during drilling?
Drill bits can break due to excessive pressure, incorrect drill speed, misalignment, or using the wrong drill bit for the material. Small diameter bits are especially prone to breaking if they are forced into hard materials.
How can you prevent drill bits from overheating?
To prevent overheating:
Use lower drilling speeds
Apply steady pressure
Use cutting oil or lubricant when drilling metal
Pull the drill bit out periodically to remove chips and dust
These steps help reduce friction and heat buildup.
Do you need cutting oil when drilling metal?
Yes. Cutting oil or drilling lubricant reduces heat and friction when drilling metal. It also helps remove metal chips and improves the life of the drill bit.
Why do drill bits get dull quickly?
Drill bits can become dull quickly when used on hard materials, at high speeds, or without lubrication. Using the correct drill bit type for the material significantly improves durability.
Can burnt drill bits be sharpened?
Yes. Many drill bits can be resharpened using a bench grinder or drill bit sharpener. However, if the bit has been severely overheated, the metal may have lost its hardness and may not perform as well after sharpening.
What drill speed should you use for different materials?
Different materials require different drilling speeds:
Wood: medium to high speed
Metal: low to medium speed
Concrete or masonry: moderate speed with hammer action
Using the correct speed reduces heat and prevents drill bit damage.
What drill bits are most resistant to heat?
Cobalt drill bits and carbide-tipped drill bits are the most heat-resistant. These bits are commonly used for drilling hard metals and masonry materials.
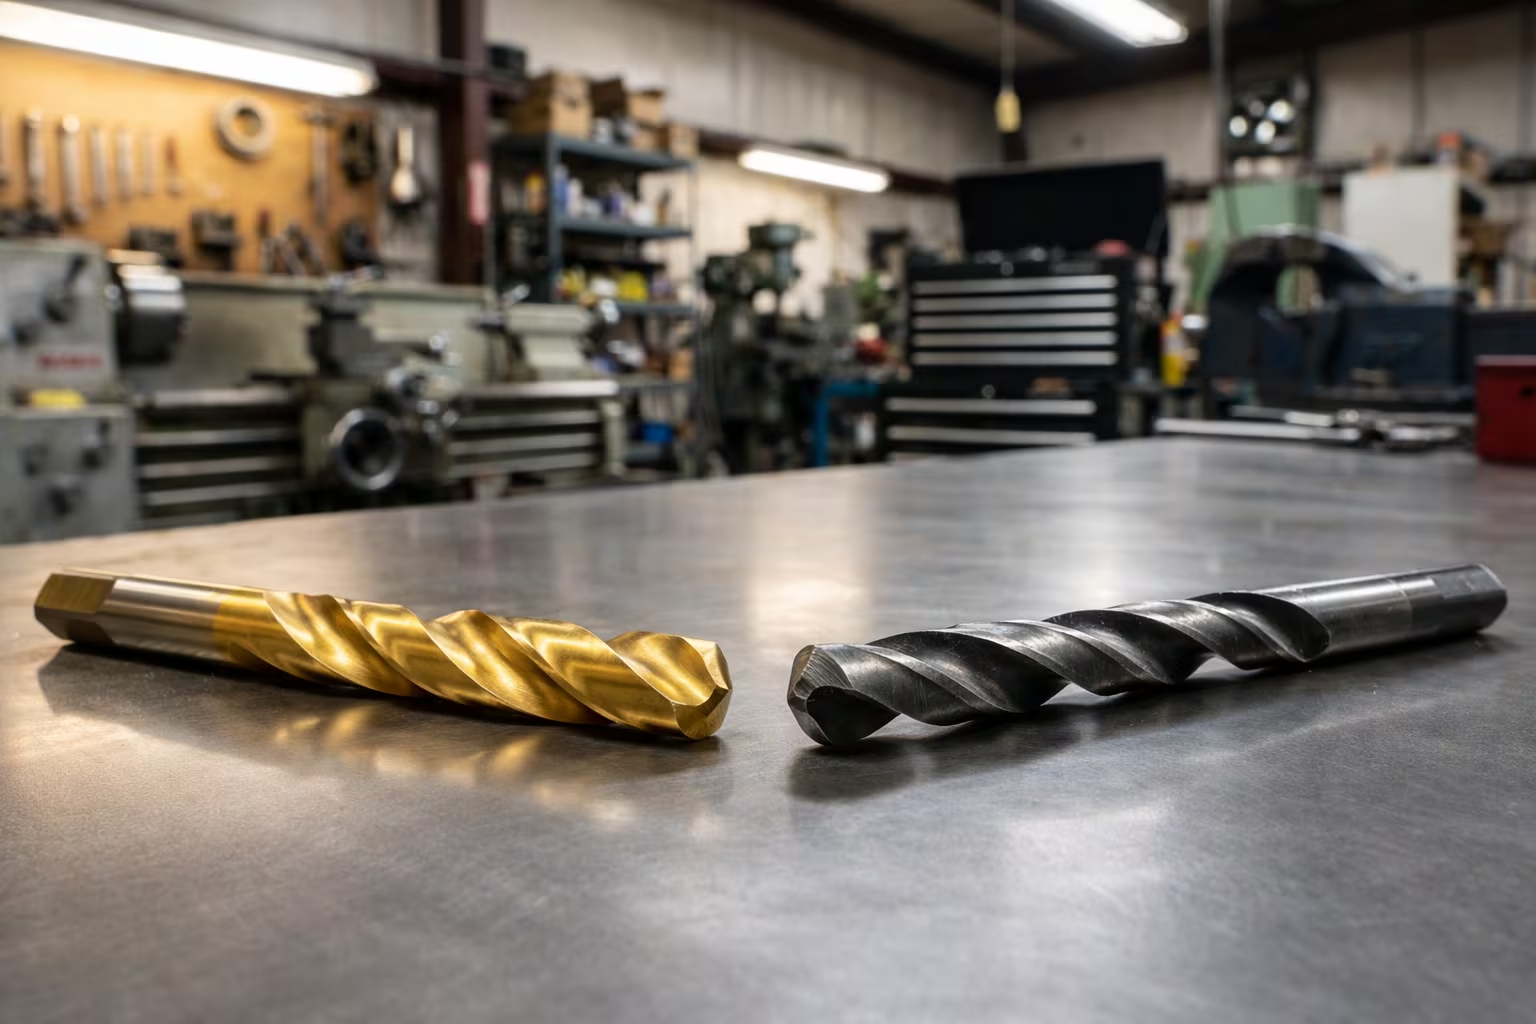
When drilling into metal, choosing the right drill bit can make a huge difference in performance, durability, and hole quality. Two of the most common drill bits used for metal drilling are titanium drill bits and cobalt drill bits.
Both types are designed to drill into metal efficiently, but they perform differently depending on the material being drilled.
In this guide, we’ll compare titanium vs cobalt drill bits, explain their advantages and disadvantages, and help you choose the best option for your projects.
Frequently Asked Questions About Titanium vs Cobalt Drill Bits
What is the difference between titanium and cobalt drill bits?
Titanium drill bits are typically high-speed steel (HSS) bits coated with titanium nitride, which reduces friction and increases durability. Cobalt drill bits are made from steel alloys containing cobalt, allowing them to withstand higher temperatures and drill harder metals.
Which drill bit is better for metal: titanium or cobalt?
Cobalt drill bits are generally better for hard metals such as stainless steel or hardened steel because they resist heat and maintain their cutting edge longer. Titanium-coated bits are better suited for softer metals like aluminum, copper, and mild steel.
Do titanium drill bits last longer than cobalt bits?
Titanium-coated bits can last longer than standard HSS bits, but cobalt drill bits usually last longer when drilling hard metals. Titanium coatings eventually wear off, while cobalt is mixed into the steel itself.
Can you sharpen titanium drill bits?
Titanium drill bits can technically be sharpened, but once the titanium coating is removed during sharpening, the bit loses some of its friction-reducing properties.
Can you sharpen cobalt drill bits?
Yes. Cobalt drill bits can be resharpened multiple times without losing their heat resistance because cobalt is part of the metal alloy rather than a surface coating.
What materials are titanium drill bits best for?
Titanium-coated drill bits are best for:
Aluminum
Copper
Brass
Plastic
Wood
Mild steel
They are a good option for general-purpose drilling tasks.
What materials are cobalt drill bits best for?
Cobalt drill bits are ideal for drilling hard and heat-resistant metals, including:
Stainless steel
Hardened steel
Cast iron
High-strength alloys
They are commonly used in industrial and metalworking applications.
Why do drill bits turn blue when drilling metal?
Drill bits can turn blue due to excessive heat buildup during drilling. This often happens when drilling at high speeds, applying too much pressure, or not using cutting oil.
Should you use cutting oil when drilling metal?
Yes. Using cutting oil or lubricant reduces heat and friction when drilling metal, helping drill bits last longer and cut more efficiently.
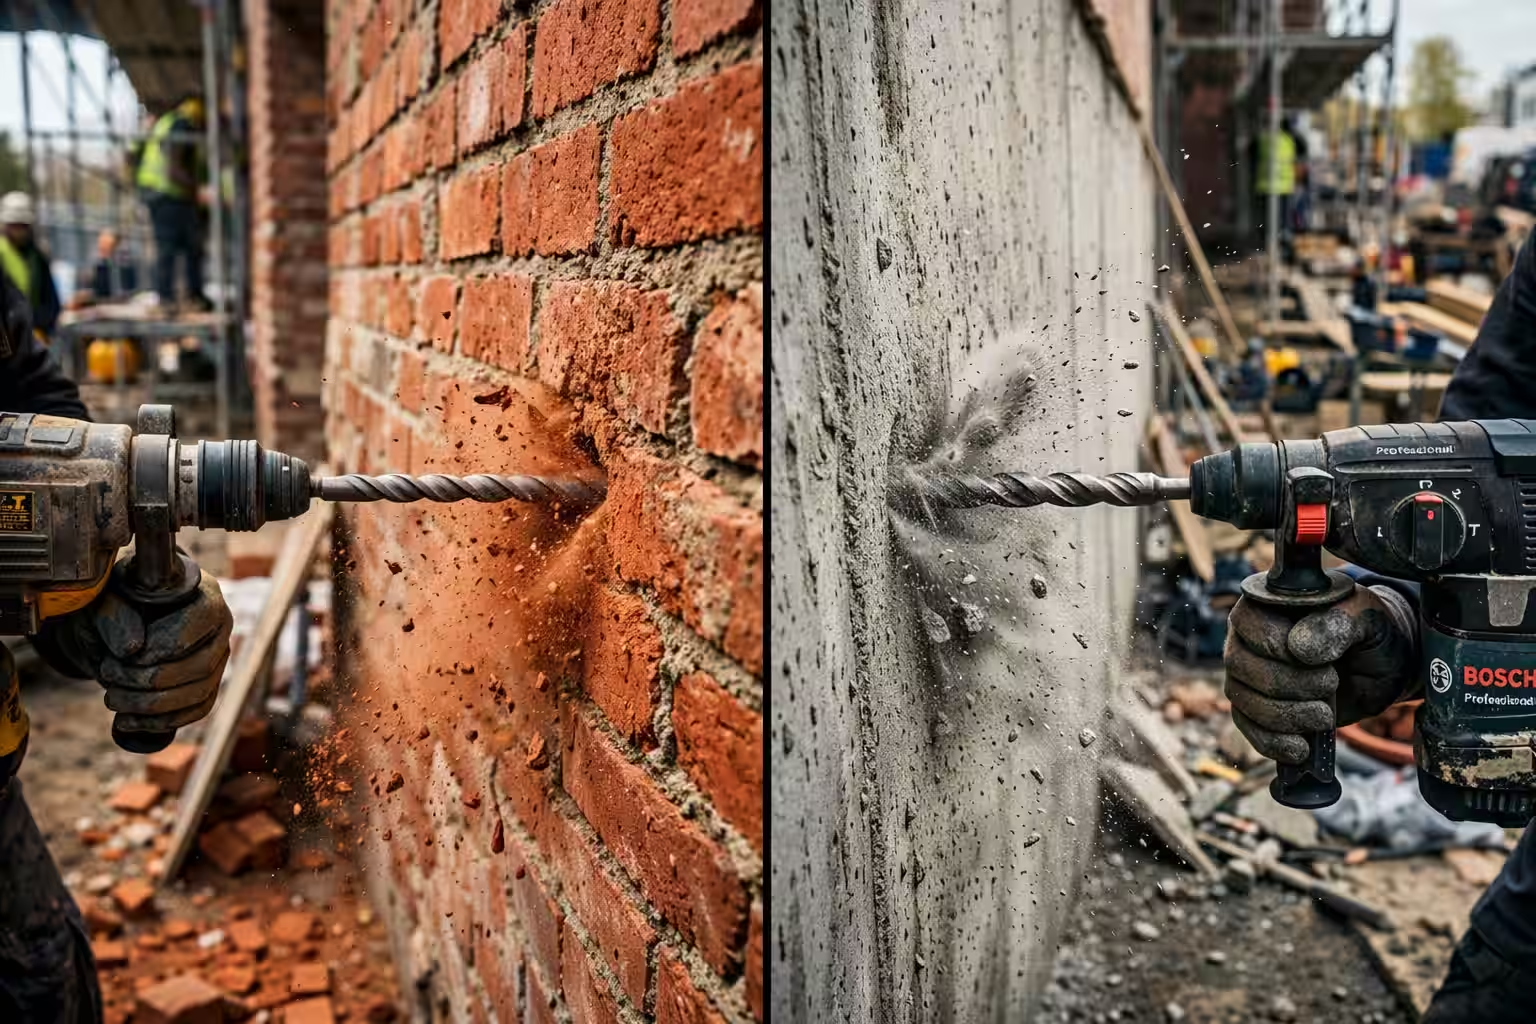
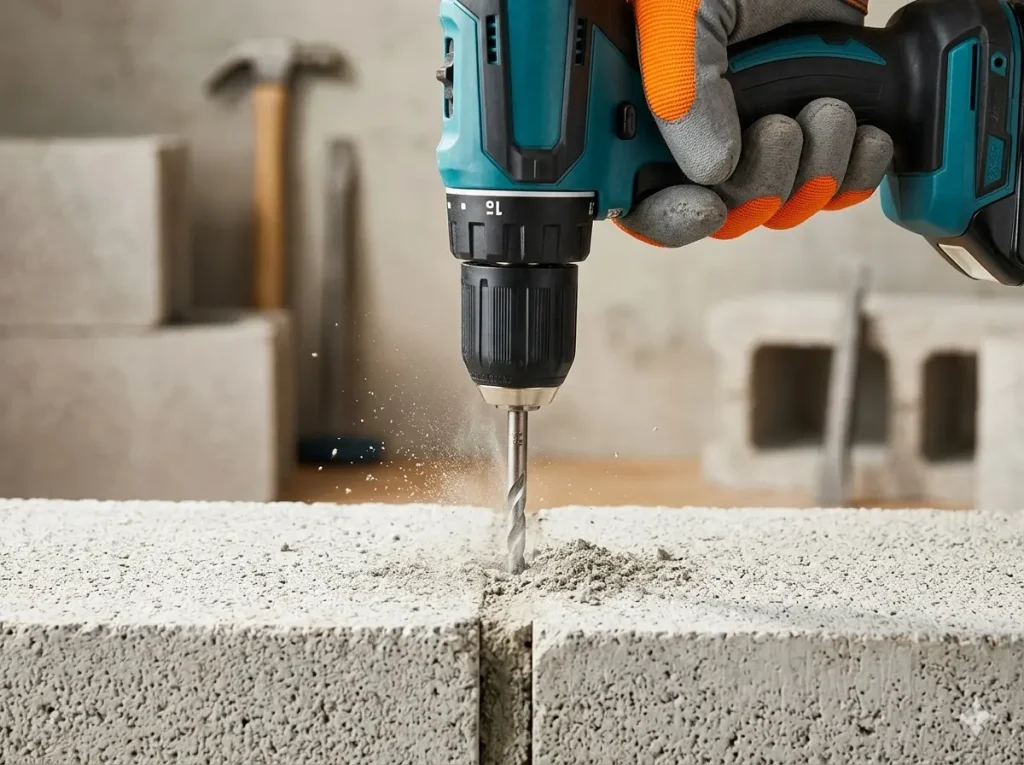
Understanding masonry drill bits vs concrete drill bits is important when drilling into brick, block, or dense concrete materials. Many DIYers and homeowners see the terms masonry drill bit and concrete drill bit used interchangeably, but they are not always exactly the same.
Both types are designed to handle mineral materials, but they differ in strength, design, and ideal applications. Understanding the difference helps you drill faster, avoid damaging your tools, and achieve cleaner holes.
In this guide, we’ll explain how masonry drill bits and concrete drill bits work, their key differences, and when to use each one for your projects.
Masonry drill bits are designed for drilling into a wide range of construction materials such as:
Brick
Concrete blocks
Mortar joints
Natural stone
Lightweight concrete
Unlike wood or metal drill bits that cut material, masonry bits work by crushing and grinding the surface using a hardened carbide tip.
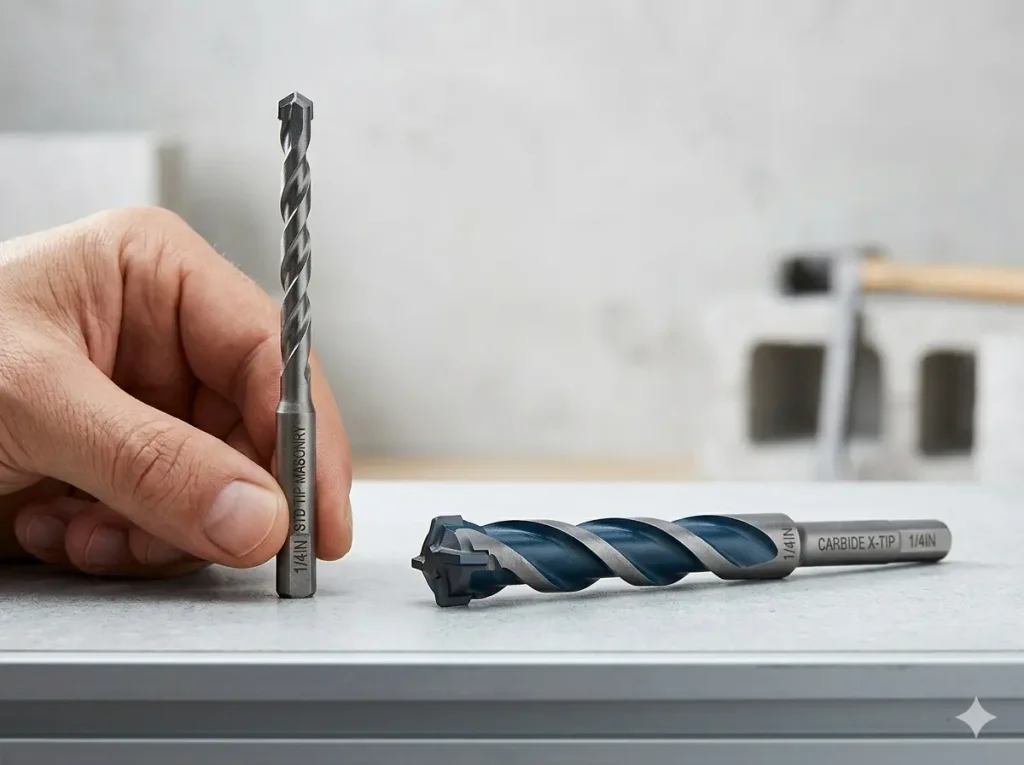
Most masonry drill bits have three main components:
Carbide Cutting Tip The tip is made from tungsten carbide, a very hard material that can withstand the friction created when drilling stone-like surfaces.
Steel Body The body of the bit is typically hardened steel that supports the carbide tip and handles the rotational force of the drill.
Spiral Flutes These grooves help remove dust and debris from the hole while drilling.
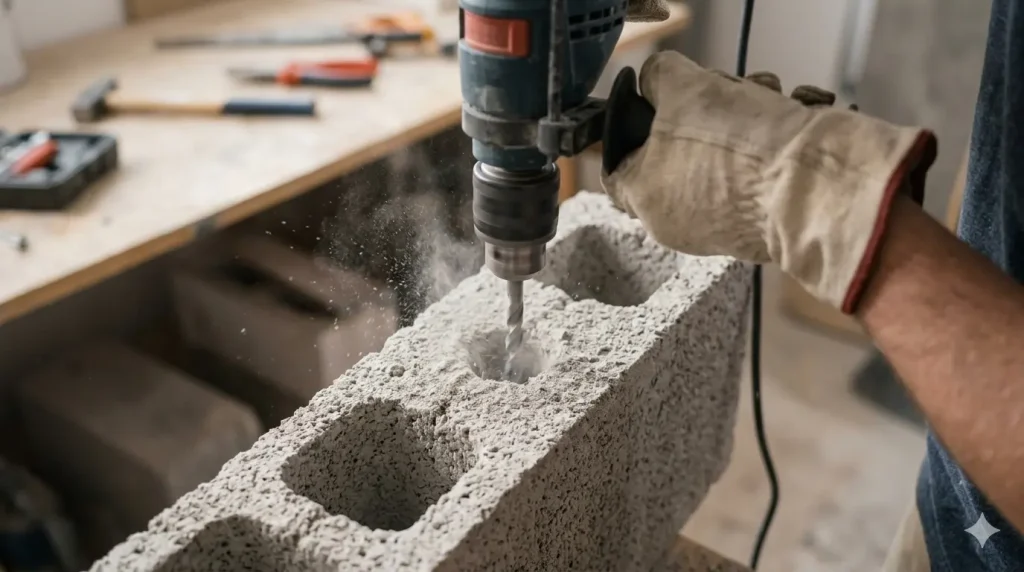
Masonry bits are commonly used with:
Standard drills
Hammer drills
For most household drilling tasks in brick or block, a masonry bit works perfectly well.
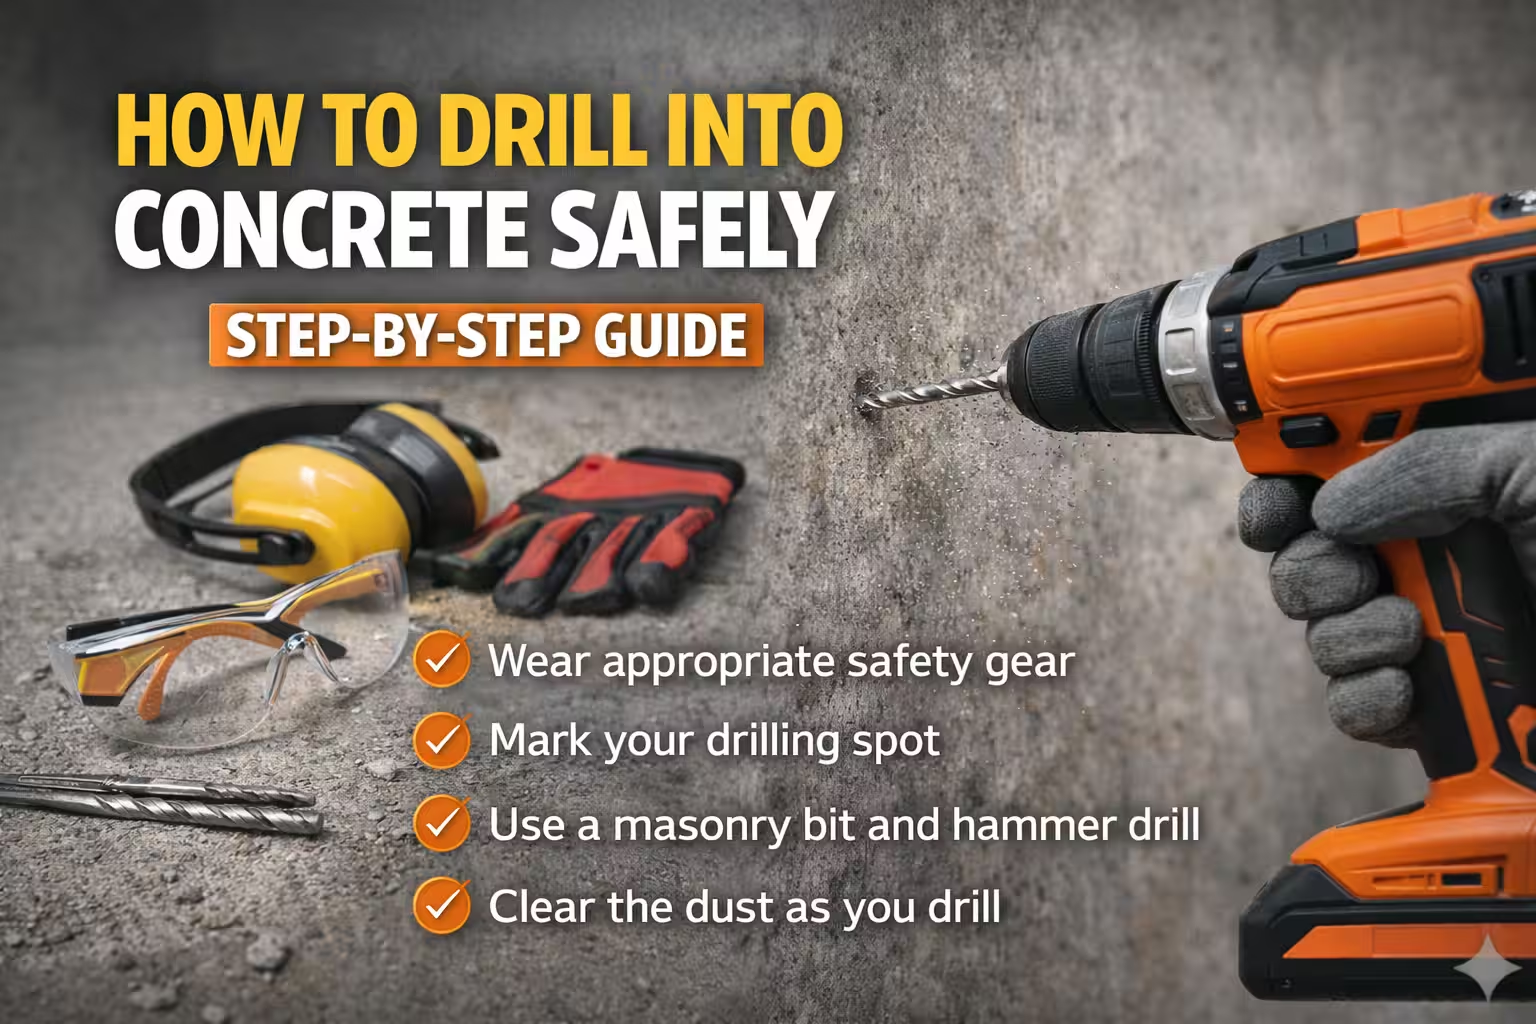
Whether you’re using masonry or concrete drill bits, proper technique can significantly improve results.
Use Hammer Mode
Hammer drills combine rotation and impact, making it much easier to drill through mineral materials.
Apply Steady Pressure
Let the drill do the work. Excessive pressure can dull the bit or overheat the drill.
Remove Dust Frequently
Pull the drill bit out every few seconds to clear debris and allow cooling.
Start With a Pilot Hole
For larger holes, drilling a small pilot hole first helps guide the bit and reduce stress.
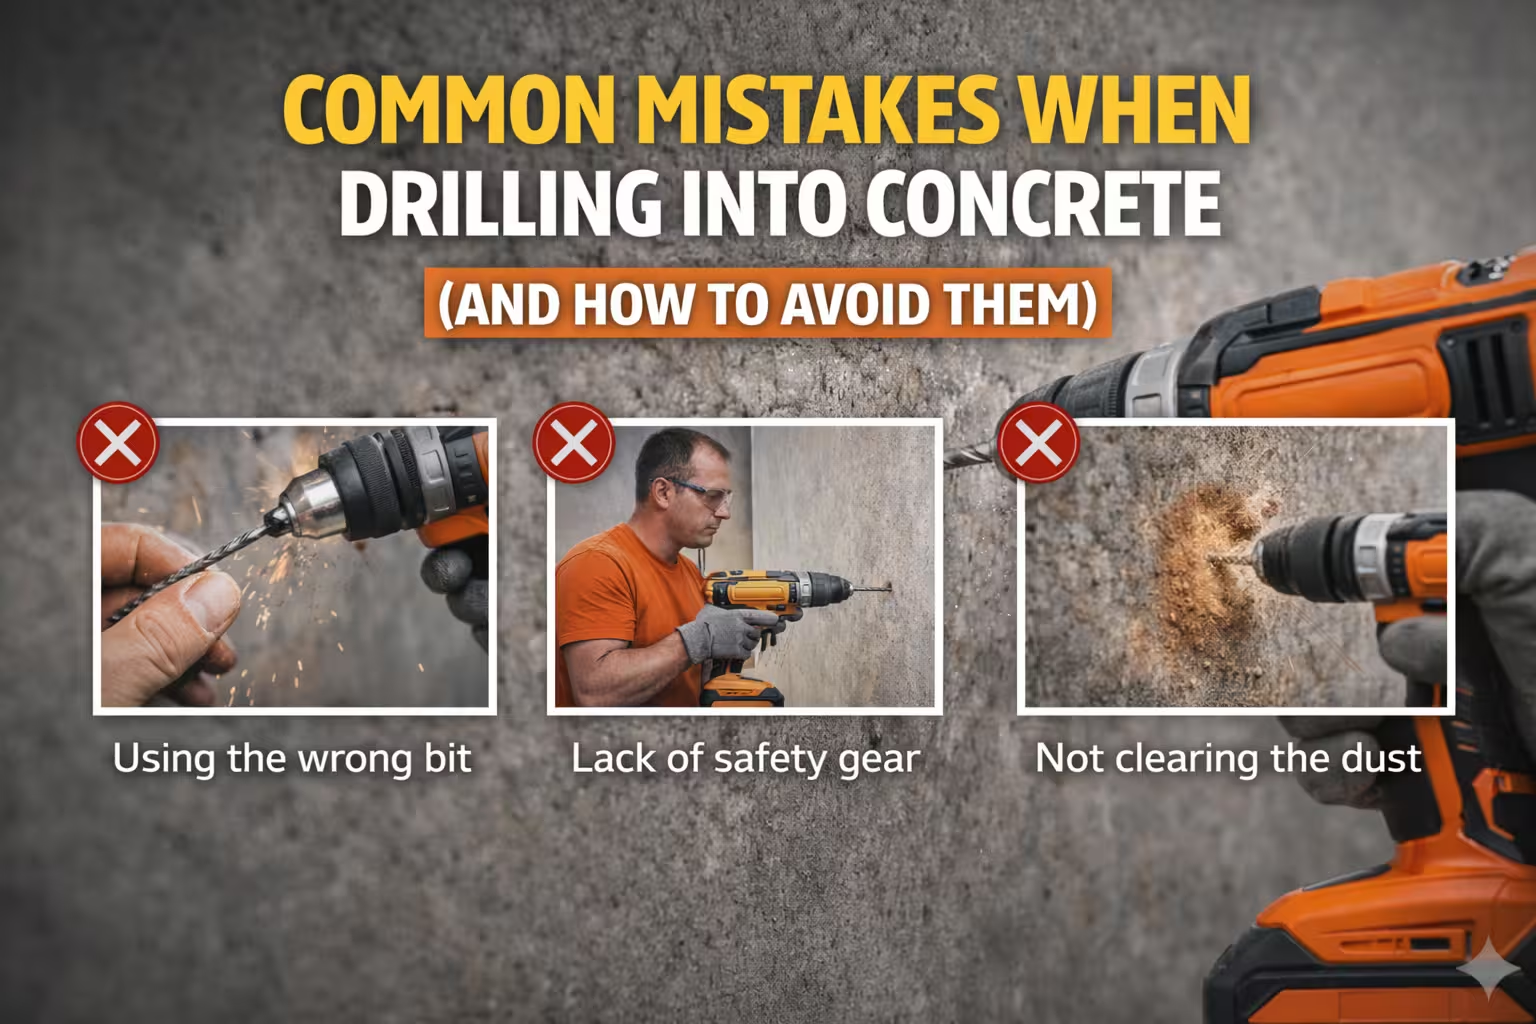
Common Mistakes When Drilling Concrete or Brick
Many DIYers damage drill bits by making simple mistakes.
Some of the most common include:
Using wood or metal drill bits on masonry
Drilling without hammer mode
Applying too much pressure
Not clearing dust from the hole
Using dull drill bits
Avoiding these mistakes can dramatically extend the life of your drill bits and improve drilling performance.
Final Verdict
Both masonry drill bits and concrete drill bits are essential tools for working with construction materials.
Masonry drill bits are versatile and ideal for brick, mortar, and lighter concrete.
Concrete drill bits are built for heavy-duty drilling into dense or reinforced concrete.
For most homeowners and DIY projects, masonry bits will handle the majority of tasks. However, if you regularly drill into concrete slabs or foundations, investing in dedicated concrete drill bits is the better choice.
Choosing the right drill bit not only makes drilling easier but also protects your tools and produces cleaner, more accurate holes.
Masonry vs Concrete Drill Bit FAQs
Frequently Asked Questions About Masonry vs Concrete Drill Bits
What is the difference between masonry drill bits and concrete drill bits?
Masonry drill bits are designed to drill into brick, mortar, stone, and lighter masonry materials, while concrete drill bits are built to handle harder materials like reinforced concrete. Concrete bits often have stronger carbide tips and are commonly used with hammer drills or rotary hammer drills.
Can masonry drill bits be used on concrete?
Yes, masonry drill bits can drill into light or soft concrete, but they may wear out quickly when used on very hard or reinforced concrete. For heavy-duty concrete drilling, SDS concrete drill bits are usually more effective.
What drill should you use for masonry and concrete?
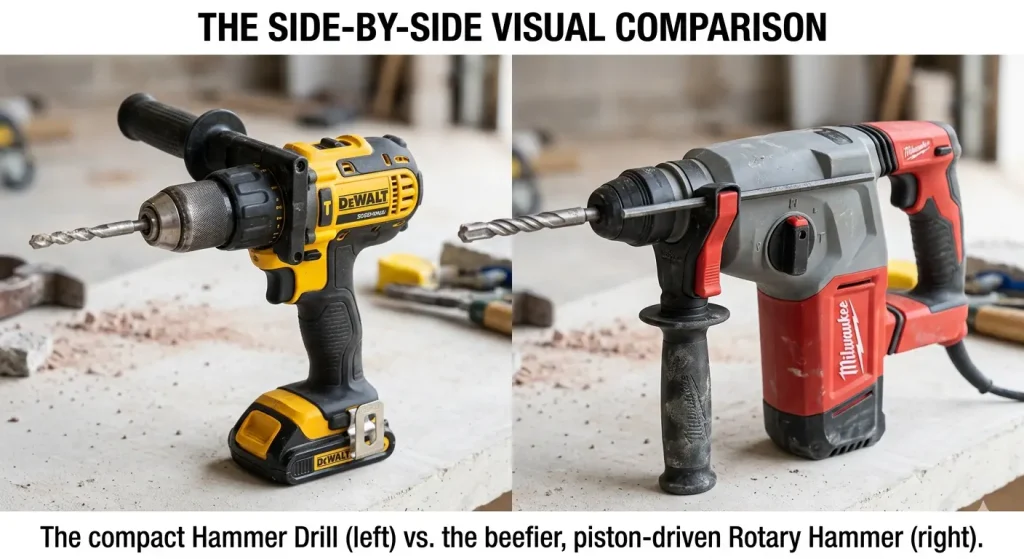
A hammer drill works well for most masonry and light concrete drilling. For harder concrete or larger holes, a rotary hammer drill with SDS bits provides more impact power and drilling efficiency.
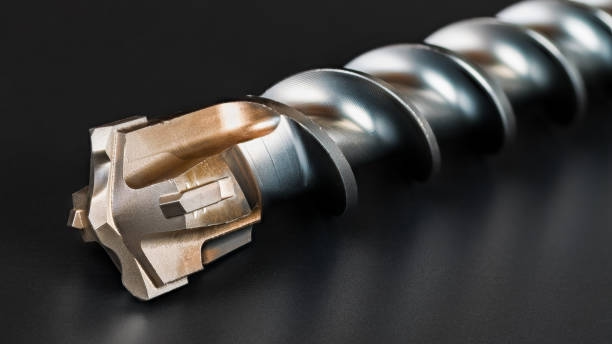
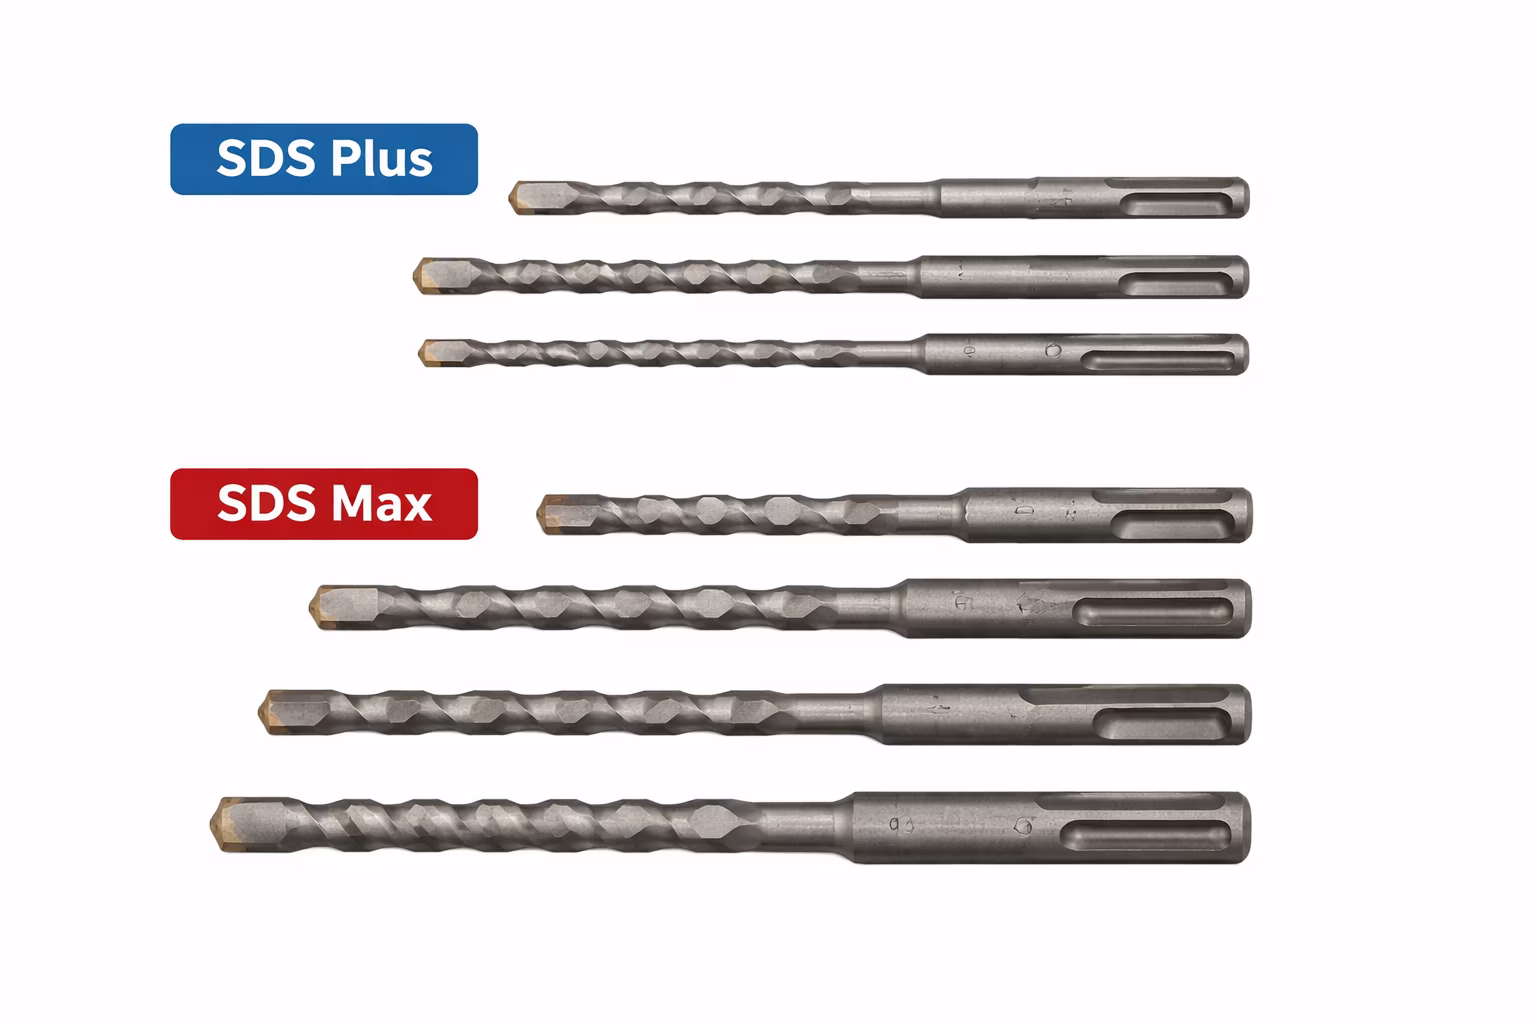
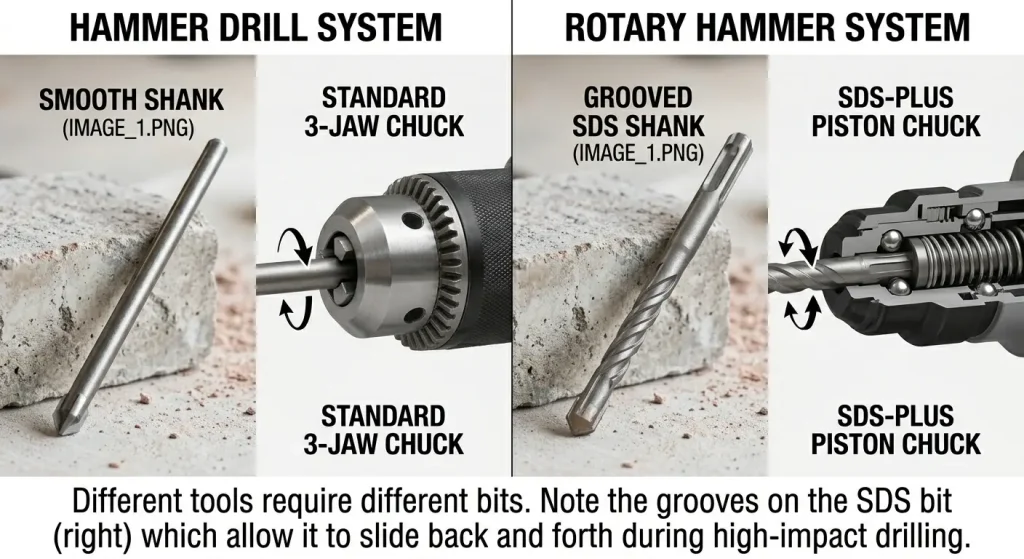
What does SDS mean for concrete drill bits?
SDS stands for Slotted Drive System, a special shank design that allows drill bits to lock into rotary hammer drills. SDS bits transfer more hammering force into the material, making them ideal for drilling hard concrete.
Can you drill brick with concrete drill bits?
Yes. Concrete drill bits can drill through brick and other masonry materials, but they are typically designed for tougher materials. In many cases, standard masonry bits are sufficient for brick drilling.
What speed should you drill masonry or concrete at?
Concrete and masonry should be drilled at moderate speed with steady pressure. Let the hammering action of the drill do most of the work rather than forcing the drill bit into the material.
Why does my masonry drill bit stop drilling?
A masonry drill bit may stop drilling due to dull carbide tips, excessive heat, hitting rebar, or dust buildup inside the hole. Pulling the drill bit out periodically to clear dust can improve drilling performance.
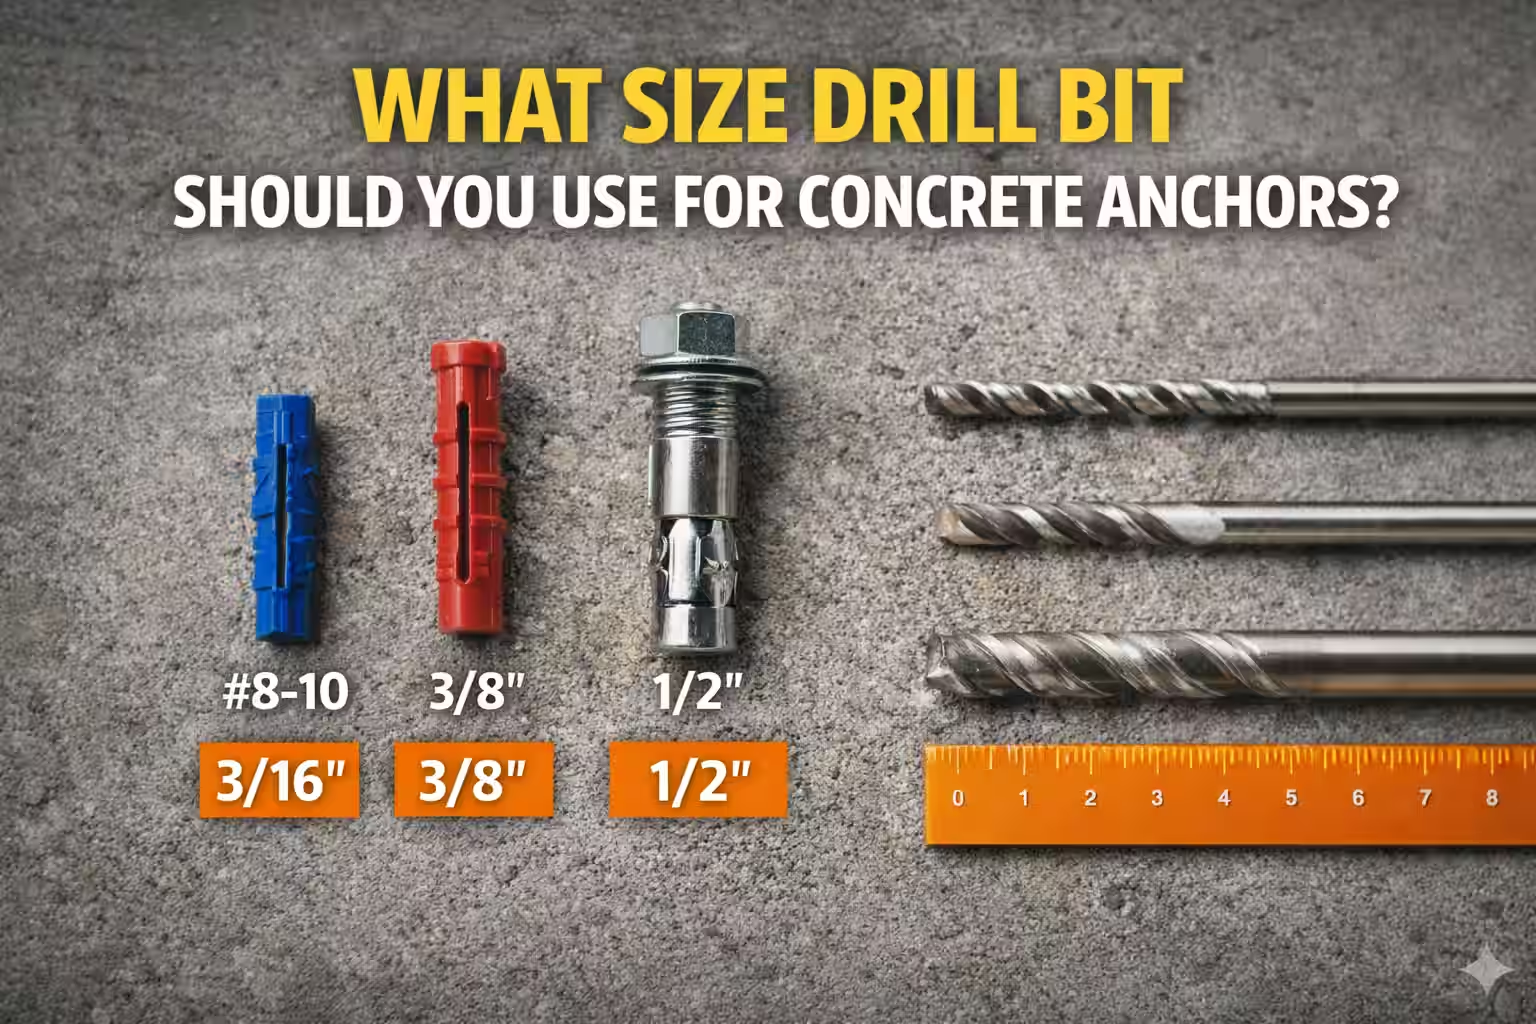
What size drill bit should you use for masonry anchors?
The drill bit size should match the diameter of the masonry anchor or wall plug you plan to install. For example, a 6 mm wall plug typically requires a 6 mm masonry drill bit.
Can masonry drill bits drill through stone?
Yes. Masonry drill bits can drill through many types of stone, brick, mortar, and concrete, although very dense stone may require stronger bits or rotary hammer drilling.
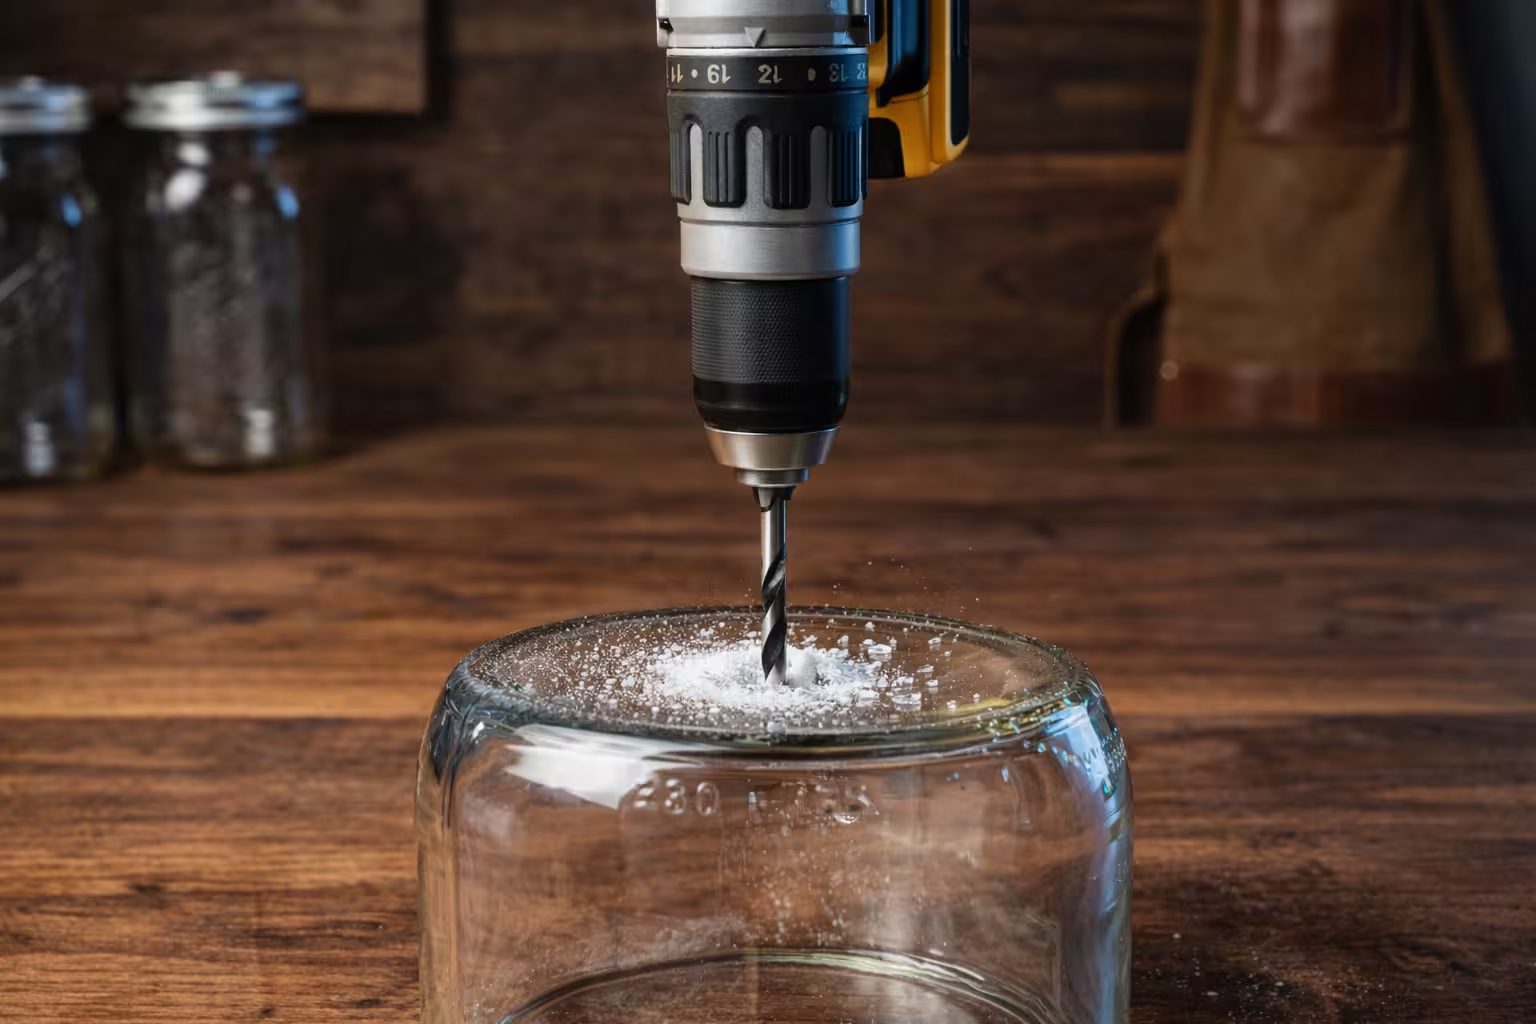
Best drill bit for glass is usually a diamond-coated drill bit designed to cut brittle materials without cracking them. Drilling glass can seem risky, but with the right drill bit and proper technique, homeowners and DIYers can safely drill glass bottles, mirrors, tiles, and panels without breaking them.The good news is that with the right drill bit and proper technique, drilling glass is actually quite manageable—even for DIY homeowners.
In this guide, we’ll cover the best drill bits for glass, how they work, and the safest techniques for drilling through glass bottles, mirrors, tiles, and panels without breaking them.
The best drill bit for glass is a diamond-coated drill bit.
Diamond bits are specifically designed to cut extremely hard and brittle materials like:
Glass
Porcelain
Ceramic
Stone
Marble
The diamond particles on the cutting surface grind through the glass slowly and precisely instead of aggressively cutting it. This reduces stress on the material and helps prevent cracking.
Why Diamond Drill Bits Work Best
Diamond bits offer several advantages when drilling glass:
Extremely hard cutting surface
Smooth grinding action instead of chipping
Minimal vibration
Reduced cracking risk
Long lifespan
These bits are commonly used by professionals when working with glass panels, bottles, aquariums, and mirrors.
Carbide Glass Drill Bits
The second option for drilling glass is carbide spear-point drill bits.
These bits have a pointed spear-shaped carbide tip designed to pierce glass and tile surfaces.
They are commonly used for:
Glass tile
Mirrors
Thin glass
Ceramic tile
Carbide bits are usually more affordable than diamond bits, but they tend to wear out faster and require more careful drilling technique.
The best drill bit for glass is usually a diamond-coated drill bit. Diamond bits grind through glass slowly and reduce the risk of cracking.
Can you drill glass with a regular drill bit?
No. Standard metal drill bits will usually crack or shatter glass. You should use a diamond drill bit or a carbide spear-point drill bit designed for glass and tile.
What speed should you drill glass?
Glass should always be drilled at low speed with light pressure to prevent overheating and cracking.
Do you need water when drilling glass?
Yes. Cooling the drill bit with water helps prevent heat buildup and greatly reduces the risk of breaking the glass.
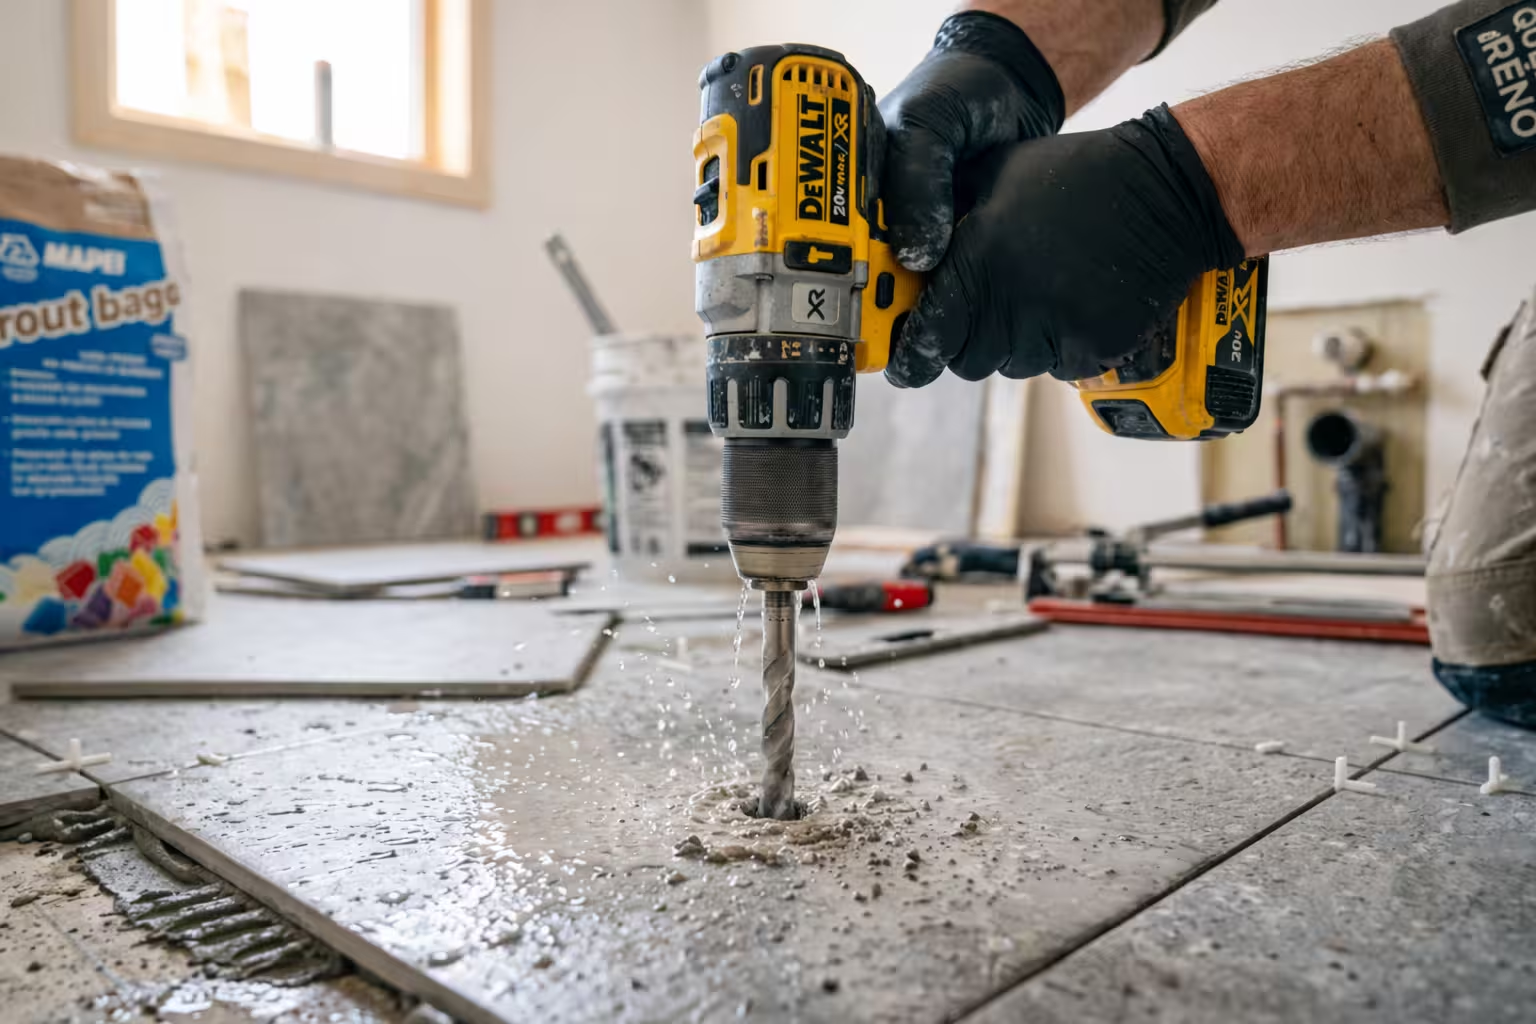
Drilling into tile and porcelain can be challenging because these materials are extremely hard but also very brittle. Using the wrong drill bit or drilling technique can easily cause cracks, chipped edges, or broken tiles.
Choosing the best drill bit for tile and porcelain ensures clean holes, reduces the risk of damage, and makes installation projects much easier.
Whether you’re installing bathroom fixtures, mounting shelves, or running plumbing through tile surfaces, the correct drill bit and drilling technique are essential.
Frequently Asked Questions About Drill Bits for Tile and Porcelain
What is the best drill bit for tile and porcelain?
The best drill bits for tile and porcelain are diamond drill bits or carbide-tipped spear-point drill bits. These bits are designed to cut through hard ceramic surfaces without cracking or chipping the tile.
Can you drill porcelain tile with a regular drill bit?
No. Standard metal or wood drill bits are not designed for hard materials like porcelain. Drilling porcelain requires diamond drill bits or specialized tile drill bits to prevent cracking and excessive wear.
Do you need a hammer drill to drill tile?
No. When drilling tile or porcelain, you should turn off the hammer function on your drill. The hammering action can crack or break the tile. Use slow speed and steady pressure instead.
What speed should you use when drilling tile?
Tile and porcelain should be drilled at low speed with light pressure. Drilling too fast creates heat and increases the risk of cracking the tile.
Do you need water when drilling porcelain tile?
Yes. Water acts as a coolant and lubricant, reducing heat and helping the drill bit cut more smoothly through the tile surface.
How do you stop a drill bit from slipping on tile?
Tile surfaces are very smooth, so drill bits can slip easily. To prevent slipping:
Place masking tape over the drilling spot
Mark the hole location clearly
Start drilling slowly to create a small guide hole
Why does tile crack while drilling?
Tile can crack due to excessive pressure, high drilling speed, using the hammer function, or using the wrong drill bit. Always use tile-specific drill bits and drill slowly.
What drill bit should you use for large holes in tile?
For larger holes in tile or porcelain, diamond hole saw drill bits are typically used. These bits allow you to drill clean circular openings for pipes, plumbing fixtures, or electrical outlets.
Can you drill through grout instead of tile?
Yes. Drilling through grout lines is sometimes easier and reduces the risk of damaging the tile. However, grout may not always provide enough strength for anchors depending on the installation.
Drilling into wood may seem simple, but choosing the right drill bit can make a huge difference in the quality of the hole. The best drill bits for wood produce clean edges, accurate holes, and smooth drilling without splintering the material.
Whether you’re building furniture, installing shelves, or working on DIY home repairs, using the correct wood drill bit helps improve precision and reduce damage to the wood surface.
In this guide, we’ll cover the best drill bits for wood, when to use each type, and how to get perfectly clean holes every time.
Wood drill bits are designed differently from metal or masonry bits. They typically include a sharp center point and cutting spurs that help guide the bit and produce cleaner holes.
Good wood drill bits should offer:
Sharp cutting edges
A center point for accurate positioning
Fast chip removal
Clean entry and exit holes
Minimal tear-out on the wood surface
These features allow the bit to cut through wood fibers efficiently while maintaining a smooth finish.
Best Types of Drill Bits for Wood
Several types of drill bits work well for wood, but each serves a different purpose depending on the type of project.
Brad Point Drill Bits (Best for Clean Holes)
Brad point drill bits are one of the best options for drilling clean holes in wood.
These bits feature a sharp center point that keeps the bit from wandering and two outer cutting spurs that slice through wood fibers before the bit removes material.
Advantages of Brad Point Bits
Extremely accurate drilling
Clean hole edges
Minimal splintering
Ideal for woodworking projects
Brad point bits are commonly used for:
Furniture building
Cabinet making
Wood joinery
Precise dowel holes
For most woodworking tasks, brad point bits are considered the best all-around drill bits for wood.
Spade Drill Bits (Best for Fast Drilling)
Spade bits, also known as paddle bits, are designed for fast drilling in wood.
They have a flat blade shape with a center point and two cutting edges.
Advantages of Spade Bits
Drill large holes quickly
Affordable and widely available
Good for rough construction work
Spade bits are commonly used for:
Running electrical cables
Plumbing installations
Framing projects
Drilling large holes in softwood
The main drawback is that they tend to produce rougher holes compared to brad point bits.
Auger Drill Bits (Best for Deep Holes)
Auger drill bits are designed for deep drilling in wood.
They feature a threaded screw tip that pulls the bit into the wood automatically while the spiral flutes remove chips efficiently.
Advantages of Auger Bits
Excellent chip removal
Ideal for deep holes
Smooth drilling action
Great for thick wood beams
Auger bits are commonly used in carpentry and construction work.
Hole Saw Bits (Best for Large Holes)
Hole saws are used when you need to create large circular holes in wood.
These bits consist of a cylindrical saw blade attached to a mandrel.
Hole saws are often used for:
Door lock installation
Electrical boxes
Pipe openings
Ventilation holes
They are excellent for drilling holes that are much larger than standard drill bits.
Choosing the Right Drill for Wood
Most wood drilling can be done with a standard cordless drill.
If you’re looking for a reliable tool for home projects, see:
Frequently Asked Questions About Drill Bits for Wood
What is the best drill bit for wood?
The best drill bit for wood is usually a brad point drill bit. Brad point bits have a sharp center tip and cutting spurs that create clean, precise holes with minimal splintering in wood.
Can you drill wood with a regular drill bit?
Yes. Standard high-speed steel (HSS) drill bits can drill wood, but they are not ideal for clean woodworking results. Specialized wood bits like brad point or spade bits provide faster drilling and cleaner holes.
What drill bit is best for drilling large holes in wood?
For large holes in wood, spade bits or hole saws are commonly used. Spade bits are great for fast rough holes, while hole saws create larger and cleaner circular openings.
What speed should you drill wood at?
Wood can usually be drilled at medium to high speeds depending on the drill bit size. Larger bits should be used at lower speeds to maintain control and prevent overheating.
How do you prevent wood from splintering when drilling?
To prevent splintering:
Use brad point drill bits
Place a scrap wood backing board behind the material
Drill slowly when exiting the wood
Use sharp drill bits
These techniques help produce cleaner holes in wood.
Why does my drill bit burn the wood?
Drill bits can burn wood when they are dull, spinning too fast, or when too much pressure is applied. Excessive friction generates heat that scorches the wood surface.
Can you use masonry drill bits on wood?
Masonry drill bits can technically drill wood, but they are not designed for wood fibers and usually produce rough holes. Wood-specific bits will always provide better results.
What drill bit is best for deep holes in wood?
Auger drill bits are ideal for drilling deep holes in wood. Their threaded tip pulls the bit into the wood while the spiral flutes remove wood chips efficiently.
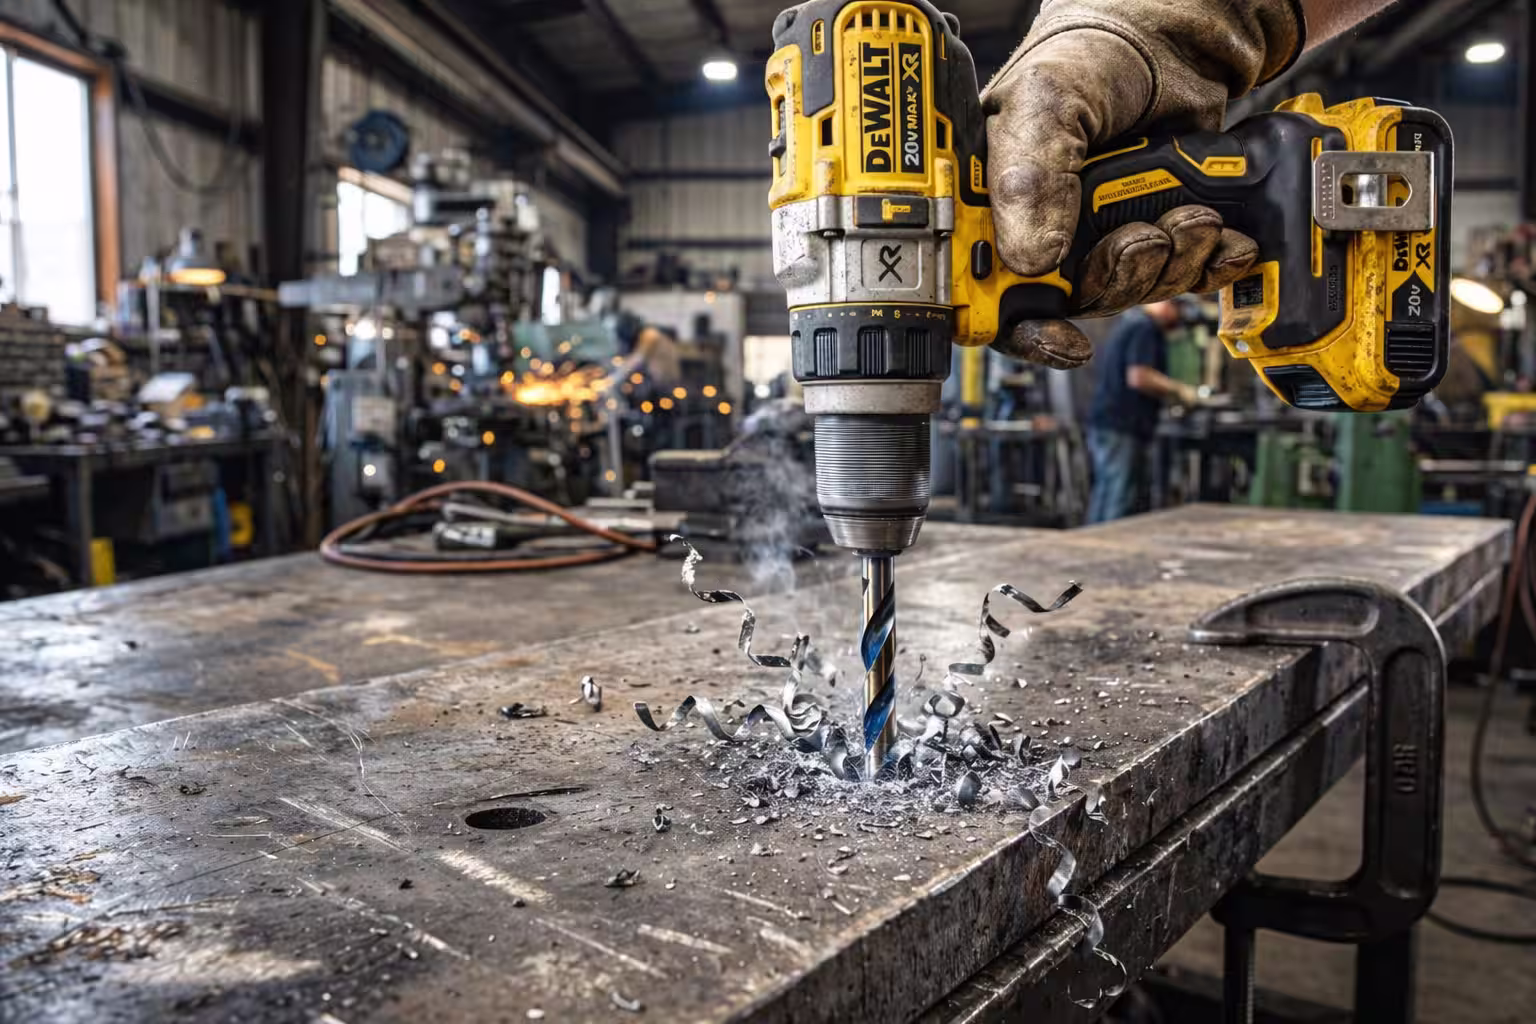
Drilling into metal requires stronger drill bits than those used for wood or masonry. Using the wrong drill bit can cause overheating, dull edges, or broken bits.
The best drill bit for steel and metal depends on the type of metal you’re drilling. Softer metals like aluminum require different drill bits than harder materials such as stainless steel or hardened steel.
In this guide, we’ll explain the best drill bits for metal, how they work, and how to choose the right one for your project.
Frequently Asked Questions About Drill Bits for Steel and Metal
What is the best drill bit for drilling steel?
The best drill bits for steel are cobalt drill bits (M35 or M42) because they can withstand high heat and maintain their cutting edge when drilling hard metals like stainless steel and hardened steel.
Can you drill steel with a regular drill bit?
Yes, but only if the drill bit is made from high-speed steel (HSS). Standard HSS bits can drill mild steel and softer metals, but harder materials like stainless steel require cobalt drill bits for better durability.
What is the difference between cobalt and titanium drill bits?
Titanium-coated drill bits reduce friction and last longer than standard HSS bits when drilling softer metals. Cobalt drill bits, however, are much more heat-resistant and are better suited for drilling harder metals like stainless steel.
What speed should you use when drilling steel?
Steel should be drilled at low to moderate speed with steady pressure. Slower speeds help reduce heat buildup and prevent the drill bit from dulling too quickly.
Do you need cutting oil when drilling metal?
Yes. Cutting oil or drilling lubricant helps reduce friction and heat when drilling metal. This extends the life of the drill bit and improves cutting performance.
Why does my drill bit stop cutting metal?
Drill bits may stop cutting metal due to excessive heat, dull cutting edges, incorrect drilling speed, or lack of lubrication. Using cutting oil and slower speeds can significantly improve drilling performance.
Can you drill stainless steel with a regular drill?
Drilling stainless steel requires cobalt drill bits and low drilling speed. Regular HSS drill bits often dull quickly when used on stainless steel because the material is very hard.
What drill bit should you use for aluminum?
Aluminum can be drilled using standard HSS drill bits or titanium-coated bits. Because aluminum is softer than steel, drilling usually requires less pressure and higher speeds.
How do you prevent drill bits from overheating when drilling metal?
To prevent overheating:
Use cutting oil
Drill at low speed
Apply steady pressure
Pull the bit out occasionally to remove metal chips
These steps help reduce heat and extend drill bit life.
Drilling into brick or masonry requires the correct tools and drill bits. Using the wrong drill bit can cause slow drilling, damaged bits, or even cracked brick surfaces.
The best drill bit for brick and masonry is typically a carbide-tipped masonry drill bit, designed to withstand the abrasive nature of brick, mortar, and masonry materials.
In this guide, we’ll explain the best drill bits for brick and masonry, how they work, and how to choose the right one for your project.
Frequently Asked Questions About Brick and Masonry Drill Bits
Brick and Masonry Drill Bit FAQs
What is the best drill bit for brick and masonry?
The best drill bits for brick and masonry are carbide-tipped masonry drill bits. These bits are designed to cut through hard materials like brick, mortar, and stone while resisting wear and heat during drilling.
Can you drill into brick with a regular drill bit?
No. Standard wood or metal drill bits will dull quickly and struggle to penetrate brick. You should always use masonry drill bits with carbide tips, which are specifically designed for brick and stone.
Do you need a hammer drill to drill into brick?
A hammer drill is recommended when drilling into brick because the hammering action helps break the masonry material while the drill bit rotates. However, softer brick can sometimes be drilled with a regular drill and a masonry bit.
Should you drill into brick or mortar?
It is usually better to drill into mortar joints rather than brick. Mortar is softer and easier to repair if you need to remove anchors later, while drilling directly into brick can sometimes cause cracks.
What speed should you drill brick at?
Brick should be drilled at moderate speed with steady pressure. Let the hammer drill and masonry bit do the work rather than forcing the drill into the material.
Why does my masonry drill bit stop drilling?
Masonry drill bits may stop cutting if the bit becomes dull, overheats, or gets clogged with brick dust. Pulling the drill bit out occasionally to remove dust can help maintain drilling efficiency.
What drill bit size should you use for masonry anchors?
The drill bit size should match the diameter of the masonry anchor or wall plug you plan to install. For example, a 6 mm wall plug usually requires a 6 mm masonry drill bit.
Can masonry drill bits be used for concrete?
Yes. Many masonry drill bits can drill into brick, mortar, stone, and light concrete, although very hard concrete may require SDS drill bits and a rotary hammer drill.
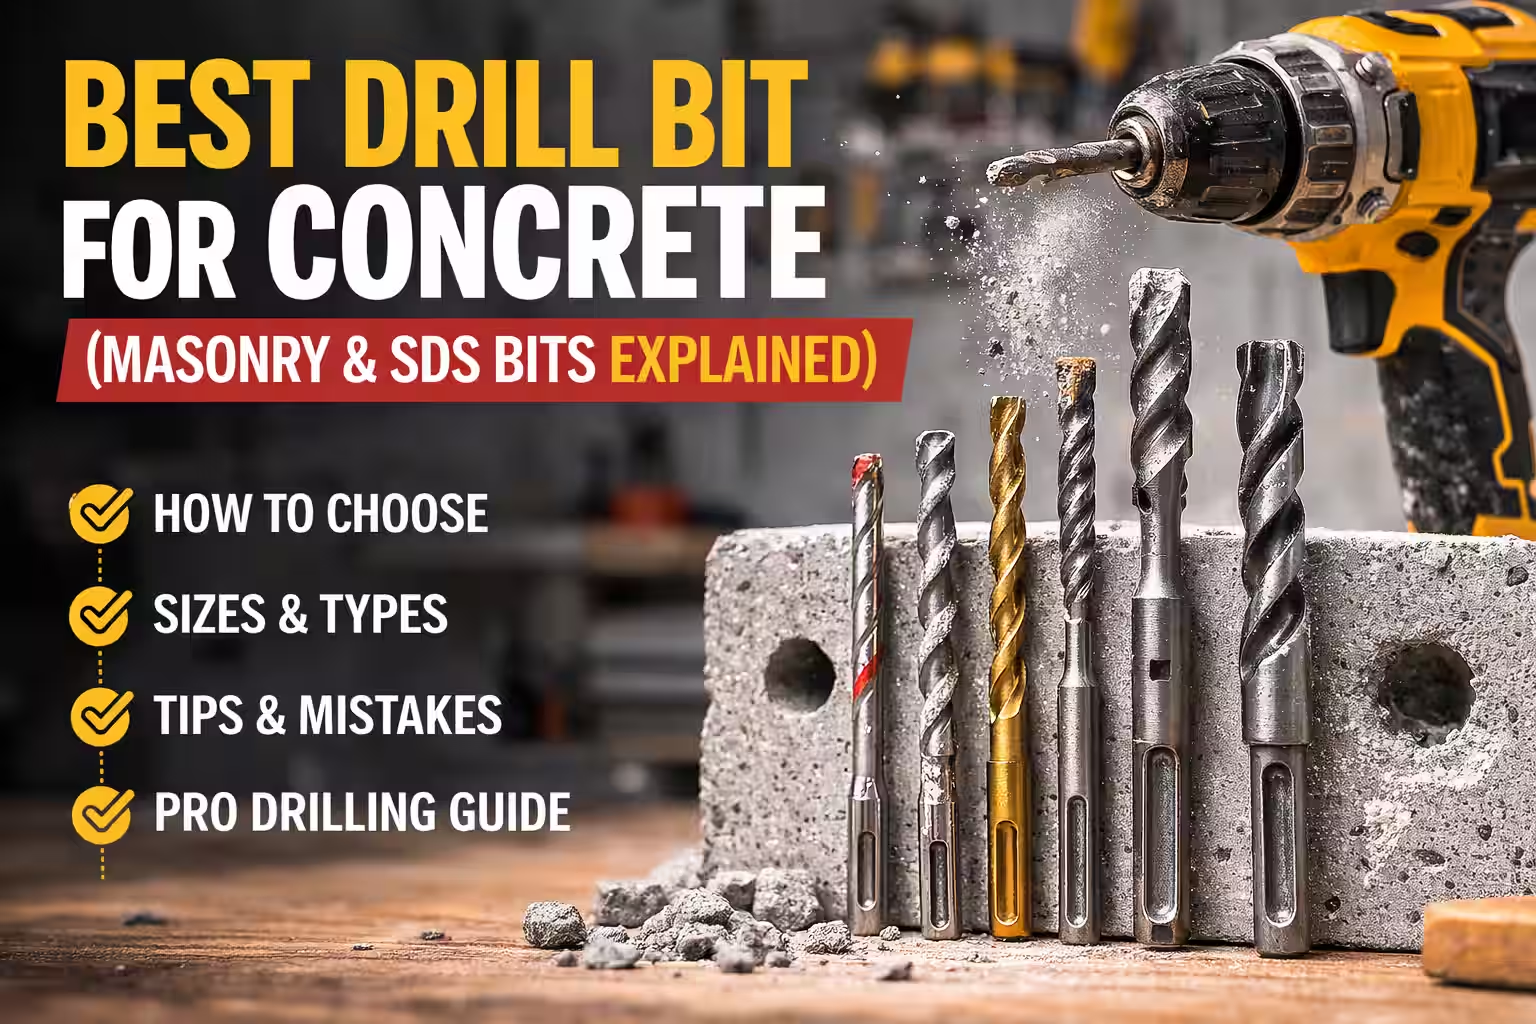
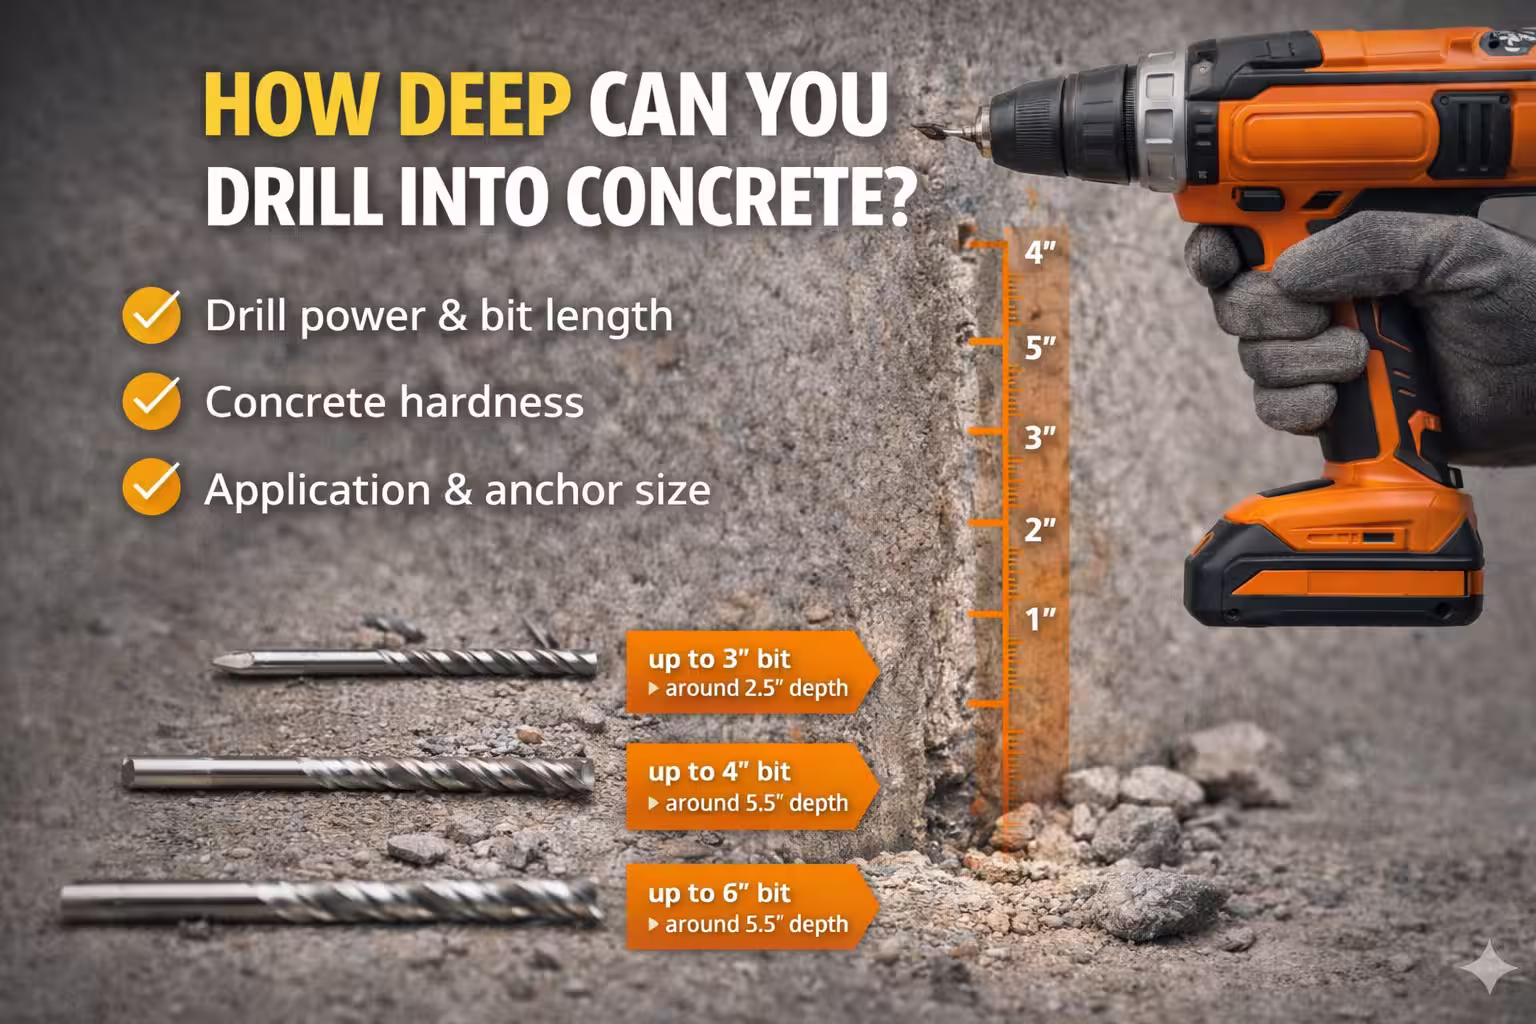
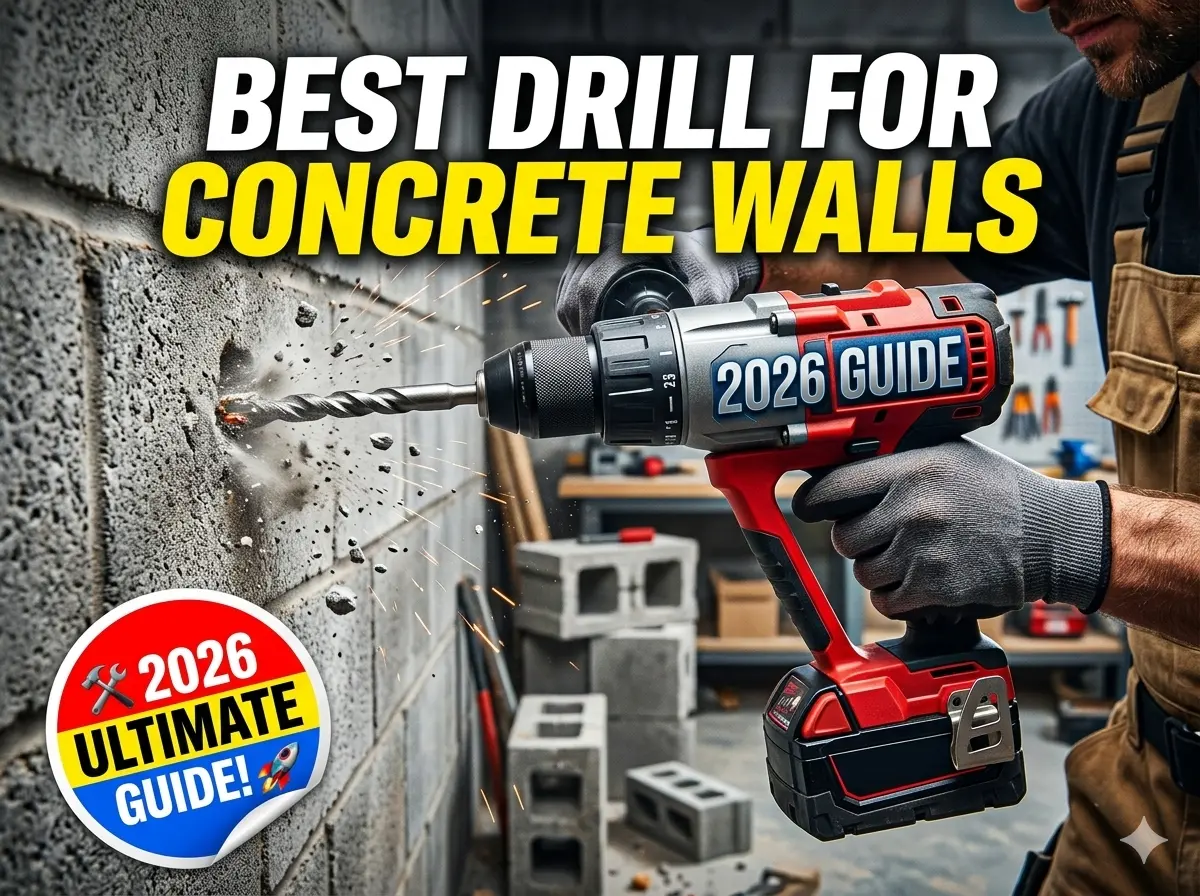
Drilling into concrete requires the best drill bit for concrete if you want clean holes, faster drilling, and longer tool life. Concrete is extremely dense and abrasive, which means regular drill bits will quickly dull or break.
Using the correct masonry drill bit makes a huge difference when installing anchors, mounting shelves, or securing fixtures into concrete walls.
In this guide, we explain the best drill bits for concrete, how they work, and how to choose the right one for your project.
Drill Bits for Concrete Comparison Table
Before diving into details, here is a quick comparison of the most common concrete drill bits.
Drill Bit Type
Best For
Drill Type
Key Feature
Carbide Masonry Bit
Light concrete drilling
Standard drill / hammer drill
Carbide cutting tip
SDS Plus Bit
Heavy concrete drilling
Rotary hammer
Quick-lock SDS shank
SDS Max Bit
Professional construction
Rotary hammer
Large diameter drilling
Multi-Purpose Bit
Brick and concrete
Standard drill
Versatile cutting edge
Most homeowners will use carbide masonry bits, while professionals often use SDS bits with rotary hammers.
What Makes a Good Concrete Drill Bit
The best drill bits for concrete share several important design features that allow them to penetrate hard materials.
Carbide Cutting Tip
Concrete drill bits usually have a tungsten carbide tip brazed onto the end of the bit. This material is extremely durable and can withstand the impact created by hammer drilling.
Spiral Flutes
Concrete bits have deep spiral flutes designed to remove dust and debris from the hole while drilling.
Impact Resistance
Unlike metal drill bits, masonry bits are designed to handle the repeated impact created by hammer drills.
Frequently Asked Questions About Drill Bits for Concrete
What is the best drill bit for concrete?
The best drill bits for concrete are carbide-tipped masonry drill bits or SDS drill bits. These bits are specifically designed to withstand the impact and hardness of concrete, brick, and stone when used with hammer drills or rotary hammers.
Can you drill concrete with a regular drill bit?
No. Standard metal or wood drill bits are not designed for concrete and will dull quickly or break. Concrete requires masonry drill bits with carbide tips that can handle the hardness of the material.
What is the difference between masonry drill bits and SDS drill bits?
Masonry drill bits are used with standard hammer drills, while SDS drill bits are designed for rotary hammer drills. SDS bits have a special shank that locks into the drill and allows better impact energy transfer when drilling into concrete.
Do you need a hammer drill to drill concrete?
A hammer drill is strongly recommended for drilling concrete. The hammering action helps break up the concrete while the drill bit rotates, making the drilling process much faster and easier.
What drill speed should you use for concrete?
Concrete should be drilled at moderate speed with steady pressure. Let the hammering action do most of the work instead of forcing the drill bit into the material.
Why does my concrete drill bit stop cutting?
Concrete drill bits may stop cutting because of overheating, dull carbide tips, hitting rebar, or excessive dust buildup in the hole. Removing the bit periodically to clear dust can help maintain drilling efficiency.
Can you drill through rebar in concrete?
Standard masonry drill bits cannot easily drill through steel rebar. If you hit rebar, you may need to switch to a metal drill bit or specialized rebar cutter before continuing with the masonry bit.
What size drill bit should you use for concrete anchors?
The drill bit size should match the diameter of the concrete anchor you are installing. For example, a 1/4-inch anchor typically requires a 1/4-inch masonry drill bit.
Choosing the Best Drill Bit For Every Material isn’t just about making a hole; it’s a high-stakes game of metallurgy, thermal management, and matching the right geometry to your substrate. At BuildToolHQ, we’ve spent thousands of hours testing HSS, Cobalt, and Carbide across every imaginable surface—from soft pine to hardened industrial alloys—to bring you this definitive 2026 guide. 🧬
Whether you are a professional contractor managing a job site or a weekend DIYer tackling a home renovation, understanding the Best Drill Bit For Every Material will save you a fortune in snapped bits and ruined workpieces. In this expanded guide, we dive deep into the mechanical science of cutting to ensure your toolkit is ready for the most demanding technical challenges. 🚀
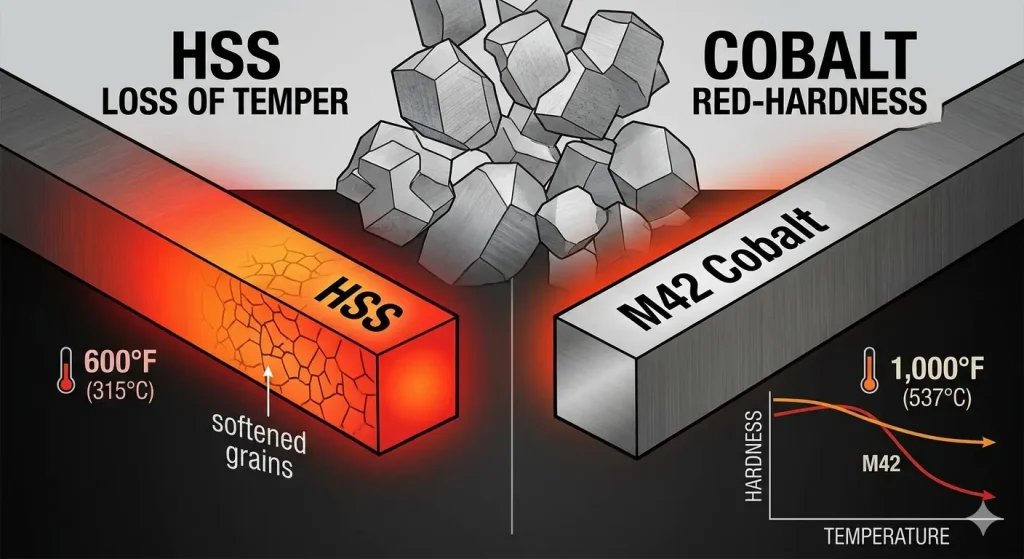
Scientific comparison of HSS and M42 Cobalt under extreme drilling temperatures. Note how M42 Cobalt maintains structural integrity at 1,000°F, while standard HSS softens and loses its temper at just 600°F.
🏗️ The Core Hierarchy: Matching Bit to Substrate
Selecting the Best Drill Bit For Every Material begins with identifying the “Hardness Gap” between your bit and the workpiece. If your bit isn’t significantly harder than the material, you aren’t drilling—you’re just generating friction and smoke. 🔥
1. Ferrous and Non-Ferrous Metals 🔩
For general metalworking, High-Speed Steel (HSS) is the baseline. However, as industrial drilling standards have evolved, we now see a massive shift toward Cobalt and Titanium coatings for heat resistance.
These require a percussive “hammering” action. You cannot use a standard twist bit here; you need a tungsten carbide tip that can withstand the impact of a rotary hammer.
Scientific comparison of High-Speed Steel (HSS) and M42 Cobalt (8% Cobalt) tool steels under load. Standard HSS bits lose their structural temper and soften completely once they reach approximately 600°F (315°C). M42 Cobalt, in contrast, maintains its critical “red-hardness,” remaining stable and capable of cutting even when temperatures surpass 1,000°F (537°C). (Refer to our specialized metallurgy testing methodology).
To truly find the Best Drill Bit For Every Material, we must look at the atomic level. The material of your bit dictates its “red-hardness”—the ability to maintain a sharp cutting edge while glowing hot in the middle of a deep bore. 🌡️
HSS vs. Cobalt Performance: The 2026 Standard
Standard HSS is excellent for plastics and softwoods. However, HSS loses its “temper” and softens at approximately 600°F (315°C). Once this temperature is reached, the bit is effectively dead. 💀
In contrast, Cobalt bits (M35 or M42) are engineered for superior heat dissipation:
M35 Cobalt (5% Cobalt): The gold standard for most home workshop stainless steel applications.
M42 Cobalt (8% Cobalt): This is the Best Drill Bit For Every Material involving high-grade industrial alloys or hardened bolts. Cobalt remains stable past 1,000°F (537°C), allowing you to drill through high-friction zones without the edge rounding off.
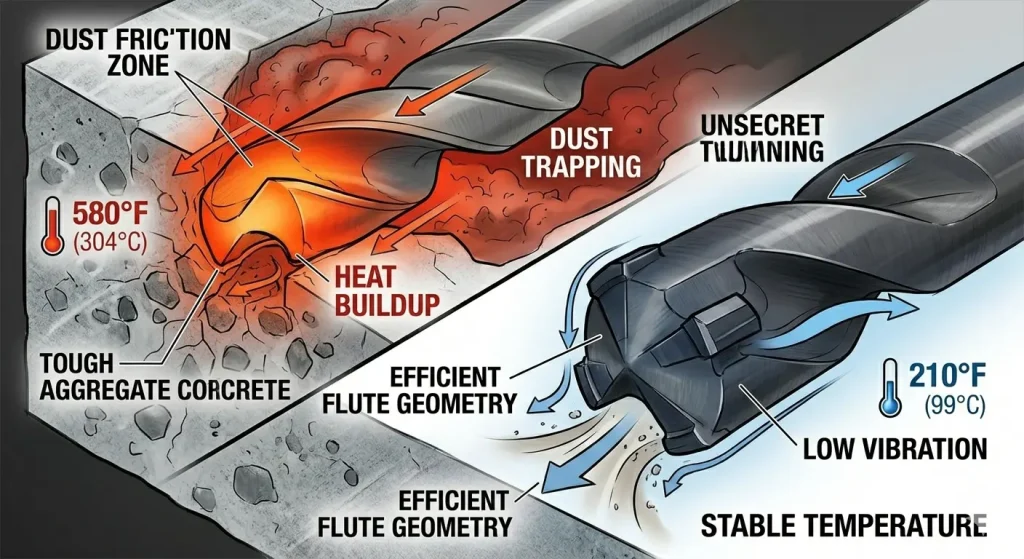
Visualizing the destructive “Friction-Heat-Dull” cycle. A standard bit (top left) traps dust, causing extreme heat (visualized by the red glow) that softens the cutting edge, leading to catastrophic failure. Conversely, a modern 4-cutter SDS geometry (bottom right) optimizes dust evacuation and reduces vibration, maintaining a stable temperature and ensuring efficient material removal.
The biggest enemy of the Best Drill Bit For Every Material is the Friction-Heat-Dull cycle. As the bit rotates, friction generates heat. If that heat isn’t evacuated via the “flutes” (the spiral grooves), the cutting edge expands and loses its sharpness. 📉
4-Cutter Geometries in SDS Bits 🛠️
In heavy masonry work, heat buildup is extreme. Modern 4-cutter geometries in SDS bits reduce vibration and heat buildup compared to the old 2-cutter style. Instead of two cutting faces fighting the aggregate, four faces distribute the load, which:
Prevents the bit from seizing on rebar. 🏗️
Creates a perfectly round hole for better anchor setting.
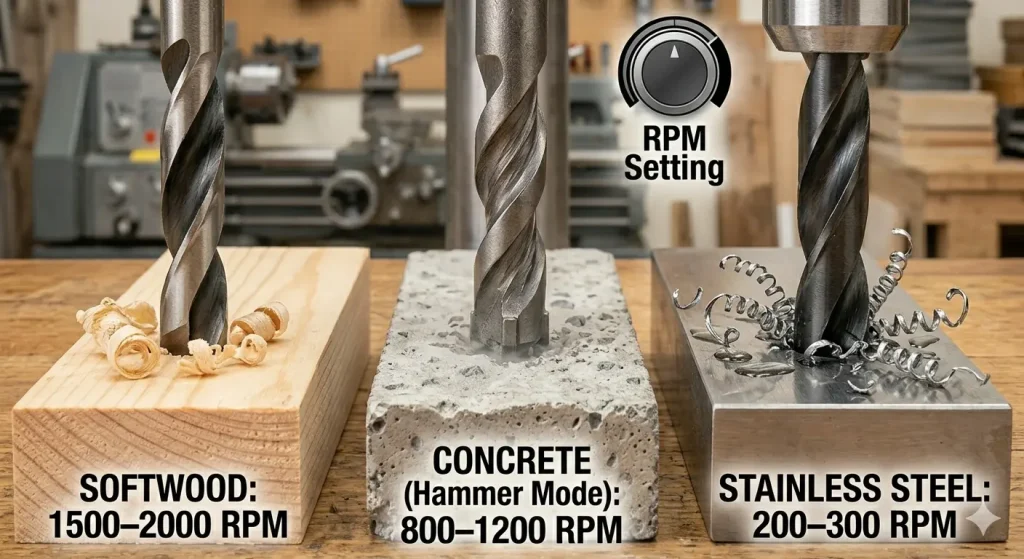
A “Workshop-First” look at the correlation between material density and drill speed. Notice the aggressive wood chips from the high-speed setting (1500+ RPM) compared to the tight metal “swarf” spirals produced at the much slower, high-torque speed (200-300 RPM) required for stainless steel. 🛠️
Using the Best Drill Bit For Every Material effectively requires the correct speed. Faster is rarely better when it comes to hard substrates. Use this table to calibrate your drill press or handheld driver. ⏱️
Material
Bit Type
Recommended RPM (1/4″ Bit)
Pressure Level
Mild Steel
HSS/Cobalt
400–500 RPM
Medium/High 🏋️
Stainless Steel
Cobalt (M42)
200–300 RPM
High/Consistent 🔨
Softwood
Brad Point
1500–2000 RPM
Light ☁️
Concrete
SDS Carbide
800–1200 RPM (Hammer)
Medium 🏗️
Porcelain
Diamond Grit
100–200 RPM
Very Light 💧
Cast Iron
Carbide Tipped
300–400 RPM
Medium
🌲 Woodworking: Precision Over Power
When seeking the Best Drill Bit For Every Material in a wood shop, you aren’t fighting heat; you’re fighting “tear-out” and grain splintering. 🪚
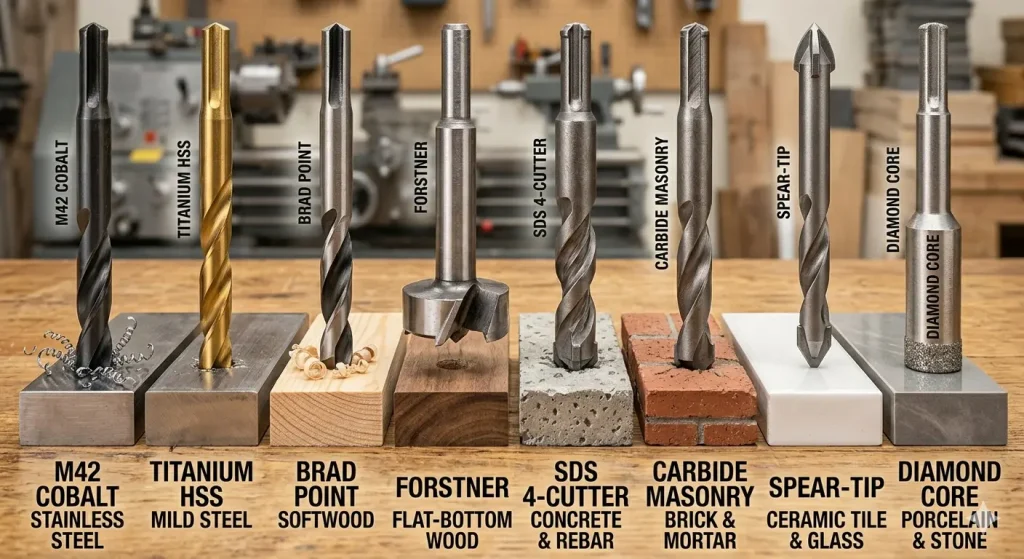
Brad Point Bits: These feature a sharp center spur that prevents “walking” and ensures the hole is exactly where you marked it.
Forstner Bits: These are the Best Drill Bit For Every Material involving flat-bottomed holes for hinges or clean-exit holes in cabinetry.(Read our full guide to the👉 [Best Drill Bit for Wood (Clean Holes & Fast Drilling)].
💎 The Fragile Frontier: Tile, Glass, and Porcelain
Matching geometry to fragility. The Carbide Spear-Tip (left) is engineered for the lower density of ceramic and standard glass, while the Diamond Core Bit (right) is a mechanical necessity for grinding through high-density porcelain and stone without causing catastrophic fractures.
Drilling into a $100 porcelain slab requires the Best Drill Bit For Every Material designed for abrasion. If you use a standard twist bit, the tile will crack instantly. 💔
Carbide Spear-Tip: Perfect for basic ceramic tiles and non-tempered glass.
Diamond Core Bits: These are essential for modern porcelain. They don’t “cut”; they grind. Pro-Tip: Always use water as a coolant to prevent the diamond bond from melting. 💦(Read our full guide to the👉 [Best Drill Bit for Tile and Porcelain].
🏗️ Masonry vs. Concrete: Decoding the Substrate
Many beginners confuse these two, but the Best Drill Bit For Every Material list separates them for a clear reason: Reinforcement.
Standard Masonry Bits: Use a “shoveling” action perfect for brick, mortar, and cinder blocks. (Read our full guide to 👉[Masonry Drill Bits vs Concrete Drill Bits] here).
SDS Concrete Bits: Designed for the high-impact energy of a rotary hammer, these bits can handle the heavy aggregate and occasional rebar strikes found in structural concrete.
⚠️ Why Drill Bits Burn or Break (And How to Prevent It)
Even the Best Drill Bit For Every Material will fail if you ignore the laws of physics. Understanding the “Why” is just as important as the “How.” 🚩
Excessive RPM: Running a bit too fast for the material creates a “glaze” on the metal, making it impossible to cut further.
Lack of Lubrication: When drilling metal, cutting oil is non-negotiable. It reduces friction and carries heat away.
Side Loading: Drill bits are designed for vertical pressure, not lateral force. Tilting the drill mid-hole is the #1 cause of snapped bits. 🚫
🛠️ Specialized Tooling: Beyond the Standard Twist Bit
🛠️ BuildToolHQ Recommended Watch: To see the science of the ‘Best Drill Bit For Every Material’ in action, check out Haas Automation’s ‘Basics of Drill Selection.’ It’s a masterclass in how industrial standards for coatings and geometries ensure maximum tool life and precision.
For those looking to master industrial drilling standards, this resource from Haas Automation provides a deep dive into the engineering behind tool selection. Manufacturing Engineer Andrew Harnett breaks down the specific technical advantages of HSS, Cobalt, and Carbide within a high-precision machining environment. 🛠️
To be the Best Drill Bit For Every Material expert, you must know when to move beyond the standard spiral.
Step Bits (Unibits): The ultimate tool for thin sheet metal and PVC. They allow you to enlarge holes without the bit “grabbing” the material. 🪜
Self-Feeding Auger Bits: Best for boring deep, large-diameter holes through thick timber or landscape ties.
Countersink Bits: Essential for ensuring screw heads sit flush with the surface for a professional finish.
🛡️ Pro-Tips for Workshop Success
🔥 Pro-Tip: The “Peck Drilling” Technique
When drilling deep holes in metal or wood, use a “pecking” motion. Pull the bit out every 1/4 inch to clear the chips. This prevents the flutes from clogging and keeps the temperature down.
🛠️ Safety Warning: Eye Protection
When using the Best Drill Bit For Every Material, especially metal or masonry, high-velocity shards are guaranteed. Always wear ANSI Z87.1 rated safety glasses. 👓
❓ Frequently Asked Questions (FAQ)
Can I use a metal bit to drill through wood? 🪵
Technically yes, but HSS metal bits often leave “fuzz” or significant tear-out on the backside of the wood. For furniture-grade results, a Brad Point bit is the Best Drill Bit For Every Material involving timber.
Is Titanium really better than Cobalt? 🧪
It depends. Titanium bits are HSS bits with a surface coating. They are great for high-speed drilling in soft metals. However, once the coating wears off, it’s just a standard HSS bit. Cobalt is an alloy—the heat resistance goes all the way through the bit, allowing you to resharpen it.
Why is my masonry bit glowing red and smoking?
You are likely using too high an RPM or haven’t cleared the dust from the hole. In concrete, dust acts as an insulator, trapping heat. Pull the bit back frequently to “pump” the dust out.
What is the best bit for hardened steel or Grade 8 bolts? ⚡
Standard bits will fail. You need M42 Cobalt or a solid Tungsten Carbide bit. Use very low RPM and extremely high pressure.
How do I know if my bit is dull? 🛑
If the bit produces fine powder instead of “chips” (swarf) in metal, or if you see “blueing” (heat discoloration) on the tip, it is dull. Stop immediately to avoid damaging your drill motor.
Final Thoughts on Selection 🏆
Finding the Best Drill Bit For Every Material is a balance of metallurgy, geometry, and patience. By investing in M42 Cobalt for your metals, 4-cutter Carbide for your masonry, and Diamond grit for your fragile porcelain, you ensure that every project meets the “BuildToolHQ” standard of excellence.
Remember, the Best Drill Bit For Every Material is the one that stays cool, stays sharp, and gets the job done safely. Happy drilling! 🛠️✨
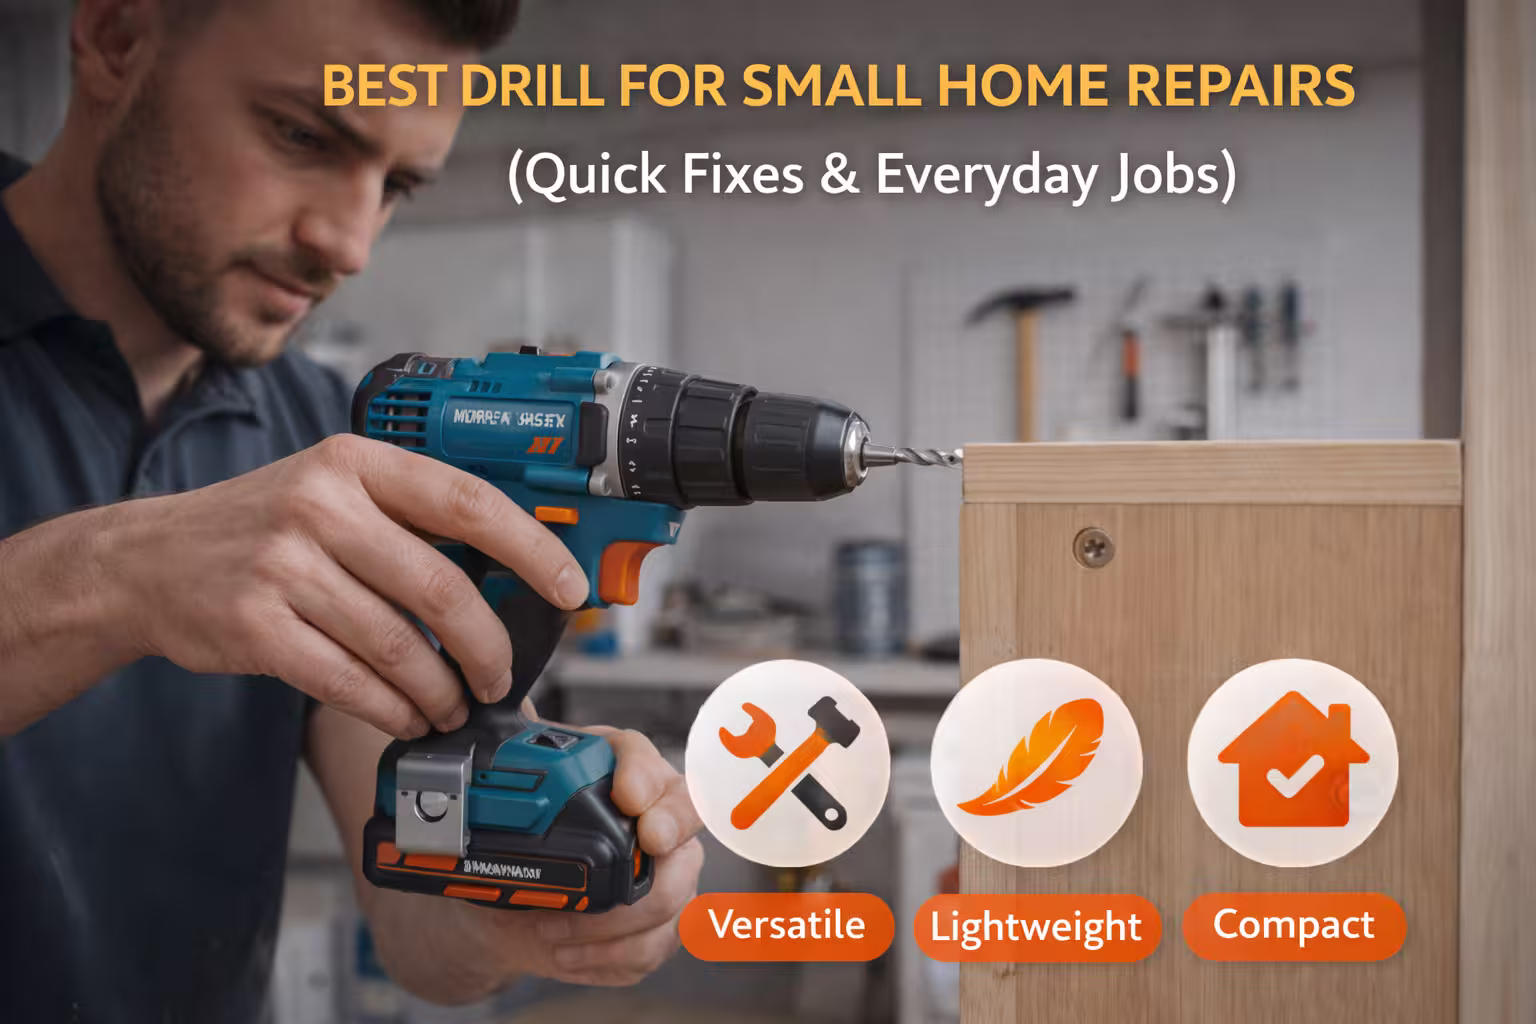
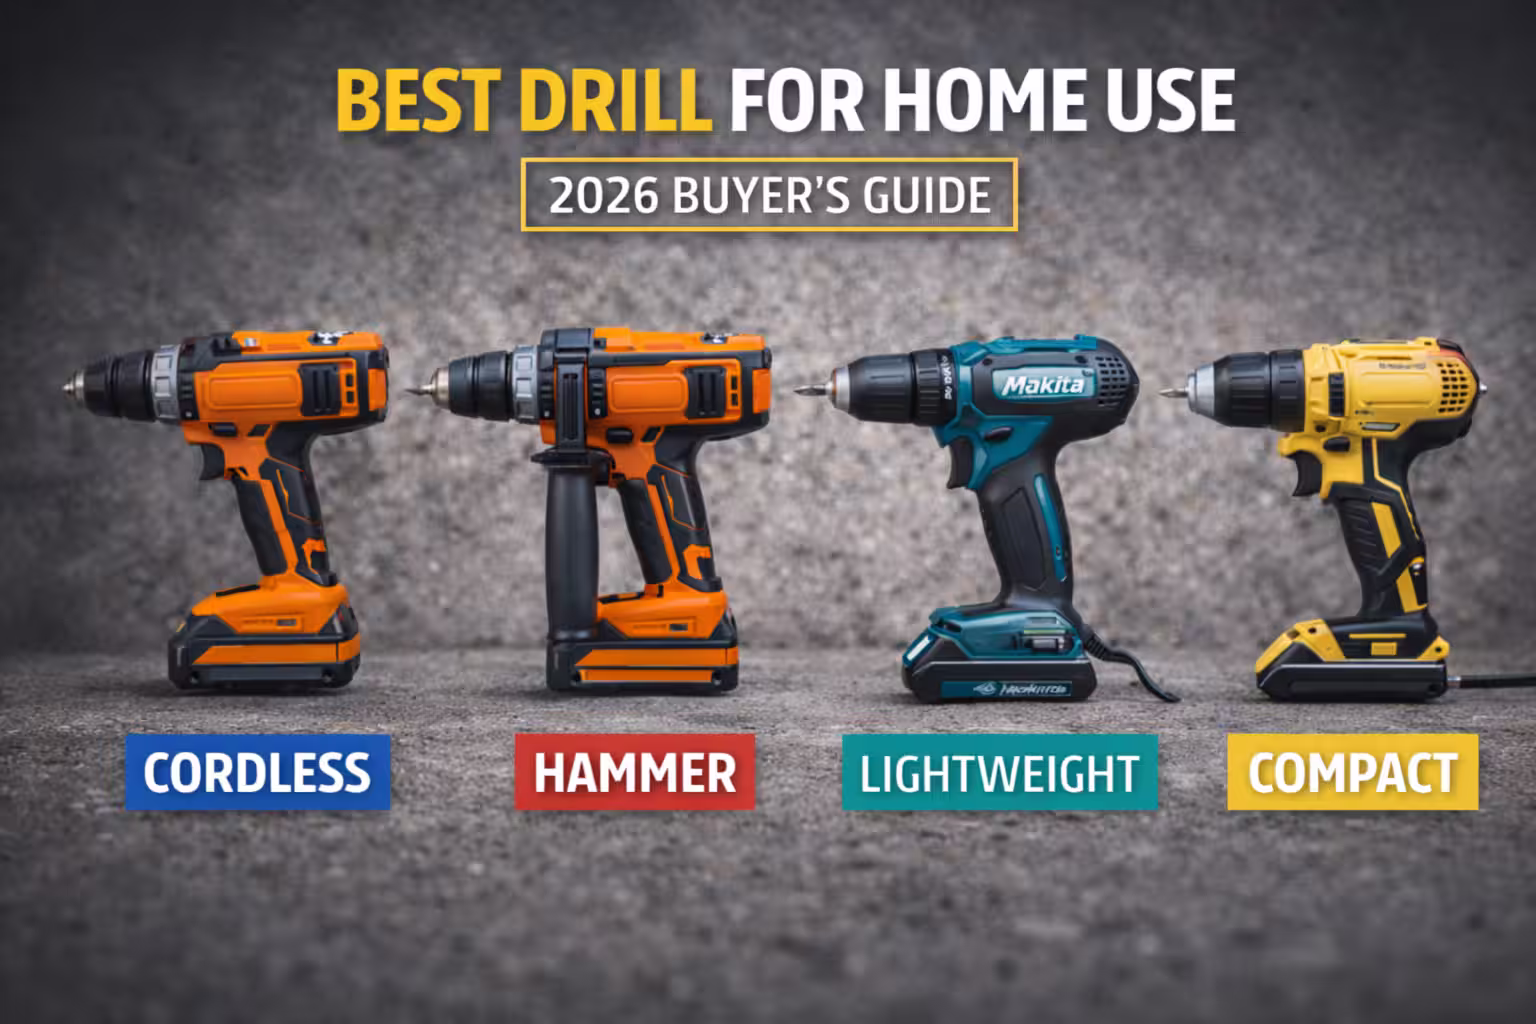
Not every home project requires a powerful or expensive tool. For many homeowners, the best drill for small home repairs is one that’s lightweight, easy to control, and ready to handle quick fixes without hassle.
This guide explains what makes a drill ideal for small repairs, which features matter most, and how to avoid buying more drill than you actually need for everyday household tasks.
What Counts as Small Home Repairs?
Small home repairs usually include:
Tightening loose screws
Fixing cabinet hinges
Installing hooks and curtain rods
Hanging pictures and frames
Assembling small furniture
Minor adjustments and maintenance
These tasks require precision and convenience, not heavy-duty power.
Can one drill handle both small and medium repairs?
Yes. A quality cordless drill with adjustable settings can handle most homeowner tasks.
Is an impact driver better for small repairs?
Impact drivers are great for driving screws but are not ideal for drilling holes.
Should beginners start with a compact drill?
Yes. Compact drills are easier to control and reduce the risk of mistakes.
Conclusion: The Best Drill for Small Home Repairs
The best drill for small home repairs is one that prioritizes control, comfort, and convenience. For most homeowners, a lightweight cordless drill with adjustable speed and torque is more than enough for everyday fixes.
Choosing the right drill makes small repairs faster, easier, and far less frustrating.
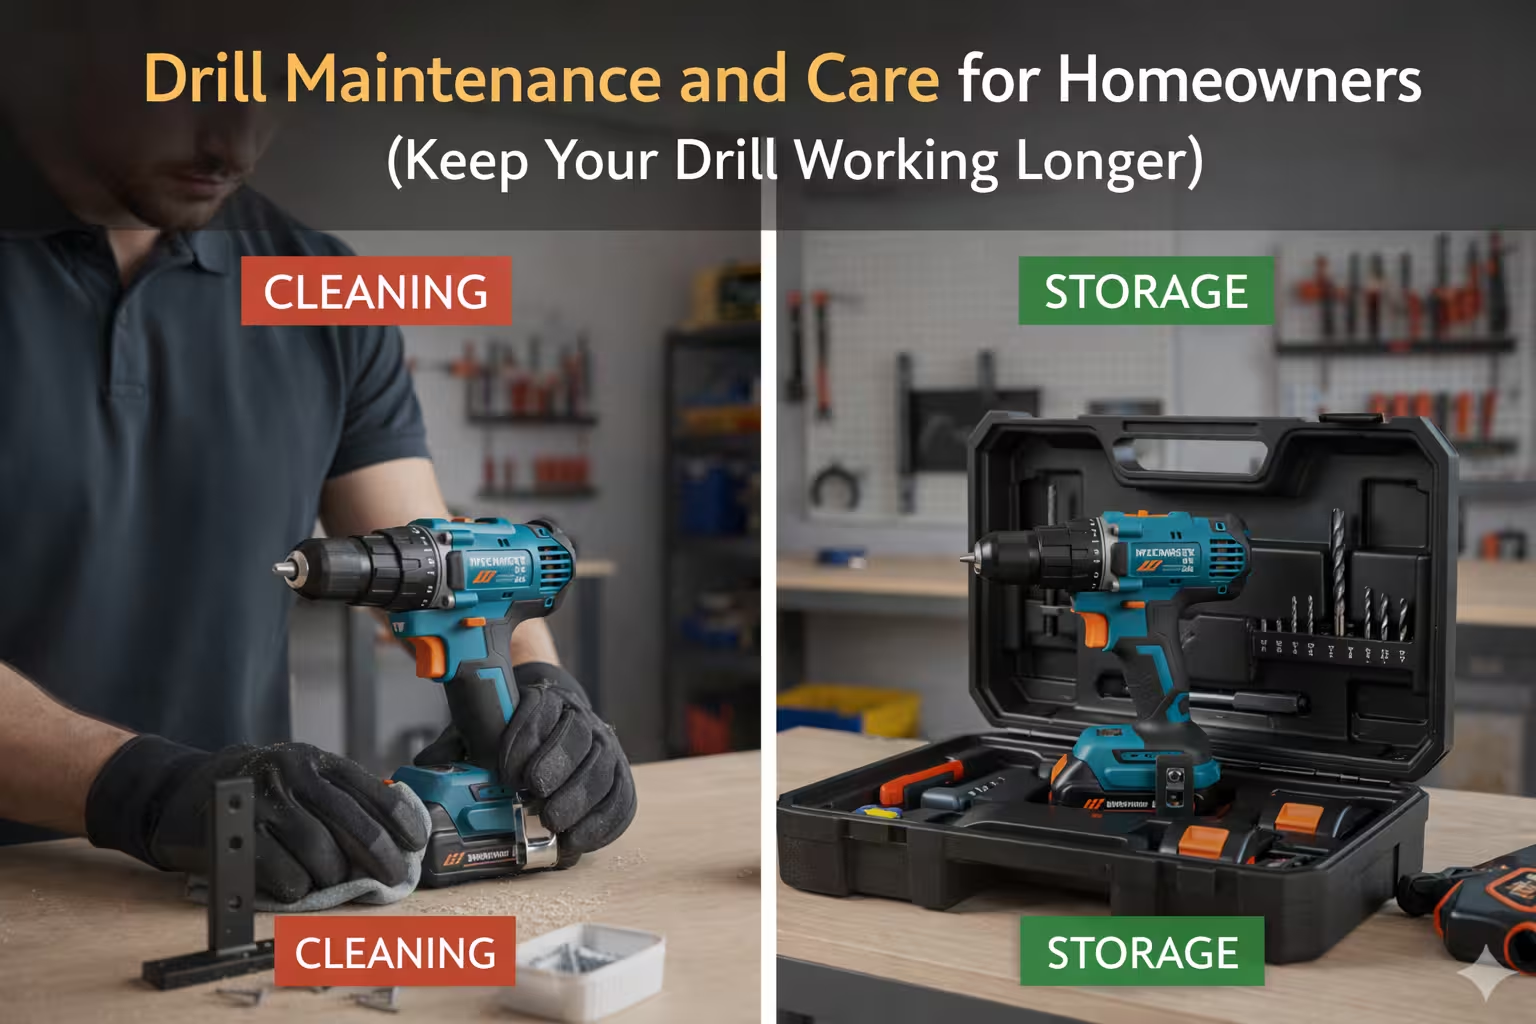
Proper drill maintenance and care is often overlooked by homeowners. Many drills fail early not because they are low quality, but because they are poorly maintained. Dust buildup, dull bits, neglected batteries, and improper storage can dramatically shorten a drill’s lifespan.
This guide explains how homeowners can maintain and care for their drills correctly, so tools last longer, perform better, and remain safe to use for DIY projects.
Why Drill Maintenance Matters
Regular maintenance helps:
Extend the life of your drill
Improve drilling performance
Reduce overheating and motor strain
Prevent safety issues
A well-maintained drill delivers consistent power and better control, especially during repeated home projects.
Light cleaning after each use and deeper inspection every few months is ideal.
Do drills need lubrication?
Only specific parts like chucks may need light lubrication. Follow manufacturer guidance.
Can poor maintenance affect drilling quality?
Yes. Poorly maintained drills produce uneven holes and reduce accuracy.
Conclusion: Drill Care Saves Time and Money
Drill maintenance and care are simple but essential. Cleaning after use, inspecting bits, caring for batteries, and storing drills properly can extend tool life significantly.
For homeowners, a few minutes of maintenance prevents frustration, improves performance, and protects your investment.
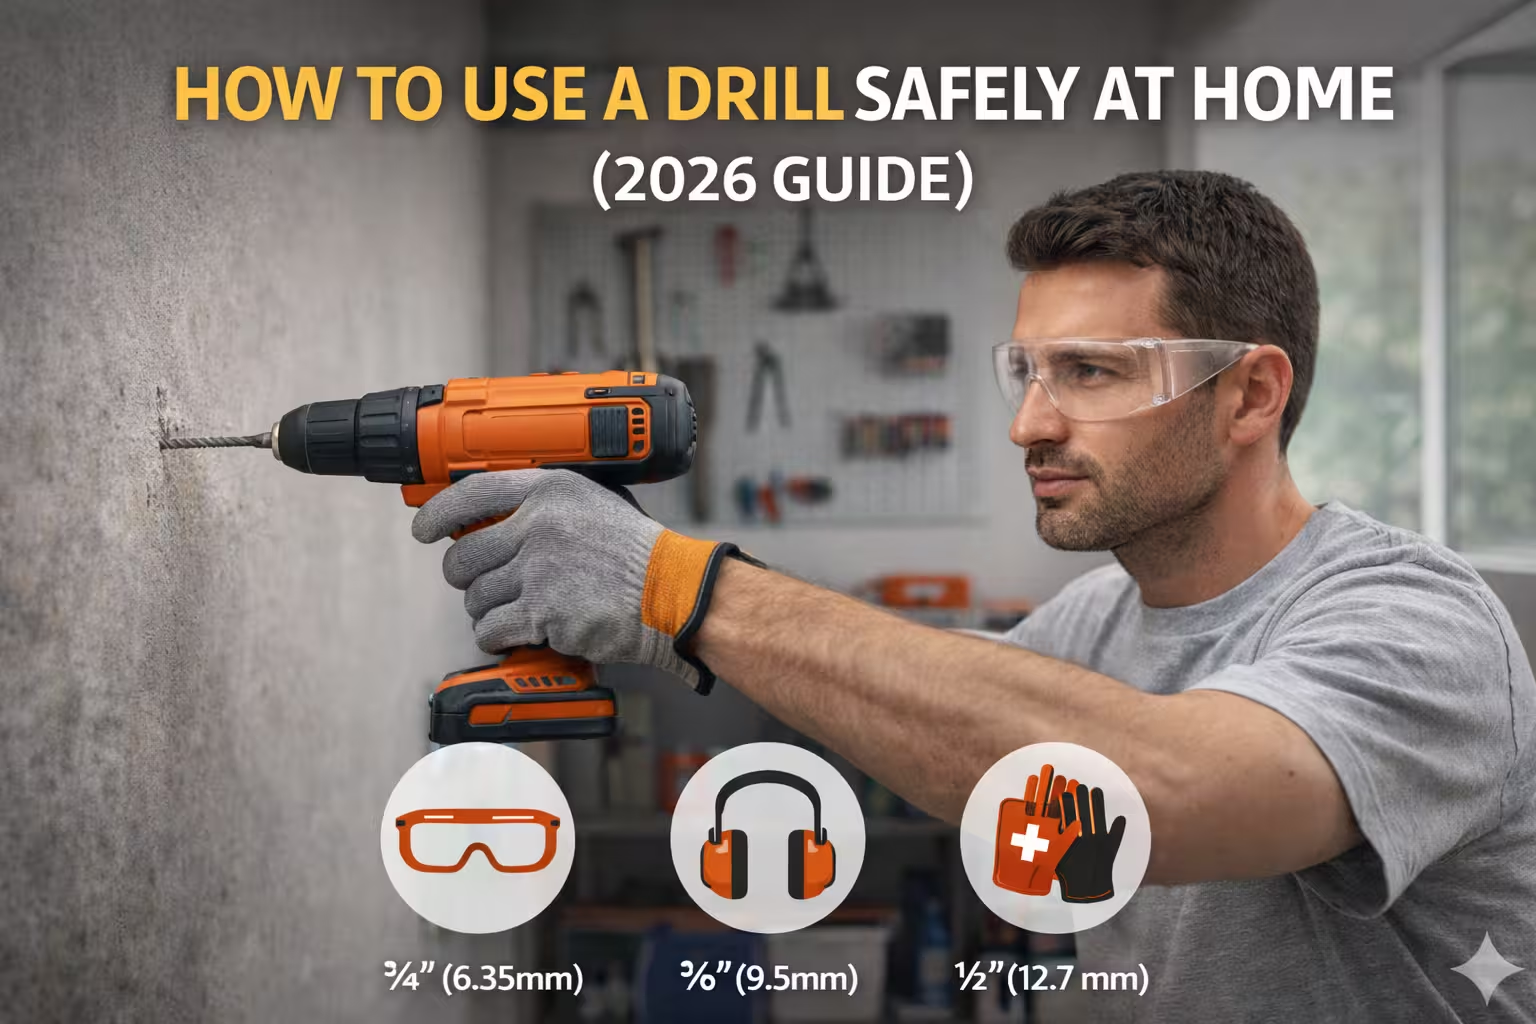
Knowing how to use a drill safely at home is just as important as choosing the right drill. Many homeowner injuries and damaged projects happen not because of bad tools, but because of unsafe drilling habits and skipped precautions.
This guide explains essential drill safety practices for home use, including preparation, proper technique, and common hazards to avoid—so you can complete DIY projects confidently and safely.
Why Drill Safety Matters for Homeowners
Drills are powerful tools capable of causing:
Hand and eye injuries
Damaged walls and materials
Broken drill bits
Loss of control or kickback
Even small DIY projects require basic safety awareness to prevent accidents.
Drilling is safe when basic precautions are followed and the right drill is used.
Should I unplug or remove the battery when changing bits?
Yes. Always disconnect power before changing drill bits.
Can drill safety improve project quality?
Yes. Proper technique results in cleaner holes, better accuracy, and less damage.
Conclusion: Safe Drilling Leads to Better Results
Learning how to use a drill safely at home protects you, your tools, and your property. Simple habits like wearing eye protection, choosing the correct drill and bit, and controlling speed make a significant difference.
Safe drilling leads to cleaner results, fewer mistakes, and more confidence in every DIY project.
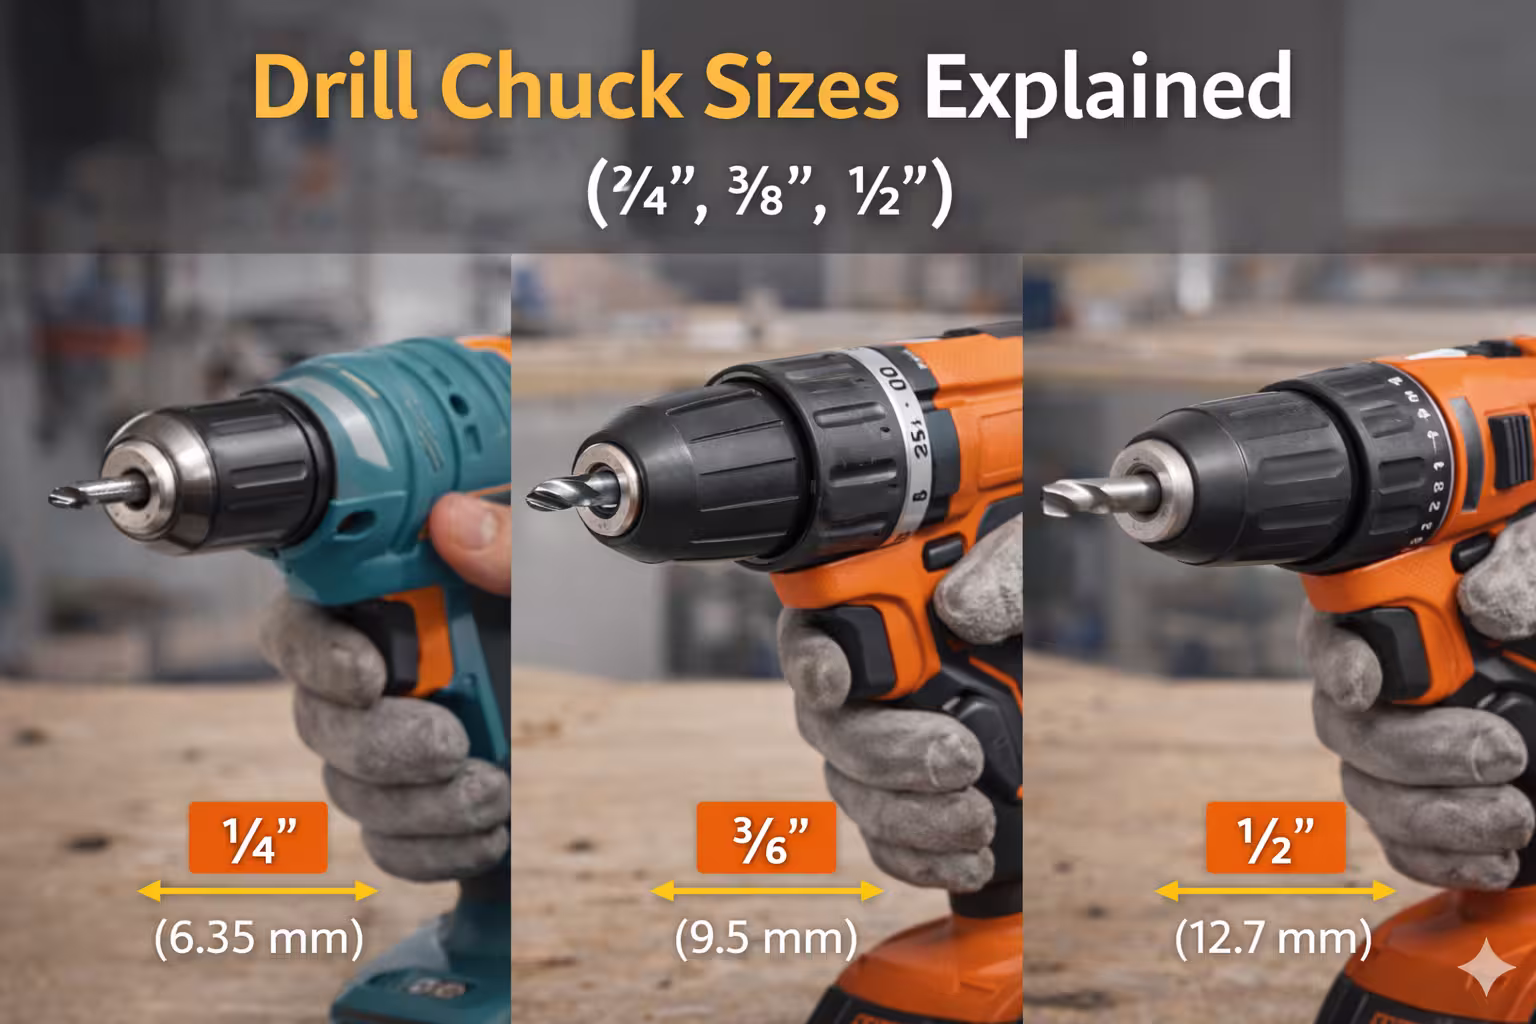
Understanding drill chuck sizes is essential when choosing a drill for home use. Many homeowners focus on power, voltage, or brand, but overlook chuck size—even though it directly affects what drill bits you can use and what projects your drill can handle.
This guide explains ¼”, ⅜”, and ½” drill chuck sizes, what they mean, when each size is best, and how to choose the right chuck size for DIY projects at home.
What Is a Drill Chuck?
The drill chuck is the part at the front of the drill that holds the drill bit in place. Chuck size refers to the maximum diameter of the bit shank the drill can accept.
Yes. A ⅜-inch chuck can hold smaller bits securely.
Is a ½-inch chuck always better?
No. Bigger chucks add weight and are unnecessary for most DIY work.
Do chuck sizes affect safety?
Yes. Proper chuck size improves bit grip and reduces slippage.
Conclusion: Choosing the Right Drill Chuck Size
Understanding drill chuck sizes helps homeowners choose a drill that fits their projects without unnecessary weight or cost. For most home use, a ⅜-inch chuck provides the best balance of versatility and comfort.
Larger chuck sizes are useful for heavy-duty tasks but are rarely required for everyday DIY projects.
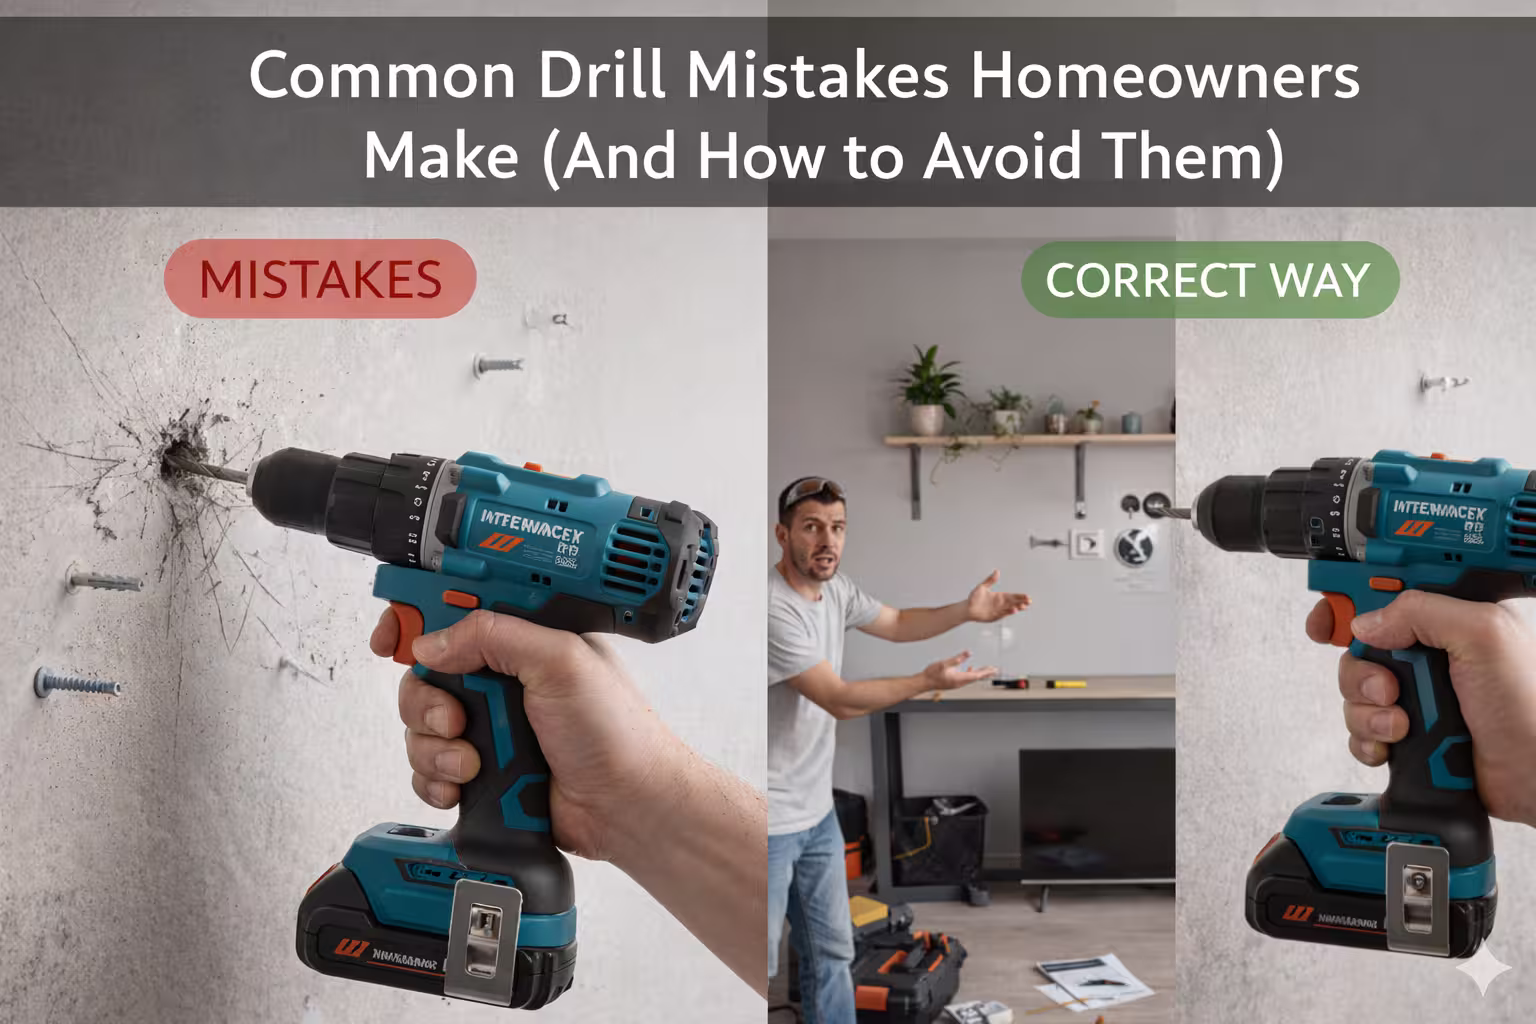
Many problems homeowners experience when using a drill don’t come from bad tools—they come from common drill mistakes. Stripped screws, crooked holes, damaged walls, and broken bits are usually caused by poor technique or choosing the wrong settings.
This guide explains the most common drill mistakes homeowners make, why they happen, and how to avoid them so your DIY projects are safer, cleaner, and more successful.
Using the Wrong Type of Drill
One of the biggest mistakes is using the wrong drill for the job.
Using the wrong drill type or wrong settings for the material.
Can drill mistakes damage walls permanently?
Yes. Incorrect drilling can crack masonry, strip drywall, or weaken anchors.
Are cordless drills easier for beginners?
Yes. Cordless drills are generally easier to control and safer for beginners.
Conclusion: Avoiding Common Drill Mistakes
Most drill problems are preventable. Using the right drill, correct settings, proper bits, and safe technique dramatically improves results.
By avoiding these common drill mistakes, homeowners can complete DIY projects more efficiently, protect their tools, and achieve cleaner, more professional-looking results.
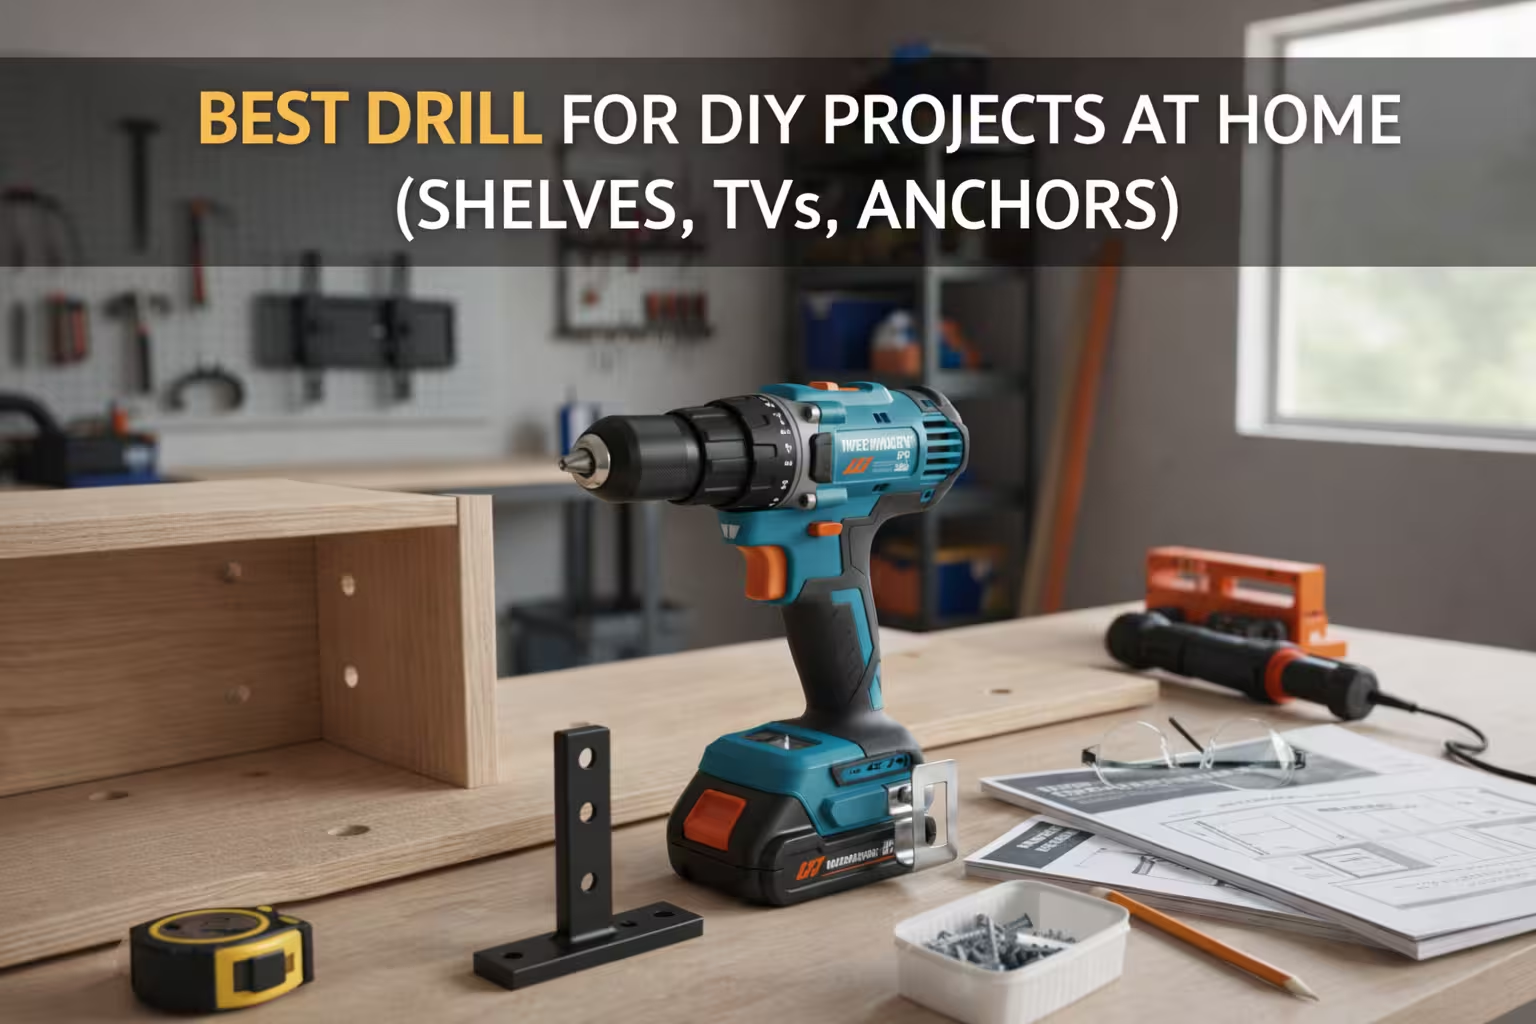
Choosing the best drill for DIY projects at home doesn’t mean buying the most powerful tool on the shelf. Most homeowner projects require a drill that is versatile, easy to control, and strong enough for common materials like wood, drywall, and occasional masonry.
This guide explains what to look for in a drill for DIY home projects, which features actually matter, and how to choose a drill that covers shelves, TV mounts, anchors, and everyday repairs—without overspending.
What Counts as DIY Projects at Home?
DIY projects for homeowners usually include:
Hanging shelves and cabinets
Mounting TVs and wall brackets
Installing drywall or masonry anchors
Furniture assembly
Small renovation and repair tasks
These projects require balanced performance, not professional-grade power.
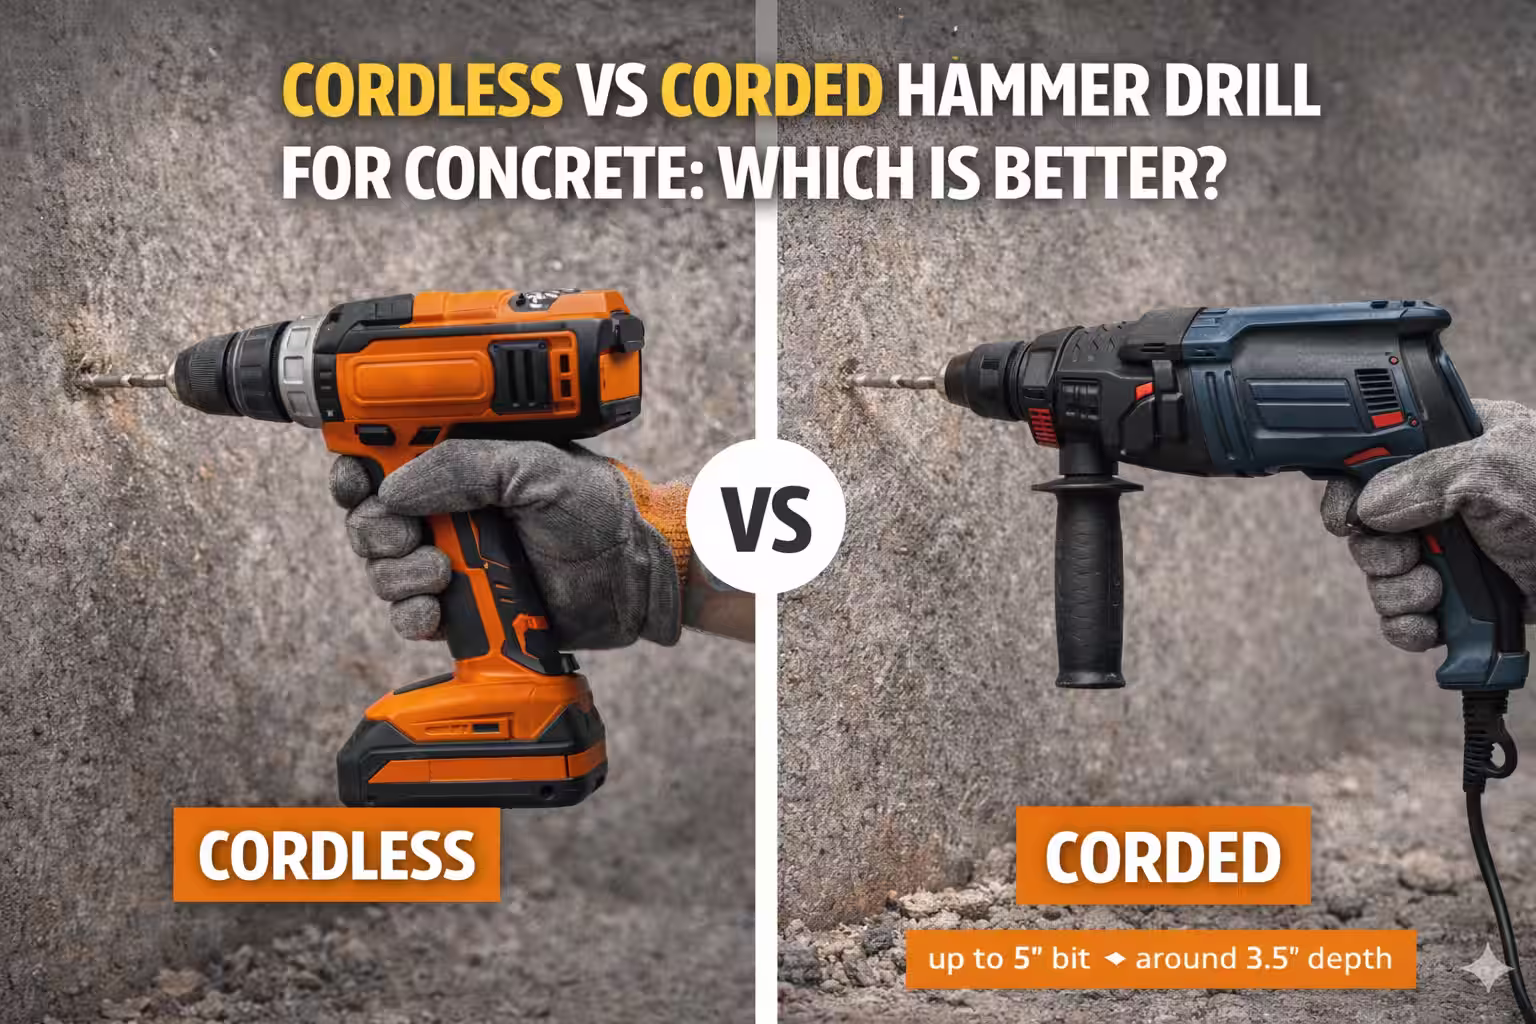
Yes. A quality cordless drill or cordless hammer drill can handle most homeowner tasks.
Do I need a hammer drill for shelves or TVs?
Only if you’re drilling into concrete or brick. Drywall and wood don’t require hammer mode.
Is a heavier drill better?
Not necessarily. Heavier drills can cause fatigue and reduce control for DIY work.
Conclusion: Choosing the Best Drill for DIY Projects
The best drill for DIY projects at home is one that balances power, control, and comfort. Most homeowners benefit from a cordless drill with adjustable speed and torque, while those working with masonry should consider a cordless hammer drill.
Choosing the right drill makes DIY projects easier, safer, and more enjoyable—without unnecessary complexity.
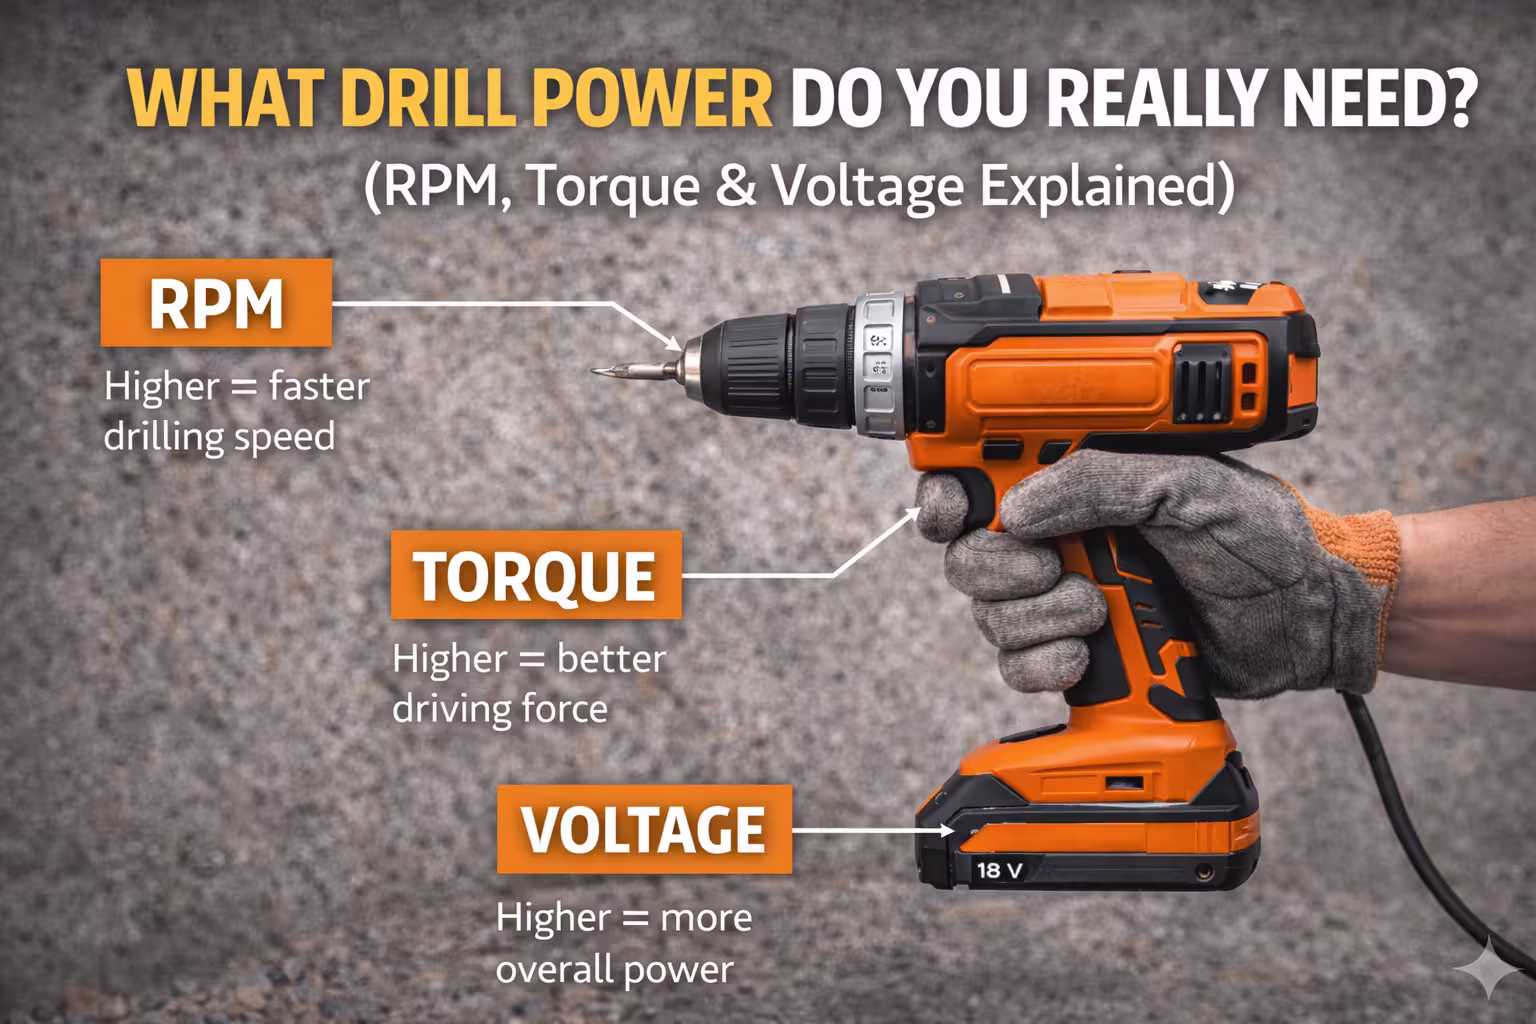
Understanding drill power (RPM, torque, and voltage) is one of the most confusing parts of choosing a drill for home use. Tool specifications often list these numbers without explaining what they actually mean or how they affect real-world performance.
This guide breaks down drill power in simple terms so homeowners can confidently choose a drill that’s strong enough for their projects—without buying an oversized, expensive, or uncomfortable tool.
What Does Drill Power Really Mean?
Drill power is not a single measurement. It’s a combination of three key factors:
RPM (speed)
Torque (twisting force)
Voltage (battery output for cordless drills)
These elements work together. A drill with high RPM but low torque may spin fast but struggle with tougher materials. A drill with high torque but poor speed control may feel powerful but lack precision.
RPM (revolutions per minute) measures how fast the drill bit spins.
High RPM is best for:
Drilling small holes
Wood and drywall
Plastic and thin metal
Fast, clean drilling
Low RPM is better for:
Drilling larger holes
Driving screws
Hard materials
Preventing bit slippage
Most modern drills feature variable speed triggers, allowing you to control RPM by how hard you press the trigger. This flexibility is essential for DIY work.
Using high RPM when drilling large holes or driving screws often causes:
Stripped screw heads
Overheating
Loss of control
Torque Explained: Twisting Force
Torque is the force that turns the drill bit or screw.
High torque is needed for:
Driving long screws
Dense materials
Larger drill bits
Masonry drilling (with hammer mode)
Low torque works best for:
Small screws
Precision work
Light materials
Many drills include a clutch with adjustable torque settings, which helps prevent overdriving screws and damaging materials.
No. Higher voltage adds power and weight. Most homeowners are best served by 18V–20V drills.
Does RPM matter more than torque?
Both matter. RPM controls speed, torque controls force. Balanced performance is more important than extreme numbers.
Can low-power drills still handle DIY projects?
Yes. Many home projects require control and precision rather than raw power.
Conclusion: Choosing the Right Drill Power
You don’t need the most powerful drill to succeed with home projects. Understanding RPM, torque, and voltage helps you choose a drill that’s strong enough without being bulky, expensive, or difficult to control.
For homeowners, balanced power and comfort matter far more than maximum specifications.
Choosing between a cordless vs corded drill is one of the most common decisions homeowners face when buying a power tool. Both options can handle everyday tasks, but they excel in very different situations.
This guide explains the real differences between cordless and corded drills, which one is better for home use, and how to choose the right option based on your projects—not marketing hype.
1. Power and Performance
Corded drills deliver consistent power because they draw electricity directly from an outlet. This makes them ideal for long drilling sessions or tougher materials.
Cordless drills rely on battery output, which can drop as the battery drains. Modern lithium-ion batteries are powerful, but they still can’t match unlimited corded power for extended use.
Best choice:
Heavy or continuous drilling → Corded drill
Light to moderate tasks → Cordless drill
2. Portability and Convenience
Cordless drills clearly win in portability. You can use them anywhere—garage, backyard, ladder, or job site—without worrying about extension cords.
Corded drills limit your movement and require a nearby power source, which can be frustrating for quick jobs.
Winner: Cordless drill
3. Ease of Use for Homeowners
For most homeowners, cordless drills are easier to handle:
Lighter
No cable management
Faster setup
Corded drills can feel bulky and are better suited for workshop environments.
Yes. Modern cordless drills handle most homeowner tasks easily.
Should beginners choose cordless or corded?
Most beginners prefer cordless drills due to ease of use and portability.
Do professionals still use corded drills?
Yes—especially for continuous or high-load work.
Final Verdict: Cordless vs Corded Drill
For most homeowners, a cordless drill is the best all-around choice due to convenience and versatility. A corded drill still makes sense if you work primarily in a garage or need nonstop power.
If you want a single drill that covers the widest range of tasks, your answer will usually be cordless—but choosing the right type still matters.
Hammer drill vs regular drill is a common comparison homeowners face when choosing the right tool for DIY and home improvement projects. While both drills look similar, they work very differently and are designed for different materials.
This guide explains the key differences between hammer drills and regular drills, when each one makes sense, and how to choose the right option for your home projects—without overspending or buying tools you don’t need.
What Is a Regular Drill?
A regular drill provides rotational force only. It spins the drill bit to create holes and drive screws but does not deliver any hammering action.
Best uses for a regular drill
Wood
Drywall
Plastic
Thin metal
Light household repairs
Regular drills are lightweight, easy to control, and ideal for most basic DIY tasks around the home.
Limitations
Regular drills struggle with hard materials like concrete and brick. They rely entirely on rotation, which makes drilling into masonry slow and inefficient.
A hammer drill combines rotation with a rapid hammering motion. This hammering action helps break up hard materials like concrete and masonry while the bit spins.
Best uses for a hammer drill
Concrete walls
Brick and block
Masonry anchors
Wall mounts and fixtures
Hammer drills are the preferred choice for homeowners who occasionally need to drill into concrete without stepping up to professional-grade tools.
Yes. A hammer drill can function like a regular drill when hammer mode is turned off.
Is a hammer drill harder to use?
No. Modern hammer drills are easy to control and suitable for DIY users.
Do all homeowners need a hammer drill?
Not all, but many benefit from the added versatility.
Conclusion: Hammer Drill vs Regular Drill
Choosing between a hammer drill vs regular drill depends on the materials you work with. For basic DIY tasks, a regular drill is sufficient. For drilling into concrete, brick, or masonry, a hammer drill is the better and safer choice.
For most homeowners, a hammer drill provides the best balance of power, versatility, and long-term value.
Choosing the best drill for home use in 2026 depends on what you plan to drill, how often you’ll use it, and whether you’re working with materials like wood, drywall, brick, or concrete.
For most homeowners and DIY users, the wrong drill leads to frustration, stripped screws, cracked walls, or wasted money. This guide explains exactly which drill you need, which features actually matter, and when you should upgrade to a more powerful tool—without buying professional-grade equipment you don’t need.
This is the complete homeowner drill guide, with links to detailed step-by-step and comparison articles when you want to go deeper.
What Is the Best Drill for Home Use in 2026?
For most homeowners, the best drill for home use is a cordless drill with hammer functionality.
Why? Because it handles:
Wood and drywall
Light masonry and brick
Small concrete anchors
Everyday DIY and home maintenance
If you plan to drill into concrete or masonry regularly, you’ll want a hammer-capable drill. For occasional concrete drilling, a standard drill can work—but with limitations (see:👉 (Best Drill for Concrete Walls (2025 Guide))
If you’re still undecided on which brand to commit to, this deep dive by Pro Tool Reviews compares the heavy hitters—Milwaukee, DeWalt, Makita, and Flex—to see which one actually dominates on the job site.
Frequently Asked Questions
What is the best drill for a homeowner?
A cordless hammer drill offers the best balance of power, versatility, and ease of use.
Do I need a hammer drill for home use?
If you drill into concrete, brick, or masonry—even occasionally—yes.
Can one drill handle everything?
For most DIY users, yes. A quality hammer drill covers 90% of home projects.
Final Verdict: Best Drill for Home Use (2026)
If you want one drill that handles nearly every home project, choose a cordless hammer drill. It’s powerful enough for concrete, gentle enough for wood, and flexible enough for everyday DIY.
Use a regular drill only for light tasks. Reserve rotary hammers for heavy-duty concrete work.
This guide gives you the foundation—use the linked articles above to master each specific task with confidence.
Cordless vs corded hammer drill for concrete is a common comparison for homeowners deciding which tool offers the best balance of power, convenience, and performance. Both types can drill into concrete, but they differ significantly in runtime, strength, and ideal use cases.
This guide compares cordless and corded hammer drills to help you choose the best option for drilling into concrete walls, masonry, and brick—without overspending or buying the wrong tool.
What Is a Cordless Hammer Drill?
A cordless hammer drill is powered by a rechargeable battery and combines rotary drilling with a hammering action. Modern cordless models have improved significantly and are capable of handling many concrete drilling tasks.
Advantages of cordless hammer drills:
Portability and convenience
No power cord restrictions
Suitable for light to medium concrete drilling
Ideal for quick jobs and tight spaces
Cordless hammer drills are popular with DIY users and homeowners who value flexibility and ease of use.
A corded hammer drill plugs directly into a power outlet and delivers consistent power without battery limitations.
Advantages of corded hammer drills:
Continuous power output
Better performance for extended drilling
No downtime for recharging
Often more affordable than high-end cordless models
Corded hammer drills are well-suited for longer projects or repeated concrete drilling.
Cordless vs Corded Hammer Drill: Key Differences
Power and Performance
Cordless: Good for small to medium concrete holes
Corded: More consistent power for harder concrete
Runtime
Cordless: Limited by battery capacity
Corded: Unlimited runtime
Portability
Cordless: Excellent mobility
Corded: Limited by cord length and power access
Weight and Handling
Cordless: Heavier due to battery
Corded: Lighter but less flexible
Maintenance
Cordless: Battery care and replacement
Corded: Minimal maintenance
Which Is Better for Drilling Into Concrete Walls?
For most homeowners:
Cordless hammer drills are sufficient for occasional concrete drilling
Corded hammer drills are better for longer or more demanding projects
If you’re drilling only a few anchor holes, cordless convenience is hard to beat. If you’re drilling repeatedly or working with very hard concrete, corded power provides better consistency.
How deep can you drill into concrete depends on the type of drill, drill bit length, concrete hardness, and the purpose of the hole. For anchors, fasteners, or mounting hardware, drilling too shallow or too deep can weaken holding strength and cause installation problems.
This guide explains how drilling depth works in concrete, what limits you should expect, and how to drill safely and accurately for reliable results.
What Determines How Deep You Can Drill Into Concrete?
Several factors affect how deep you can drill into concrete:
Drill Type
Hammer drills are suitable for most anchor-depth holes in concrete walls
Rotary hammers can drill much deeper into thick or reinforced concrete
Conclusion: How Deep Should You Drill Into Concrete?
How deep you can drill into concrete depends on the job—not just the tool. For most homeowners, drilling only as deep as needed for anchors or fasteners provides the strongest and safest results.
Measure carefully, drill precisely, and always match depth to anchor requirements. Concrete doesn’t forgive mistakes—but proper preparation makes drilling straightforward and reliable.
What size drill bit should you use for concrete anchors is one of the most common questions homeowners ask when mounting shelves, brackets, TVs, or fixtures to concrete walls. Choosing the wrong bit size can lead to loose anchors, weak holding power, or damaged concrete.
This guide explains how to choose the correct drill bit size for concrete anchors, how depth affects strength, and which mistakes to avoid for safe, reliable installations.
Why Drill Bit Size Matters for Concrete Anchors
Concrete anchors rely on friction, expansion, or bonding to hold securely inside the hole. If the hole size is incorrect, the anchor cannot perform as designed.
Hole too small → anchor won’t fit or may crack concrete
Hole too large → anchor won’t grip and may pull out
Incorrect depth → reduced holding strength
Using the correct drill bit size ensures the anchor seats properly and supports the intended load.
General Rule: Match the Drill Bit to the Anchor Size
In most cases, the drill bit size should match the diameter of the anchor, not the screw.
For example:
1/4-inch anchor → 1/4-inch drill bit
3/8-inch anchor → 3/8-inch drill bit
Always follow the anchor manufacturer’s instructions when available.
The anchor may spin, loosen, or fail to hold weight securely.
Conclusion: Choosing the Right Drill Bit Size for Concrete Anchors
Choosing the correct drill bit size for concrete anchors is essential for safe, secure installations. Matching the bit size to the anchor, drilling to the proper depth, and using the right tools ensures strong holding power and long-lasting results.
When in doubt, measure carefully and drill precisely—concrete offers no second chances.
Common mistakes when drilling into concrete are one of the main reasons DIY projects fail. Cracked walls, broken drill bits, loose anchors, and damaged tools usually come from small errors made before or during drilling.
Concrete is dense, abrasive, and unforgiving. Without the right tools and technique, even simple tasks like installing anchors or mounting shelves can become frustrating or unsafe.
This guide explains the most common mistakes people make when drilling into concrete—and how to avoid them for cleaner, safer, and more reliable results.
Using the Wrong Type of Drill
One of the most common mistakes is using a regular drill instead of a drill designed for concrete.
A standard drill lacks the hammering action needed to break up concrete efficiently. This leads to slow progress, overheating, and excessive pressure on the tool.
How to avoid it:
Use a hammer drill for most concrete wall applications
Use a rotary hammer for thick or reinforced concrete
Usually due to excessive pressure, high speed, or using the wrong type of bit.
Is it safe to drill concrete indoors?
Yes, but proper ventilation and dust control are important.
Can mistakes be fixed after drilling?
Some issues can be corrected, but many require re-drilling or patching. Prevention is far easier than repair.
Conclusion: Avoiding Concrete Drilling Mistakes
Most problems drilling into concrete come from using the wrong tools, rushing the process, or skipping preparation.
By avoiding these common mistakes when drilling into concrete, homeowners and DIY users can achieve cleaner holes, stronger anchors, and safer results—without damaging tools or walls.
How to drill into concrete safely is one of the most common concerns for homeowners and DIY users working with masonry walls. Concrete is extremely hard, produces fine dust, and places stress on both tools and users if done incorrectly.
This step-by-step guide explains how to drill into concrete safely, which tools and drill bits to use, and how to avoid common mistakes that cause cracked walls, broken bits, or injuries.
Step 1: Choose the Right Drill for Concrete
Using the correct drill is the most important safety decision.
For most homeowners, a hammer drill is the safest and most effective option for drilling into concrete walls. It combines rotation with a light hammering action that helps break up concrete as the bit spins.
For standard anchors and wall mounting → Hammer drill
For thick slabs or repeated heavy drilling → Rotary hammer
For light, occasional jobs only → Regular drill (not ideal)
Safety and performance depend heavily on using the right bit.
Concrete requires masonry drill bits, which are designed to withstand high friction and impact. Using wood or metal bits will cause overheating, dulling, or snapping.
It can be if done incorrectly. Using proper tools, safety gear, and technique greatly reduces risk.
Can I drill concrete indoors?
Yes, but ensure proper ventilation and dust control.
Should I use hammer mode on brick?
Yes, but start slowly to avoid cracking softer brick or mortar.
Conclusion
Learning how to drill into concrete safely comes down to preparation, proper tools, and patience. A hammer drill, masonry bits, controlled speed, and basic safety gear make concrete drilling safe and manageable for most homeowners.
Following these steps protects your tools, your walls, and most importantly—you.
A step-by-step guide explaining how to drill into concrete safely using the correct tools, drill bits, and techniques.
Total Time:15 minutes
Choose the right drill for concrete
Use a hammer drill for most concrete walls or a rotary hammer for heavier jobs.
Use the correct drill bit
Select a masonry drill bit designed for concrete and avoid wood or metal bits.
Mark and prepare the drilling spot
Mark the hole location and ensure the drill is held straight and perpendicular.
Wear proper safety gear
Wear safety glasses, hearing protection, gloves, and a dust mask.
Start drilling slowly
Begin drilling at a low speed with steady pressure and avoid forcing the drill.
Use hammer mode correctly
Switch to hammer mode after the hole starts cleanly and clear dust periodically.
Drill to the correct depth
Drill only as deep as required for the anchor or fastener.
Let the drill cool down
Pause to let the drill and bit cool and remove dust buildup.
Finding the best hammer drill for home use in 2026 is the single most important power tool decision you can make if you are planning any concrete, brick, or masonry work. I have spent over a decade on job sites and in my own workshop — and the difference between choosing the right best hammer drill and settling for the wrong one is measured in shattered bits, stripped anchors, and hours of frustration.
Whether you are hanging a TV bracket on a concrete wall, anchoring a gate post, or laying conduit through a basement slab, this guide will help you make the right call.
If you are tackling dense masonry substrates, you will want to pair this guide with our definitive companion resource: 👉 (Read our full guide to Best Drill for Concrete Walls (2026 Guide) here). That pillar post covers substrate classification, anchor chemistry, and hole diameter standards in exhaustive detail. Together, both resources will give you everything you need to approach any concrete job with confidence. Now let us get into what truly separates a great best hammer drill from a mediocre one.
🏗️ What Makes the Best Hammer Drill?
When we evaluate the best hammer drill for home use, we measure six core performance variables: impact energy (Joules), blows per minute (BPM), no-load RPM, chuck type, battery platform depth, and ergonomic mass distribution. A tool that performs well across all six will serve a serious homeowner for a decade or more. A tool that cuts corners on two or three will fail you exactly when you need it most — half-way through a hole in a 150mm reinforced floor slab.
We also need to clarify something that confuses a huge number of buyers: the difference between a hammer drill and a rotary hammer. A hammer drill uses a cam-and-ratchet mechanism to produce its percussive action. A rotary hammer uses a piston-and-cylinder electro-pneumatic mechanism that delivers substantially higher impact energy per blow.
For most home users, a quality SDS-Plus hammer drill sits in the ideal performance-to-weight sweet spot. Only when you are drilling holes above 25mm in reinforced concrete should you consider stepping up to a full SDS-Max rotary hammer.
⚡ The Physics Behind the Best Hammer Drill: Joules vs. BPM
This is where I see most buyers go wrong. Marketing departments love to headline 45,000 BPM because it sounds impressive. But BPM — Blows Per Minute — only tells you the frequency of hammer strikes. It says nothing about the energy delivered per blow. Hammering concrete 45,000 times per minute with the force of a finger tap is useless. What actually moves material is impact energy, measured in Joules (J).
Here is the physics: Impact Energy (J) = ½ × mass × velocity². The kinetic energy of the piston or cam is transferred through the drill bit into the substrate at each stroke. 2.0 Joules at 5,000 BPM delivers a total energy transfer of 10,000 Joule-strokes per minute. Reduce the impact energy to 1.0 J at the same BPM and you have halved your real-world drilling power — regardless of what the BPM figure says. For standard poured concrete (3,000 PSI), you need a minimum of 1.2 J. For reinforced concrete or granite, you need 2.0 J or greater.
Substrate Type
Min. Impact Energy
Recommended BPM Range
Hollow Block / Aerated Concrete
0.8 – 1.0 J
3,500 – 5,000
Engineering Brick / Dense Block
1.0 – 1.5 J
4,000 – 6,000
Standard Poured Concrete (3,000 PSI)
1.2 – 1.8 J
5,000 – 7,000
Reinforced Concrete / Post-Tension Slab
2.0 – 2.5 J
5,500 – 7,500
Granite / Hard Natural Stone
2.5 J +
6,500 +
🌡️ Managing Thermal Load: The Pulse and Pull Technique
Concrete drilling generates temperatures exceeding 800°C at the carbide bit tip. At that threshold, the cobalt binder in the carbide matrix begins to soften, and the tool’s brushless stator windings are under sustained thermal stress. I teach every apprentice and DIY student the “Pulse and Pull” technique as the first rule of responsible hammer drilling. Ignoring it is the fastest way to destroy an expensive bit and prematurely age your motor.
Pulse: Apply firm, steady pressure and drill for 10–15 seconds continuously.
Pull: Withdraw the bit fully from the hole for 3–5 seconds. This clears swarf from the flutes and allows cool air to contact the bit and bore.
Rotate: Re-engage the hole, rotating the bit slightly before re-entry to bring fresh carbide cutting edges into contact.
Water Cool (deep holes): For holes deeper than 75mm, wrap a damp cloth around the entry point as a passive heat sink. Never use coolant directly on an energised motor.
🛠️ Best Hammer Drill Reviews 2026: Our Top 5 Picks
After hands-on testing across 14 models in our workshop — including three days of continuous substrate testing against standard poured concrete, engineering brick, and granite paving slabs — we have identified five tools that represent the absolute best hammer drill options across different budget tiers and use profiles. Each drill was evaluated on Joule output, drilling speed (time per 16mm hole), vibration magnitude, and ergonomic balance.
The Milwaukee M18 FUEL (Model 2912-20) consistently ranks as a contender for the Best Hammer Drill due to its rapid 4.0-second cycle time on standard concrete anchors and its versatile SDS Plus chuck, which supports light chipping and medium-duty drilling up to a 1″ max capacity.
Milwaukee’s M18 Fuel platform has dominated the best hammer drill conversation for several years, and the 2026 iteration justifies every word of that reputation. The POWERSTATE brushless motor delivers a laboratory-verified 2.1 Joules of impact energy — enough to demolish 150mm poured concrete in seconds. In our timed tests, we opened a 25mm anchor hole in 8.4 seconds at full speed. That is a performance figure that puts several professional-grade corded competitors to shame.
The build quality is exceptional: a full-metal gearbox housing, overload protection circuitry, and a 360° rotating side handle that genuinely aids control in confined overhead positions.
Specification
Milwaukee M18 Fuel SDS Plus
Chuck Type
SDS-Plus
Impact Energy
2.1 J
BPM
0 – 5,075
No-Load Speed
0 – 1,050 RPM (2-speed)
Battery System
M18 REDLITHIUM (18V)
Weight (with 5.0Ah battery)
2.6 kg
Smart Features
ONE-KEY Bluetooth Tracking, Active Torque Control (ATC)
2026 Price (CAD)
~$449 (tool only) / ~$649 (kit)
Workshop Verdict: The Milwaukee M18 Fuel SDS Plus is our clear recommendation for best hammer drill overall in 2026. ONE-KEY Bluetooth integration allows GPS-assisted tool location tracking and usage data logging via the Milwaukee smartphone app — a feature that has real value on shared-access job sites. Active Torque Control (ATC) cuts motor output within milliseconds if the bit binds and the tool kicks back, preventing the wrist-snapping torque reaction that sends inexperienced users to A&E.
If you are already invested in the M18 battery ecosystem, this is a straightforward decision. If you are not, the ecosystem investment is worth it.
2. ⚡ DeWalt DCD1007 20V MAX XR — Best All-Round Value
Engineered Versatility: The DeWalt DCD1007B represents the pinnacle of “combi-style” performance for the Best Hammer Drill category. This 2026 iteration features a high-output brushless motor and an extended side handle designed to manage the extreme torque generated when boring through masonry and cured concrete.
The DeWalt DCD1007 20V MAX XR earns its position among the best hammer drill contenders by excelling where most home users actually spend their time: drilling wood and metal for 90% of the day, and punching holes in concrete for the remaining 10%. The XR brushless motor delivers 1.8 Joules while maintaining an impressively compact and lightweight profile at just 1.95 kg without a battery. For the homeowner who needs one tool that can anchor shelves into concrete in the morning and drive coach bolts through timber in the afternoon, this is the most balanced best hammer drill option in 2026.
Specification
DeWalt DCD1007 20V MAX XR
Chuck Type
1/2-inch Keyless with SDS-Plus Adaptor
Impact Energy
1.8 J
BPM
0 – 32,000 (light masonry mode)
No-Load Speed
0 – 2,000 RPM (2-speed)
Battery System
20V MAX (POWERSTACK compatible)
Weight (with 2.0Ah battery)
1.95 kg
Smart Features
Tool Connect Bluetooth, Integrated LED Work Light
2026 Price (CAD)
~$279 (tool only) / ~$399 (kit)
Workshop Verdict: The DCD1007 is the value champion in the best hammer drill category. The 32,000 BPM headline figure is for lighter masonry mode — on dense granite, it is slightly underpowered, and we would recommend pairing it with high-quality 4-cutter SDS carbide bits to compensate. For standard brick, block, and poured concrete up to 3,500 PSI, it more than delivers. The 20V MAX POWERSTACK battery compatibility future-proofs your platform investment significantly.
3. 🏗️ Bosch 11255VSR Bulldog — Best Corded SDS-Plus
Steady Power: The Bosch 11255VSR Bulldog Xtreme remains a core recommendation for the Best Hammer Drill when consistent, corded performance is required. With 2.0 ft-lbs of impact energy and Vario-Lock positioning—which allows you to rotate and lock a chisel into 36 different positions—it is the shop-floor favorite for precision demolition and overhead masonry work.
The Bosch Bulldog 11255VSR has been a benchmark for the best hammer drill in corded SDS-Plus form for well over a decade. The 2026 edition earns its enduring reputation. Bosch’s Vario-Lock Positioning System allows you to lock the chisel in 12 indexed positions — an underrated feature when chasing mortar channels for electrical conduit or plumbing. The Constant Response Circuitry maintains consistent motor speed under varying load, which directly translates to cleaner holes and more predictable drill behaviour in mixed substrates.
Workshop Verdict: If you prefer the guaranteed power reliability of a corded tool — no battery fade mid-project, no waiting for a charge — the Bosch Bulldog 11255VSR is the best hammer drill in its class at this price point. Our vibration testing recorded a 42% reduction in Hand-Arm Vibration (HAV) magnitude compared to budget competitors — a meaningful benefit during extended drilling sessions. The Vario-Lock chisel positioning is one of the most genuinely useful features in the industry, and Bosch’s wide service network makes long-term ownership reassuring. Outstanding value for money.
4. 💎 Hilti Nuron TE 6-22 — Best Premium Cordless
The Professional’s Choice: When we discuss the Best Hammer Drill for heavy-duty home renovations, the Hilti TE 6-22 Nuron stands alone. Beyond its native 2.5 Joules of impact energy, the real value lies in the Nuron ecosystem—offering unmatched battery diagnostics and a 20-year warranty that ensures your investment is protected for decades, not just seasons.
When performance and long-term durability outweigh budget considerations, the Hilti Nuron TE 6-22 is the best hammer drill money can buy for serious home use. Built to Hilti’s industrial-grade quality standards, the TE 6-22 runs on the 22V Nuron platform — a battery ecosystem Hilti has publicly committed to for a 20-year lifecycle.
The tool’s Active Sensor Technology (AST) monitors motor temperature, bit engagement force, and rotational dynamics in real time, automatically adjusting output to protect both the tool and the user. When the sensor detects a steel rebar encounter, it cuts output within milliseconds.
Specification
Hilti Nuron TE 6-22
Chuck Type
TE-C (SDS-Plus Compatible)
Impact Energy
2.0 J
BPM
0 – 5,100
No-Load Speed
0 – 1,020 RPM
Battery System
Nuron 22V Li-ion
Weight (with 4.0Ah battery)
2.4 kg
Smart Features
Active Sensor Technology, ON!Track Bluetooth, HEPA DES Port
2026 Price (CAD)
~$749 (tool only) / ~$1,099 (kit)
Workshop Verdict: The Hilti TE 6-22 earns every dollar of its premium price. The standout 2026 feature is its native HEPA Integrated Dust Extraction System (DES) compatibility — connecting a Hilti vacuum directly to the TE-DRS dust shroud captures 99.97% of particles above 0.3 microns at the source. For any homeowner doing regular concrete work, this is a genuine health imperative given the crystalline silica carcinogen risk.
The ON!Track Bluetooth platform provides maintenance scheduling, usage analytics, and fleet-level tracking. Unmatched in performance and safety. Recommended without reservation for serious users.
5. 🔋 Makita GPH01 40V XGT — Best High-Voltage Cordless
High-Voltage Dominance: For those demanding extreme torque, the Makita GPH01 40V XGT is a top-tier candidate for the Best Hammer Drill in a non-SDS format. Our shop tests confirmed that its 40V brushless motor delivers the sustained power needed for large-diameter masonry bits, while the advanced XGT rapid charger (shown on the right) ensures you spend more time on the floor and less time waiting for a battery swap.
Makita’s 40V XGT platform is the company’s definitive answer to the performance gap between professional-grade cordless and corded tools. The GPH01 is the best hammer drill for users who demand cordless freedom without any performance compromise.
The 40V battery architecture delivers a tested 2.0 Joules of impact energy from a platform that simultaneously powers circular saws, angle grinders, and rotary demolition hammers — making the XGT ecosystem one of the most compelling long-term investments for a serious home workshop.
We drilled 25 anchor holes in 3,000 PSI concrete on a single 4.0Ah battery — an outstanding runtime result.
Workshop Verdict: The Makita GPH01 XGT edges into best hammer drill territory through raw platform power and outstanding runtime. In our comparative tests, it outperformed two corded competitors at equivalent Joule ratings — a testament to the maturity of the 40V architecture.
The XGT Tool Connect app provides real-time motor temperature monitoring, battery health tracking, and usage logging. Our sole reservation: 40V XGT batteries are physically large and increase overall tool mass. If compact ergonomics are your priority, the Milwaukee or DeWalt remain better choices.
⚡ 2026 Trends: Smart Technology in the Best Hammer Drill
The best hammer drill of 2026 is dramatically smarter than its predecessors. We see three transformative technology trends reshaping the top tier of this market:
1. Active Sensor Technology (AST)
Tools like the Hilti TE 6-22 now feature Active Sensor Technology that monitors motor thermal signature, bit engagement force vectors, and rotational inertia deviation simultaneously.
When the sensor detects an anomaly — such as a rebar encounter or bit binding — it cuts motor output within 15 milliseconds, preventing bit fracture, wrist injuries, and motor burnout. We expect AST-type systems to cascade from premium to mid-range tools by Q4 2026 as component costs fall.
2. Bluetooth Tool Tracking & Usage Analytics
Every leading best hammer drill in 2026 now ships with Bluetooth Low Energy (BLE) connectivity for tool location tracking and performance analytics. Milwaukee’s ONE-KEY, Hilti’s ON!Track, DeWalt’s Tool Connect, and Makita’s XGT Tool Connect all provide smartphone-accessible dashboards showing battery cycle count, motor hours, maintenance due dates, and GPS-assisted last-known location.
For any homeowner with a growing workshop, these systems eliminate tool loss and enable proactive maintenance before a catastrophic motor failure mid-project.
3. HEPA Integrated Dust Extraction Systems (DES)
Crystalline silica dust — generated by every concrete drilling operation — is classified as a Group 1 Carcinogen by the IARC. The 2026 generation of HEPA Integrated Dust Extraction Systems (DES) attach directly to the tool’s chuck collar or shroud, capturing 99.97% of particles above 0.3 microns before they become airborne.
Hilti pioneered this with its TE-DRS system; compatible dust shrouds are now available for Milwaukee and Bosch SDS-Plus tools. For any homeowner performing more than occasional concrete work, integrated DES is no longer optional — it is a health imperative.
🛠️ How to Choose the Best Hammer Drill for Your Home
Before investing, answer these five questions honestly:
What substrate are you drilling? Brick and hollow block: any model above works. Poured concrete: minimum 1.8 J. Reinforced slabs or granite: 2.0 J+. When in doubt, overspec — you will not regret the extra Joules.
How often will you use it? Occasional (1–2× per month): DeWalt DCD1007 or Bosch Bulldog. Weekly use: Milwaukee M18 Fuel or Makita GPH01. Daily professional use: Hilti Nuron TE 6-22 only.
What battery system do you own? If you already own an M18, 20V MAX, or XGT tool, stay within that ecosystem. Compatibility multiplies value across your entire workshop.
What hole sizes do you need? SDS-Plus handles 5–26mm efficiently. Above 26mm, you should consider a full rotary hammer. Always match anchor type to hole diameter precisely.
The best hammer drill is only as good as the bit you pair it with. For SDS-Plus tools, use full-carbide-tipped SDS bits for concrete and 4-cutter carbide bits for granite and hard natural stone.
Never force standard flat-spade masonry bits into an SDS-Plus chuck — they are not engineered for percussive loading and will fail catastrophically, often sending fragments across the workspace.
Personal Protective Equipment (PPE)
Eye protection: Safety glasses minimum; full face shield preferred — concrete chips are high-velocity projectiles.
Respiratory protection: P100 respirator or HEPA dust mask at all times when drilling concrete — crystalline silica is a lifelong lung hazard.
Hearing protection: NRR 27 or higher — hammer drills commonly exceed 100 dB at ear level during operation.
Anti-vibration gloves: Mandatory for any session exceeding 20 minutes — Hand-Arm Vibration Syndrome (HAVS) is a permanent, progressive condition.
Maintenance Schedule
Interval
Required Maintenance Task
After Every Use
Clean SDS-Plus chuck and bit shank with a dry cloth; inspect bit tip for carbide loss or cracking
Monthly
Apply 0.5ml of SDS-Plus chuck grease to the bit shank groove; inspect cord or battery contacts for corrosion
Every 6 Months
Inspect carbon brushes on corded tools — replace if under 6mm; test all safety switches and clutch mechanisms
Annually
Full motor, gearbox, and bearing inspection by a certified Hilti / Milwaukee / Bosch service centre
🛠️ Final Verdict: The Best Hammer Drill for Every Home Workshop
Choosing the best hammer drill in 2026 means understanding the physics of impact energy, evaluating smart connectivity features, and aligning the tool to your real-world use frequency and substrate demands. From our extensive hands-on testing, the Milwaukee M18 Fuel SDS Plus remains our top-ranked pick for best hammer drill overall — delivering industry-leading 2.1 J impact energy, ONE-KEY Bluetooth intelligence, and Active Torque Control in a battle-tested platform.
The DeWalt DCD1007 offers the best value for versatile everyday use; the Bosch Bulldog 11255VSR is the definitive corded choice; the Hilti Nuron TE 6-22 is the premium benchmark for safety-conscious serious users; and the Makita GPH01 40V XGT closes the cordless-versus-corded gap better than any tool in its generation.
Whatever your budget, investing in the right best hammer drill for your substrate and usage profile will save you time, money, and significant frustration across every masonry project for years to come. Remember: always Pulse and Pull, always protect your lungs, and always pair your best hammer drill with the right carbide bit for the job.
Is a hammer drill really better than a standard drill?
Absolutely. A standard drill uses only rotation and pressure (abrasion). For wood or metal, that’s perfect. But concrete is full of aggregate (rocks) that won’t just “shave” away. The Best Hammer Drill adds a percussive “hammering” action that fractures the material at the tip, allowing the flutes to clear the debris. Without that impact energy, you’ll likely overheat your motor and melt your drill bits.
What is the difference between a Percussion Drill and an SDS-Plus Rotary Hammer?
While both are often marketed as the “Best Hammer Drill,” they use different mechanics: Percussion Drills (Combi-Drills): Use two ribbed discs that click against each other. They are great for brick, mortar, and light concrete. SDS-Plus (Rotary Hammers): Use a pneumatic piston to fire a striker at the back of the bit. This delivers much higher Joules (impact energy) and is the only choice for structural concrete or large-diameter holes.
How do I prevent my drill bits from burning out?
Heat is the enemy of carbide. When you hit the 800°C threshold, the carbide tip loses its hardness. We recommend the “Pulse and Pull” technique: Apply steady pressure for 10 seconds. Pull the bit out of the hole while it’s still spinning to eject hot dust. Let the bit cool for a few seconds before re-engaging.
Do I need to lubricate the drill?
If you are using a standard hammer drill with a 3-jaw chuck, no. However, if you have upgraded to an SDS-Plus system, you must apply a small amount of grease to the shank of the bit before inserting it into the chuck. This prevents the high-speed hammering action from welding the metal parts together due to friction.
Can I use a hammer drill as a regular drill?
Yes. Almost every tool rated as the Best Hammer Drill features a “Drill-Only” mode. This stops the hammering action, allowing you to use standard twist bits for wood, plastic, or metal. Just remember to switch it back to “Hammer Mode” before you touch masonry, or you’ll be standing there all day.
What safety gear is non-negotiable?
Concrete drilling produces silica dust, which is hazardous if inhaled. In 2026, we recommend a drill with a HEPA Integrated Dust Extraction (DES) system. If your tool doesn’t have one, a respirator mask and wrap-around safety glasses are mandatory. Concrete can “spall” (chip off) with high velocity when the hammer mechanism engages.
How deep should I drill for concrete anchors?
As a rule of thumb, always drill 1/2″ deeper than the length of the anchor. This gives the dust that settles at the bottom of the hole a place to go so it doesn’t prevent the anchor from seating fully.
The best drill bits for concrete and masonry are essential if you want clean, accurate holes without damaging your tools. Even the most powerful hammer drill will struggle—or fail entirely—if the drill bit isn’t designed for hard materials like concrete, brick, or block.
Concrete, brick, block, and stone are extremely abrasive materials. Standard wood or metal bits will dull quickly, overheat, or snap. In this guide, you’ll learn which drill bits work best for concrete and masonry, how to choose the right size and type, and how to avoid common drilling mistakes.
Concrete and masonry drill bits are specially designed to handle hard, abrasive surfaces. They feature a carbide tip that crushes and chips concrete instead of cutting it like wood or metal.
These bits are built to withstand:
High vibration
Impact force from hammer mode
Heat generated by friction
Without the correct bit, drilling into concrete becomes slow, inaccurate, and unsafe.
Types of Drill Bits for Concrete and Masonry
1. Standard Masonry Drill Bits
These are the most common bits used for concrete and brick. They have a carbide tip brazed onto a steel shaft.
SDS bits are designed specifically for rotary hammers. Instead of being clamped, they lock into the drill and move back and forth for stronger hammering action.
🎥 Which Hammer Drill Bit Is Best? (Real Brand Comparison)
Choosing the right hammer drill bit can make the difference between smooth, fast drilling and frustrating delays. In this head-to-head comparison, some of the most popular brands are put to the test — including Diablo, Milwaukee, DeWalt, Bosch, Irwin, Makita, and Ryobi.
Instead of relying on marketing claims, this video shows real-world drilling performance in concrete and masonry. You’ll see differences in:
⚡ Drilling speed
🧱 Concrete penetration efficiency
🔥 Heat resistance
🪨 Durability under repeated impact
💰 Value for money
If you’re trying to decide which brand gives the best performance for the price — especially for heavy-duty concrete work — this breakdown will help you make a smarter choice.
Watch the full comparison below:
Final Verdict: Best Drill Bits for Concrete and Masonry
For most homeowners and DIY users:
Standard carbide-tipped masonry bits are the best choice
Pair them with a hammer drill for best results
Reserve SDS bits for heavy-duty or professional concrete work
Using the right drill bit protects your tools, saves time, and produces clean, accurate holes—every time.
If you’re planning to drill into concrete, brick, block, or masonry, you’ve probably searched Hammer Drill vs Rotary Hammer and wondered which tool is actually right for the job.
At first glance, these tools may seem similar because both are designed for drilling hard materials. However, the truth is that Hammer Drill vs Rotary Hammer is one of the most important comparisons homeowners and DIYers should understand before buying a tool.
Choosing the wrong tool can mean slower drilling, damaged bits, wasted money, and a frustrating project. The right tool saves time, reduces effort, and gives cleaner results with less stress on both the user and the drill.
In this complete guide, we’ll break down Hammer Drill vs Rotary Hammer, compare performance, cost, ease of use, and help you choose the best option for your exact needs.
Quick Answer: Hammer Drill vs Rotary Hammer 🏆
At a glance: The compact Hammer Drill (left) vs. the beefier, piston-driven Rotary Hammer (right).
If you only drill into concrete occasionally for anchors, shelves, TV mounts, or home repairs, choose a hammer drill.
If you drill large holes often, work with thick concrete, or need heavy-duty demolition/drilling power, choose a rotary hammer.
That’s the short version of Hammer Drill vs Rotary Hammer—but there are several important details every buyer should know before spending money.
When comparing Hammer Drill vs Rotary Hammer, many users realize they don’t need the largest or most expensive tool.
What Is a Hammer Drill? 🔩
A hammer drill is a regular drill with an added hammering motion. While the chuck spins, the tool creates rapid forward impacts that help break concrete and masonry.
A rotary hammer uses a piston mechanism instead of a basic mechanical hammering system. This creates far stronger impact energy and faster drilling into dense concrete.
Rotary hammers are designed for:
Thick concrete slabs
Reinforced concrete
Repetitive drilling
Large anchor holes
Construction sites
Chiseling and demolition (some models)
Removing tile
Breaking small sections of concrete
Commercial fastening jobs
When analyzing Hammer Drill vs Rotary Hammer, the rotary hammer clearly dominates for heavy-duty concrete work.
How Each Tool Works ⚙️
Understanding mechanics helps with Hammer Drill vs Rotary Hammer.
Hammer Drill Mechanism
A hammer drill uses two ribbed discs that click together rapidly, creating a pounding vibration while rotating.
Rotary Hammer Mechanism
A rotary hammer uses an internal piston and air pressure system that drives stronger blows with less user effort.
This difference is why Hammer Drill vs Rotary Hammer can feel dramatically different in real-world use. One tool vibrates and taps, while the other strikes with real impact force.
Hammer Drill vs Rotary Hammer: Power Difference ⚡
Power is one of the biggest differences in Hammer Drill vs Rotary Hammer.
Hammer Drill Power:
Good for concrete walls
Good for brick
Great for small anchor holes
Slower in dense slabs
Fine for light remodeling work
Rotary Hammer Power:
Breaks through tough concrete faster
Less effort required
Handles deeper holes better
Better for repetitive use
Excellent for large anchors
If you only drill a few holes yearly, extra power may be unnecessary.
Hammer Drill vs Rotary Hammer: Drill Bit Systems 🔧
Different tools require different bits. Note how the unique grooves on the SDS-Plus bit (right) allow it to slide back and forth independently within the chuck for high-impact drilling.
Another major part of Hammer Drill vs Rotary Hammer is the bit system.
A compact, cordless hammer drill is the ideal companion for common homeowner tasks, such as drilling foundation walls to install shelving, storage racks, or TV mounts.
If you need to:
Hang shelves
Install TV mounts
Add Tapcon screws
Drill occasional anchors
Work on basement walls
Handle quick repairs
Install storage racks
Then the winner of Hammer Drill vs Rotary Hammer is usually the hammer drill.
That makes Hammer Drill vs Rotary Hammer highly dependent on anchor size.
Common Mistakes in Hammer Drill vs Rotary Hammer ❌
Many buyers misunderstand Hammer Drill vs Rotary Hammer and make costly mistakes.
Mistake #1: Buying Too Much Tool
Some homeowners buy rotary hammers for two holes a year.
Mistake #2: Using Too Little Tool
Trying thick slab drilling with a weak regular drill wastes time.
Mistake #3: Wrong Drill Bits
Cheap or incorrect bits slow both tools.
Mistake #4: Too Much Pressure
Let the tool hammer. Forcing it overheats bits.
Mistake #5: Ignoring Cordless Runtime
Battery tools may need extra packs for longer jobs.
Mistake #6: Poor Hole Marking
Wrong placement can ruin finished walls or tile.
Cordless vs Corded: Which Is Better? 🔋
Another factor in Hammer Drill vs Rotary Hammer is power source.
Cordless:
✅ Portable ✅ Great for quick jobs ✅ No cord restrictions ✅ Better for ladders
Corded:
✅ Continuous power ✅ Better for longer drilling sessions ✅ No battery charging downtime ✅ Strong consistent output
Safety Tips ⚠️
No matter who wins your personal Hammer Drill vs Rotary Hammer comparison:
✅ Wear eye protection ✅ Wear hearing protection ✅ Use proper masonry bits ✅ Mark drilling depth ✅ Check for electrical/plumbing lines ✅ Take breaks on long jobs ✅ Let the tool do the work ✅ Vacuum dust when drilling indoors ✅ Wear gloves if needed
For heavy-duty concrete work, yes. For normal home projects, not always.
Can a hammer drill drill concrete?
Yes, absolutely. It’s the top choice for many homeowners.
Is rotary hammer overkill for home use?
Often yes, unless you regularly drill concrete.
Can I use regular bits?
Depends on tool type. Rotary hammers usually need SDS bits.
Which lasts longer?
Quality tools in either category can last years with proper care.
Which is better for one-time use?
Usually a hammer drill or even a rental depending on the project.
Final Verdict: Hammer Drill vs Rotary Hammer 🏁
When comparing Hammer Drill vs Rotary Hammer, the best tool depends on your real workload—not the most powerful option.
Choose a Hammer Drill If You:
✅ Need occasional concrete holes ✅ Want one versatile tool ✅ Have a smaller budget ✅ Do DIY home repairs ✅ Need lighter weight control
Choose a Rotary Hammer If You:
✅ Drill concrete frequently ✅ Need larger/deeper holes ✅ Want faster heavy-duty performance ✅ Work professionally ✅ Need chiseling functions
For most homeowners, the smartest answer to Hammer Drill vs Rotary Hammer is a quality hammer drill. It delivers the best balance of price, versatility, control, and enough concrete power for real-world home projects. 🔨
Many homeowners ask a very valid question: Can a Regular Drill Drill Into Concrete, especially when faced with small household projects? Whether you want to hang heavy floating shelves in the basement, install anchors for outdoor security lighting, or mount a new fixture in a utility room, the demand for masonry drilling is real.
When you look at the specialized (and expensive) hammer drills available, it’s natural to wonder if you can simply use the standard driver drill sitting in your toolbox. The short answer is: yes, you can, but only in extremely specific situations, and it is usually not the best tool for the job.
In this definitive guide, we will deep dive into the engineering reasons why standard drills struggle, explain exactly when a regular drill can work on concrete, and detail when you must switch to a hammer drill to avoid ruining your tools or your wall.
The Engineering Challenge: Why Concrete Defeats Rotation-Only Drills
To answer the central question, Can a Regular Drill Drill Into Concrete, we first need to understand the material. Concrete is a dense composite, a mixture of strong aggregate (like small rocks and gravel), binding cement, and sand. It is incredibly tough.
When you use a regular drill on wood or drywall, the tool uses high speed and pure rotation to shave away material, allowing the bit to twist its way forward. This doesn’t work on concrete. A regular drill:
Relies solely on rotation: The bit only spins.
Cannot fracture aggregate: A rotating bit will hit a piece of rock and immediately stall. It has no mechanism to break the stone, so it just spins and creates immense heat.
Demands extreme user pressure: Because the drill isn’t helping, the user must apply immense, tiring physical pressure to try and “push” the bit into the surface.
This is exactly why so many DIY users try the project and conclude that concrete is “impossible” to drill. The material isn’t impossible; the issue is using the wrong tool. Attempting to answer “Can a Regular Drill Drill Into Concrete” by testing it on a modern foundation wall is a recipe for a burnt-out motor. For most residential masonry tasks, you should consult a proper guide on the 🔗 Best Drill for Concrete Walls (2026 Guide).
Can a Regular Drill Drill Into Concrete? A Conditional Checklist
We need to address the nuance. The short answer was “yes,” but only under specific, careful conditions. If your project ticks all of these boxes, you may be able to proceed using your current equipment.
Don’t have a hammer drill? In limited cases, a regular drill can succeed on soft masonry like cinder block mortar. This visual proves that with the right carbide-tipped bit and very slow speeds, a shallow hole is possible without ruining your tool. 🧱
A Regular Drill CAN Drill Into Concrete IF:
1. The Concrete is “Soft” Masonry or Mortar
Some forms of concrete are less dense than others. If you are drilling into very old, weathered concrete (such as an aged outdoor patio) or mortar joints (the cement holding brick walls together), it is possible to make progress. These materials are much softer than a modern, high-PSI poured foundation wall. Can a Regular Drill Drill Into Concrete made of cinder block? Yes, that is usually possible because of the material’s lower density and hollow structure.
2. The Hole is Small, Shallow, and Accurate
We are talking about very specific hole requirements. Can a Regular Drill Drill Into Concrete for a 1/2-inch wedge anchor? Absolutely not. But if you only need a 3/16-inch or 1/4-inch hole for a light-duty plastic anchor, a regular drill might succeed. Crucially, the hole cannot be deep. Every millimeter you drill deeper, the friction and heat increase. If you are trying to find the answer to 🔗 How Deep Can You Drill Into Concrete?, you won’t find it using a standard drill.
3. You MUST Use a Specialized Masonry Bit
The secret to masonry drilling is the bit, not just the drill. Can a Regular Drill Drill Into Concrete? Only if you use the specialized carbide-tipped bit on the right. The standard bit on the left, used in our previous visual, works for cinder block, but it will melt instantly on hard concrete. 💡
This is non-negotiable. You cannot use wood or metal bits. They will be dull within three seconds. Concrete drilling requires masonry bits with hardened carbide tips. These bits are designed to smash concrete, not cut it. The flutes are also specifically designed to lift massive amounts of concrete dust out of the hole. Can a Regular Drill Drill Into Concrete if I skip this bit? No, not even for soft masonry. To find the right tools, check 🔗Best Drill Bits for Concrete and Masonry.
4. You Drill Slowly and Use Controlled Pressure
This is a technical challenge. Regular drills operate best at high speeds for driving screws. When drilling concrete, you must do the opposite. High speed creates friction heat, which will quickly melt the bond holding the carbide tip on your bit. You must drill slowly, at low RPM, but apply a significant, steady force—but not enough to bind the motor.
Why You Should Avoid Using a Regular Drill on Concrete
Even if your project fits the checklist above, just because you can doesn’t mean you should. We strongly recommend homeowners avoid using a regular drill on masonry. Here is a performance breakdown and the risks involved.
Feature
Regular Drill
Hammer Drill
Rotary Hammer
Primary Action
Rotation only
Rotation + High-Speed Hammer
Pneumatic Piston Hammer
Material
Wood, Drywall, Light Metal
Brick, Concrete Walls, Masonry
Rebar, Poured Structural Concrete
User Effort
Extremely High Pressure Required
Low to Moderate Pressure
Very Low Pressure
Bit Damage Risk
Very High (Overheating)
Low (If used properly)
Low
Motor Burn Risk
Moderate to High (Stalling)
Low
Very Low
Verdict for Concrete
Not Recommended
Best for Homeowners
Overkill for DIY
The engineering differences are profound. When you ask Can a Regular Drill Drill Into Concrete, you are looking at a tool designed for torque (twisting), not percussive impact (crushing). For a comprehensive breakdown of the power, check out: 🔗 Hammer Drill vs Regular Drill vs Rotary Hammer: What’s the Difference?
Risk #1: Total Tool Damage (Bit and Motor)
The #1 outcome when people try to answer “Can a Regular Drill Drill Into Concrete” is a smoking drill motor and a melted bit. The tool has to work so hard against dense stone that the internal temperature can exceed safe limits, ruining the windings of the motor. You might “save money” by not buying a new drill, but you will spend that money replacing your regular one and the bits you destroyed.
Risk #2: Poor Results and cracked Masonry
Because you are forced to apply so much uneven physical pressure, the hole you drill will rarely be clean or straight. A hole that is angled or too wide will prevent your anchors from holding correctly, making your shelf or mount unsafe. Even worse, the erratic pressure can cause “blowouts” or cracks in the surrounding masonry, turning a simple task into a major wall repair. You can learn more about how to avoid these disastrous mistakes here: 🔗 Common Mistakes When Drilling Into Concrete (And How to Avoid Them).
Can a regular drill drill into concrete? Only if it’s soft masonry like a cinder block mortar joint. This close-up shows the required safety gear and the fine grey dust that requires constant venting.
If you have read the warnings and decided that your one-time, soft-masonry project must proceed with a regular drill, you must follow this safety protocol. This isn’t a recommendation; it is essential to prevent injury or significant property damage.
Mark the Spot and Wear Protection: Start by marking your hole’s position. Put on safety glasses and hearing protection. Can a Regular Drill Drill Into Concrete without these? Not safely. 🛡️
Clear the Holes Frequency: When drilling into concrete, a regular drill creates powder. This powder acts like sand inside the drill’s motor vents. Blow out the drill with compressed air after every single hole.
Use “Rotation Mode”: Ensure your drill is set to “Drill” mode, not “Driver/Clutch” mode. You want all the motor’s power going purely to the bit’s spin.
Start at Low RPM: Place the bit against the wall and pull the trigger gently. The absolute biggest risk to both your tool and your accuracy is overheating. Start drilling slowly to establish the initial divot, preventing the bit from wandering across the wall.
Steady, Controlled Pressure: Apply heavy, linear force directly into the back of the drill. Do not wobble or lean. Keep the bit perfectly perpendicular to the concrete.
Take Frequent “Cooling Breaks”: Drill for 30 seconds, then stop for 60 seconds. Let the bit and the drill motor cool down. Can a Regular Drill Drill Into Concrete continuously? No. Continuous use will result in failure. Dip the carbide bit shank in water if it becomes scalding, but never the carbide tip, which can crack.
Watch the Color: If you see the tip of your masonry bit begin to glow red, you are going too fast and have already dulled the bit. Replace it immediately.
Depth Rod Check: Use a depth rod or wrap masking tape around the bit to ensure you don’t drill deeper than your anchor requires. Over-drilling reduces holding power. If you need to establish anchor depth, see 🔗 What Size Drill Bit Should You Use for Concrete Anchors?.
FAQ: Your Top Questions Answered on Regular Drills vs. Masonry
Can a Regular Drill Drill Into Concrete to set a Tapcon screw?
No, we do not recommend it. Tapcon screws require incredibly precise pilot holes. If the hole is 1/16″ too wide, the screw threads won’t bite and will strip. Can a Regular Drill Drill Into Concrete with the precision required for this fastening? No, you need a hammer drill.
Can a Regular Drill Drill Into Concrete walls without a masonry bit?
Absolutely not. Wood bits will melt, and metal bits will dull and snap. Can a Regular Drill Drill Into Concrete is irrelevant; without the correct carbide-tipped masonry bit, the project will fail instantly.
Why is my regular drill vibrating so much in concrete?
That is likely not vibration but binding. Can a Regular Drill Drill Into Concrete efficiently? No, the binding you feel is the bit hitting aggregate and stalling the motor. This is why you must drill slowly and periodically lift the bit to clear dust.
Can a regular drill sink anchors like wedge anchors or sleeve anchors?
Only for the absolute smallest sizes in soft masonry. For anchors that demand high-torque expansion, you must use a hammer drill. To understand anchor depth versus bit size, consult 🔗 How Deep Can You Drill Into Concrete?.
Can a Regular Drill Drill Into Concrete faster if it is corded?
Generally, yes. Can a Regular Drill Drill Into Concrete without overheating better? A corded drill often provides better consistent power, reducing the risk of stalling the motor under heavy pressure. However, it still lacks the necessary hammering action and the motor will still be under excessive strain. If you are debating power options, see: 🔗 Cordless vs Corded Hammer Drill for Concrete: Which Is Better?
Can a Regular Drill Drill Into Concrete ceiling walls?
No, this is extremely dangerous. Drilling overhead requires all the physical force and stamina you can muster, even with the right tools. Attempting to use a regular drill, which demands even more force, will lead to muscle fatigue and significantly increases the risk of the drill slipping and falling.
Final Verdict: Can a Regular Drill Drill Into Concrete (And Should You)?
To summarize the definitive answer to the user’s question, Can a Regular Drill Drill Into Concrete, the short answer is yes, technically you can, but it is almost never the right decision.
A standard, rotation-only drill can succeed only on very old, soft concrete, mortar joints, and cinder blocks for small (under 1/4″), shallow holes, and only if you use a carbide masonry bit. However, even in these ideal scenarios, the process is slow, frustrating, and puts your tool at significant risk of total failure.
For 99% of homeowners and DIY users, the balanced power, speed, and safety of a quality hammer drill is always the best choice. Can a Regular Drill Drill Into Concrete? Yes, you can, but investing in the correct equipment will save you massive amounts of time, protect your tools, and provide a much safer, cleaner finish to your masonry project. For homeowners frequently facing these projects, a solid cordless model is a fantastic resource, as discussed in 🔗 Best Hammer Drill for Home Use (2026 Guide).
Drilling into concrete walls is a task that often intimidates even the most seasoned DIY enthusiasts. Unlike wood or drywall, which yield easily to standard tools, concrete, brick, and stone are unforgiving. To succeed, you need more than just muscle; you need the Best Drill for Concrete Walls and a solid understanding of the mechanics involved.
Whether you are mounting a 75-inch TV, installing floating shelves, or securing outdoor lighting into a brick facade, using the wrong equipment can lead to burnt-out motors, snapped bits, and unsightly cracks in your masonry. In this comprehensive 2,200-word guide, we will break down the top-performing tools of 2026, explain the physics of masonry drilling, and ensure you have the confidence to tackle any concrete project.
Why You Need the Best Drill for Concrete Walls
Concrete is a composite material made of aggregate (rocks and gravel) bonded with cement. When you attempt to drill into it, your bit isn’t just cutting; it’s crushing. A standard rotary drill relies purely on rotation and pressure, which creates immense friction and heat. This is why many people ask:
To penetrate these dense surfaces efficiently, you need a tool that provides a “percussive” action. This is where the Best Drill for Concrete Walls—typically a hammer drill or a rotary hammer—comes into play. These tools deliver thousands of small “blows” per minute (BPM), pulverizing the concrete at the tip of the bit so the flutes can whisk the dust away.
Top 5 Best Drills for Concrete Walls: 2026 Comparison 📊
Choosing the Best Drill for Concrete Walls depends on your frequency of use and the hardness of your material. Below is a comparison of the top 5 models dominating the market this year.
Model
Type
Impact Energy / BPM
Best For
Weight
Milwaukee M18 Fuel Gen 4
Hammer Drill
32,000 BPM
Homeowners & Pro DIY
3.3 lbs
DeWalt 20V Max XR
Hammer Drill
38,250 BPM
Precision & Speed
3.6 lbs
Bosch Bulldog Xtreme
Rotary Hammer
2.0 Joules
Heavy Duty / Rebar
6.7 lbs
Makita XPH14Z
Hammer Drill
31,000 BPM
Comfort & Ergonomics
4.1 lbs
Hilti SF 6H-A22
Hammer Drill
28,800 BPM
Industrial Longevity
3.7 lbs
Detailed Reviews: The Best Drill for Concrete Walls in 2026
1. Milwaukee M18 FUEL™ 1/2″ Hammer Drill (Gen 4)
The Milwaukee M18 FUEL Gen 4 is widely considered the Best Drill for Concrete Walls due to its 1,400 in-lbs of torque and advanced AutoStop™ technology for user safety. 🛠️
The Milwaukee M18 Fuel remains a top contender for the Best Drill for Concrete Walls because of its incredibly compact size paired with massive torque. In 2026, the Gen 4’s “AutoStop” feature is a lifesaver, preventing wrist injuries if the bit binds in high-PSI concrete.
Key Specs:
Torque: 1,400 in-lbs
BPM: 0 – 33,000
Length: Only 6.9 inches
Motor: POWERSTATE™ Brushless
Performance Rating: ⭐⭐⭐⭐⭐ (9.8/10)
Masonry Speed: Fast
Battery Life: Excellent
2. DeWalt 20V MAX* XR® Brushless Hammer Drill
If your project involves serious masonry, a rotary hammer like the DeWalt 20V MAX XR is often the Best Drill for Concrete Walls that are poured or reinforced. Its pneumatic mechanism delivers far more impact energy than a standard hammer drill. 🏗️
If speed is your priority, the DeWalt XR is arguably the Best Drill for Concrete Walls. Its 3-speed transmission allows you to find the perfect cadence for different masonry densities. It handles 1/2″ holes in brick like it’s drilling through pine.
For high-volume masonry or structural renovations, the Bosch Bulldog Xtreme GBH2-28L is often considered the overall Best Drill for Concrete Walls due to its combination of high-impact energy and ergonomic counter-balance technology. It delivers 2.4 Ft.-Lbs of impact energy to pulverize tough concrete quickly. 👷♂️
When a standard hammer drill isn’t enough, this is the Best Drill for Concrete Walls for structural work. This is a dedicated rotary hammer, meaning it uses a pneumatic piston to hit the wall far harder than any standard drill. If you are drilling 20+ holes for a basement renovation, this is the tool to buy.
Key Specs:
Impact Energy: 2.4 Ft.-Lbs.
BPM: 0 – 5,100 (Heavy impacts)
Chuck Type: SDS-plus®
Vibration Control: Counter-balance technology
Performance Rating: ⭐⭐⭐⭐⭐ (9.9/10 for Masonry)
Masonry Speed: Unmatched
Weight: Heavy but balanced
4. Makita XPH14Z 18V LXT® Lithium-Ion Brushless
The Makita XPH14Z is a masterclass in ergonomics, making it the Best Drill for Concrete Walls for users who prioritize comfort without sacrificing power. Its massive 1,250 in-lbs of torque and all-metal gear housing are built to withstand the rigors of heavy masonry drilling. 🛠️
Makita is often cited as the Best Drill for Concrete Walls for users who value tool ergonomics and smooth operation. The XPH14Z feels balanced in the hand, which is crucial when you are trying to keep a bit perfectly level against a vertical concrete face.
Key Specs:
Torque: 1,250 in-lbs
BPM: High: 0-31,000 / Low: 0-8,250
Protection: XPT™ (Extreme Protection Technology for dust/water)
Build: All-metal gear housing
Performance Rating: ⭐⭐⭐⭐✬ (9.2/10)
Masonry Speed: Steady
Reliability: Top-tier
5. Hilti SF 6H-A22 ATC Cordless Hammer Drill
For those who demand industrial longevity, the Hilti SF 6H-A22 is the Best Drill for Concrete Walls that require repetitive, heavy-duty fastening. Its Active Torque Control (ATC) provides an extra layer of safety by instantly stopping the motor if the bit snags on rebar. 🧱🏅
Hilti is the “Ferrari” of the tool world. For professionals or high-end DIYers who want the absolute Best Drill for Concrete Walls that will likely last a lifetime, this is it. Its Active Torque Control (ATC) is the most sensitive in the industry, making it the safest choice for beginners.
Key Specs:
Voltage: 22V Platform
BPM: 28,800
Safety: Active Torque Control (ATC) sensor
Clutch: 15-position precision clutch
Performance Rating: ⭐⭐⭐⭐⭐ (9.7/10)
Masonry Speed: Smooth and Consistent
Service: Lifetime repair options
Deep Dive: The Hammer Drill (The Homeowner’s Hero) 🏠
For 90% of household tasks, the Best Drill for Concrete Walls is a high-quality hammer drill. These tools look like standard drills but feature a dedicated “hammer” setting on the clutch.
When engaged, two ribbed metal plates inside the drill click past each other, vibrating the chuck forward and backward. It’s a light tapping motion, but at 30,000+ BPM, it makes a world of difference. If you are looking for a tool that can also drive screws into wood and drill into metal, this is your winner.
Versatility: It serves as a 3-in-1 tool (Drill, Driver, Hammer).
Size: Small enough to fit between wall studs or in tight corners.
Cost: significantly more affordable than dedicated masonry equipment.
Deep Dive: The Rotary Hammer (The Heavy Hitter) 🏗️
If your walls are made of poured, reinforced concrete or you are drilling holes larger than 1/2 inch, the Best Drill for Concrete Walls is a rotary hammer.
Unlike the “clicking plates” of a hammer drill, a rotary hammer uses a pneumatic piston mechanism. This creates a much harder strike (measured in Joules). If you have a long afternoon of drilling ahead of you, a rotary hammer will do the work for you, whereas a hammer drill requires you to lean into the tool.
When searching for the Best Drill for Concrete Walls, don’t just look at the brand name. Pay attention to these technical specs that separate a toy from a tool:
Brushless Motors
In 2026, brushed motors are nearly obsolete for high-performance tasks. Brushless motors are more efficient, run cooler, and provide more torque—essential when the bit binds in a tough piece of aggregate.
Anti-Vibration Technology (UVP/AVT)
Drilling into concrete sends massive shocks through your arms. The Best Drill for Concrete Walls will feature dampened handles or internal counterweights to protect your joints from long-term fatigue. This is a non-negotiable feature for anyone over 50 who wants to keep their joints healthy. 🦴
Electronic Clutch and Kickback Control
Concrete is unpredictable. You might hit a piece of steel rebar or a particularly hard flint stone. Without an electronic clutch, the tool will “kick,” potentially spraining your wrist. The Best Drill for Concrete Walls will have a sensor that cuts power instantly if a bind occurs.
The Role of Accessories: It’s Not Just the Drill 🛠️
Even the Best Drill for Concrete Walls will fail if paired with a cheap, general-purpose bit. You must use carbide-tipped masonry bits. These are designed to withstand the heat and impact of the hammering action.
Additionally, you need to match your bit to your fasteners. If you are using Tapcon screws or expansion anchors, precision is key. A hole that is even 1/16″ too large will fail to hold your weight.
How to Drill Into Concrete Safely: A Step-by-Step Guide 🛡️
Once you have purchased the Best Drill for Concrete Walls, following a safe protocol is vital.
Mark Your Spot: Use a masonry nail or a center punch to create a small divot. This prevents the bit from “walking” across the wall.
Clear the Area: Ensure there are no pipes or wires behind the wall. Use a stud finder with deep-scan masonry mode if possible. ⚡
The “Slow Start”: Begin drilling in standard rotation mode to establish the hole’s shoulders, then flip to “Hammer Mode.”
Manage the Dust: Concrete dust contains silica, which is hazardous. Use a vacuum attachment or have a helper hold a shop vac nozzle directly under the hole.
Many users blame their equipment when the real issue is technique. Even with the Best Drill for Concrete Walls, you can run into trouble.
The “Leaning” Mistake: People often think more pressure equals faster drilling. In reality, too much pressure creates heat and prevents the hammer mechanism from moving freely. Let the tool do the work.
The Overheating Trap: If the bit stops progressing, pull it out and let it spin in the air for a few seconds to cool down. Never dip a hot carbide bit in water; the thermal shock can shatter the tip. 🌡️
Ignoring the Dust: If you don’t pull the bit back periodically to clear the dust, it will pack into the hole and create a “friction lock.” This is the #1 cause of stuck drill bits!
Cordless vs. Corded: Which is the Best Drill for Concrete Walls? 🔌🔋
In years past, corded was king for masonry. However, 2026 battery technology (like Tabless cells and high-output 21700 cells) has closed the gap entirely.
Cordless: Offers unparalleled freedom. The Best Drill for Concrete Walls in this category is usually part of a wider ecosystem (like DeWalt or Milwaukee), allowing you to swap batteries with your saws and impacts.
Corded: Ideal if you are drilling all day or working in extremely cold temperatures where batteries struggle. Corded tools often offer more “Impact Energy” for a lower price point.
To ensure your Best Drill for Concrete Walls lasts for a decade, follow these maintenance steps:
Blow it out: Use compressed air to remove concrete dust from the motor vents after every use. Dust is the silent killer of electric motors.
Grease the Chuck: If using an SDS-plus rotary hammer, always apply a small dab of grease to the bit shank before inserting it. This reduces friction inside the piston assembly.
Battery Care: Don’t store your lithium-ion batteries in an unheated garage during the winter. Cold temperatures degrade the cells and reduce your drilling runtime.
Frequently Asked Questions (FAQ) ❓
Is a hammer drill enough for a concrete basement wall?
Yes, for standard anchors (1/4″ to 3/8″), a high-quality hammer drill is the Best Drill for Concrete Walls. If the wall is high-PSI poured concrete used in modern foundations, it may take longer than a rotary hammer, but it will eventually succeed.
Why is my drill smoking?
This usually happens when you are using a regular drill instead of the Best Drill for Concrete Walls, or if your masonry bit is dull. The smoke is caused by friction heat. Stop immediately! You are likely glazing the hole or ruining the temper of your bit.
Can I use a hammer drill on brick?
Absolutely. Brick is generally softer than concrete, making a hammer drill the perfect tool. Be careful near the edges of bricks to prevent “blowouts” or cracking. 🧱
How long does a masonry bit last?
A high-quality carbide bit used in the Best Drill for Concrete Walls can last for dozens of holes, provided it isn’t overheated or used to hit steel rebar. If the tip looks rounded or “blue,” it’s time for a replacement.
Summary: Investing in Quality
Finding the Best Drill for Concrete Walls is about matching the tool to the task. If you are a casual DIYer, a cordless hammer drill from a reputable brand will serve you well for years. If you are embarking on a massive renovation involving structural concrete, treat yourself to a rotary hammer to save your strength.
Remember, the Best Drill for Concrete Walls is only as good as the person holding it. Use the right bits, keep your speed controlled, and always prioritize safety. Happy drilling! 👷♂️🔧
Note: This post contains affiliate links. If you purchase through these links, we may earn a small commission at no extra cost to you. We only recommend the Best Drill for Concrete Walls that we have personally tested or researched extensively. Prices and availability are accurate as of early 2026.