
In the world of precision manufacturing, your CNC machine is only as capable as the few millimeters of carbide meeting the workpiece. For the BuildToolHQ community, understanding the difference between Upcut vs. Downcut CNC bits versus Compression tooling isn’t just about knowing which shape to buy—it’s about mastering the intersection of material science, geometry, and mechanical physics.
Understanding the nuances between Upcut vs Downcut CNC bits is essential for any CNC machining project.
Familiarizing yourself with Upcut vs Downcut CNC bits can lead to superior results in your crafting.
Choosing the wrong geometry results in more than just a “bad cut.” It leads to workholding failure, shortened spindle life, and potentially dangerous tool breakage. This guide is designed to transform you from a “user” into a “technician,” providing a deep dive into Upcut vs Downcut CNC bits and Compression bits so you can achieve a zero-sanding finish every time.
As we established in our foundational [The Ultimate Guide to CNC Router Bits: Selection, Speeds, and Materials], the way a tool interacts with wood fibers dictates the success of the entire carve.
1. The Physics of the Cut: Why Geometry Matters
When discussing Upcut vs Downcut CNC bits, it’s important to consider their impact on different materials.
A proper understanding of Upcut vs Downcut CNC bits ensures better finishes on your projects.
To master the selection of Upcut vs Downcut CNC bits and Compression bits, you first have to understand how wood reacts to a spinning blade at high RPM. Wood is not a solid block; it is a bundle of cellulose fibers. If you pull those fibers away from their support (the rest of the board), they splinter—this is the “tear-out” that ruins expensive slabs.
The “spiral” or “flute” of a CNC bit acts like a screw thread. Depending on the direction of that screw, the bit is either pushing those fibers into the wood core or pulling them out. The choice between Upcut vs. Downcut vs. Compression is essentially a choice of where you want the “stress” of the cut to be directed.
2. The Upcut Spiral: The Workhorse of the Shop
The Upcut spiral is the most common tool for a reason: it is incredibly efficient at moving material and evacuating heat.
Mechanical Action & Airflow
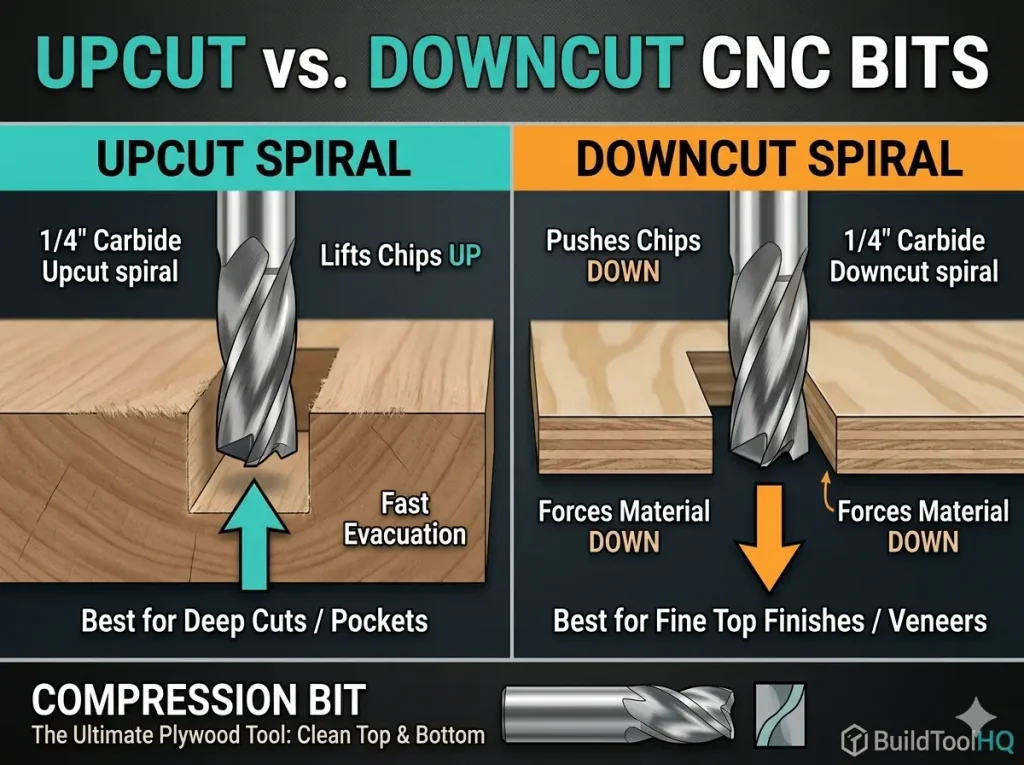
The flutes wrap upward toward the shank. As the bit spins, it acts like a high-speed vacuum, pulling chips and heat up and away from the workpiece. This creates a “cooling effect” that preserves the life of your carbide.
- The Pro: Superior chip evacuation. This is vital for deep mortises or slotting where chips would otherwise get trapped, causing “re-cutting” and friction fire.
- The Con: It pulls the top surface fibers up. On materials like Baltic Birch plywood or melamine, this results in a “fuzzy” or splintered top edge that requires heavy sanding.
- Best Use Case: Roughing passes, cutting solid natural wood where the top edge will be rounded over, or deep slotting where bit breakage is a concern.
If you are calculating your chip load to prevent tool wear, remember that the upcut bit is the most forgiving geometry for heat management. See our core guide on [The Ultimate Guide to CNC Router Bits: Selection, Speeds, and Materials] for the specific physics of heat dissipation.
In summary, understanding Upcut vs Downcut CNC bits can greatly enhance your proficiency.
For detailed work, the choice of Upcut vs Downcut CNC bits can greatly influence the outcome.
3. The Downcut Spiral: Precision for the “Show Side”
If your project relies on a perfect top surface—like the intricate details found in [V-Carve Bits and Sign Making: Achieving crisp detail and sharp corners]—the Downcut bit is your best friend.
The Downward Pressure Advantage
The flutes on a downcut bit are reversed. As the tool rotates, it shears the wood fibers downward, pressing them against the core of the material.
- The Pro: It creates a flawlessly clean top edge. Because it pushes down, it also acts as an “extra clamp,” helping hold thin materials flat against the wasteboard without the part lifting.
- The Con: It pushes chips into the cut. In deep grooves, these chips can pack tightly, leading to heat buildup or “charring” on the edges.
- Technical Tip: To run a downcut bit safely, you must use high-quality carbide. We discuss the thermal benefits of different coatings in our section on [Diamond Coated & Specialized Bits: For composites and abrasive materials].
For a crisp finish, understanding Upcut vs Downcut CNC bits is vital.
4. The Compression Bit: The Best of Both Worlds
Understanding Upcut vs Downcut CNC bits is critical for achieving the desired outcome.
For professionals cutting double-sided laminates or expensive plywood, the Compression bit is the ultimate evolution of Upcut vs. Downcut vs. Compression technology.
Your choice of Upcut vs Downcut CNC bits can greatly enhance the quality of your work.
Understanding the “Transition Zone”
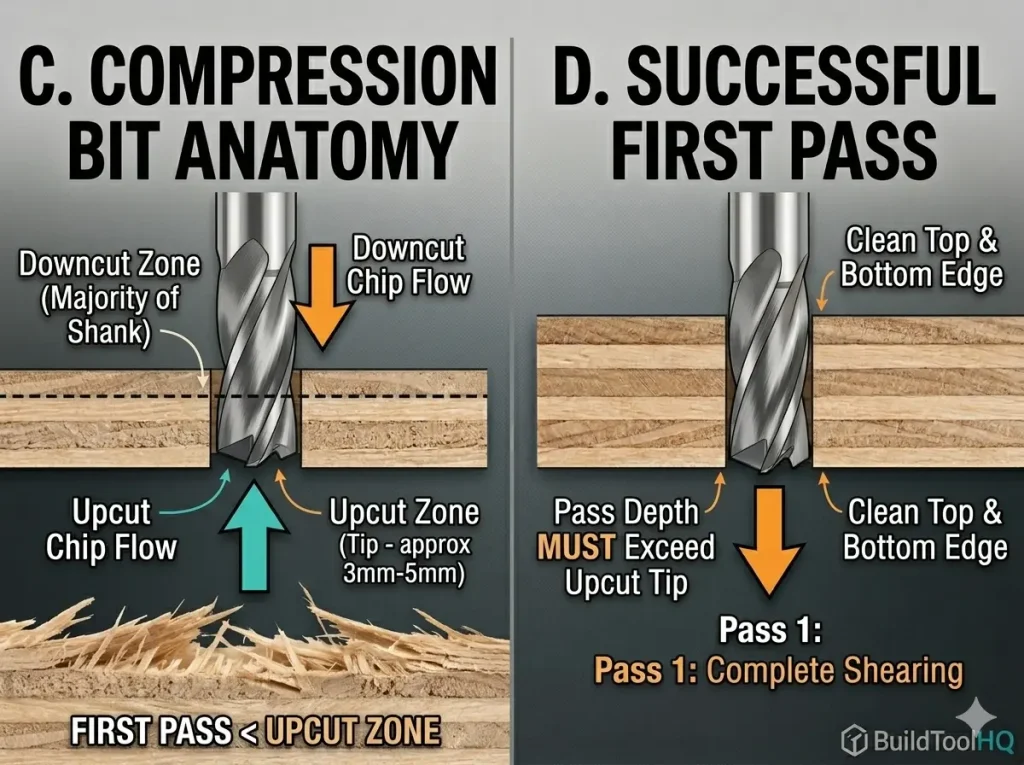
A compression bit is a hybrid. The bottom 3-5mm of the bit features an upcut geometry, while the remainder of the cutting length is a downcut.
In woodworking, the debate of Upcut vs Downcut CNC bits is crucial for optimal results.
- The Bottom: Pulls the bottom fibers up toward the center.
- The Top: Pushes the top fibers down toward the center.
- The Result: The material is “sandwiched,” leaving a clean, sharp edge on both sides of the board.
Ultimately, the choice of Upcut vs Downcut CNC bits can determine your project’s success.
Utilizing the right Upcut vs Downcut CNC bits is essential for high-quality finishes.
The Golden Rule of Compression: Your first pass must be deeper than the upcut portion. If you only cut 2mm deep with a compression bit, you are only using the upcut part, and you will still get tear-out! This precision is similar to the “step-over” logic used in [Ball Nose vs. Tapered Ball Nose: The nuances of 3D carving and finishing passes].
5. Material Matching Matrix
Selecting the right tool depends entirely on your material. Below is a quick-reference guide for the BuildToolHQ community:
| Material Type | Recommended Bit | Reason |
| Baltic Birch Plywood | Compression | Prevents splintering on the veneer. |
| Natural Hardwood | Upcut | Best for chip removal and tool cooling. |
| Melamine / Laminate | Compression | Essential for clean top/bottom edges. |
| Softwood (Pine/Cedar) | Downcut | Prevents “fuzzing” on the soft fibers. |
| Acrylic & Plastics | Upcut (O-Flute) | Prevents melting by removing heat fast. |
| MDF | Upcut or Downcut | MDF is uniform; choice depends on finish. |
When selecting tools, consider the implications of Upcut vs Downcut CNC bits.
6. The Physics of Deflection and Rigid Seating
One often overlooked aspect of choosing between Upcut vs. Downcut vs. Compression bits is how they affect tool deflection. Upcut bits exert “pulling” force, while downcut bits exert “pushing” force.
To minimize “chatter” (vibration marks on your edge), you must ensure your bit is seated properly. Tool deflection increases by the cube of the length it protrudes from the collet. Always seat your bits as deeply as possible. For a guide on ensuring your collet is clean enough to handle this pressure, check out [CNC Bit Maintenance: Sharpening, cleaning, and storage for longevity].
7. Troubleshooting Common Edge Issues
Even with the right Upcut vs. Downcut vs. Compression bits, you might face these three common shop problems:
The differences in Upcut vs Downcut CNC bits can ultimately affect your project quality.
When using CNC tools, the differences in Upcut vs Downcut CNC bits can lead to varied results.
A. Burnt Edges
This usually happens with Downcut bits because the chips aren’t escaping. Solution: Increase your Feed Rate or decrease your RPM. You want the bit to “bite” the wood, not “rub” it.
B. Part Shifting
Proper knowledge about Upcut vs Downcut CNC bits allows for better project planning.
The choice of Upcut vs Downcut CNC bits can prevent various machining issues.
Upcut bits can pull small parts right off the table. Solution: Switch to a Downcut bit. The downward pressure acts as a mechanical clamp.
C. Excessive Vibration
Often caused by using a bit with too much “stick out” from the collet. This is especially common when using wide-diameter tools. Learn more about managing these forces in [Surfacing and Slab Leveling Bits: Mastering large-area clearing].
8. Conclusion: Investing in the Right Tooling
Mastering the choice of Upcut vs. Downcut vs. Compression bits is the fastest way to upgrade your shop’s output. While it is tempting to use a cheap upcut bit for everything, the time you save in sanding alone will pay for a specialized compression bit within a single project.
Familiarity with Upcut vs Downcut CNC bits is a key factor for success in CNC operations.
Keep your tools clean, calculate your chip loads carefully, and always match your geometry to your material. For a deeper look at the specific bits needed for cabinetry, revisit our guide on [Best CNC Bits for Plywood and Hardwoods: A deep dive into wood-specific geometry].
Final Pro-Tip: The “Sound” of Success
One often overlooked aspect of choosing between upcut vs downcut CNC bits is the acoustic feedback. Upcut bits tend to have a higher-pitched “scream” because they are actively vibrating the material upward. Downcut bits often sound more “muffled” because they are compressing the material against the table. If you hear excessive whistling or chatter, it may be time to revisit your Chip Load calculations or check for tool wear.
Choosing between Upcut vs Downcut CNC bits can affect both aesthetics and functionality.
The effectiveness of Upcut vs Downcut CNC bits can significantly impact your project timeline.
Frequently Asked Questions:
Why is my downcut bit burning the wood, but my upcut bit isn’t?
Burning is almost always a result of heat being trapped in the cut. Because downcut bits push chips downward, they pack the “gullet” (the space between flutes) with sawdust. If your feed rate is too slow, the bit rubs against the same dust repeatedly, generating friction.
The Fix: Increase your feed rate or decrease your RPM. You want the bit to slice off a physical chip that carries the heat away, rather than grinding wood into flour.
Can I use a compression bit for shallow pocketing or engraving?
Technically yes, but it won’t work as intended. A compression bit only “compresses” the fibers when the “upcut portion” at the tip is fully buried in the material. If you are only carving $2mm$ deep on a bit with a $5mm$ upcut length, you are effectively just using an upcut bit.
The Pro Tip: For shallow work, stick to a dedicated downcut bit to ensure a crisp top edge.
Which bit is safest for small parts that might fly off the table?
When cutting small parts—especially those without a vacuum table—downcut bits are the safest choice. The downward spiral geometry exerts mechanical pressure that helps hold the part against the wasteboard. Conversely, an upcut bit acts like a corkscrew, trying to lift the part, which often leads to “part fly-off” and tool breakage.
Do upcut vs. downcut vs. compression bits require different maintenance?
The physics of the cut stays the same, but downcut and compression bits tend to accumulate resin faster because they don’t evacuate chips as efficiently as upcut bits. Resin acts as a thermal insulator, which “cooks” the carbide.
The Fix: Check your bits every hour for “pitch” buildup. For the best cleaning protocols, refer to our guide on [CNC Bit Maintenance: Sharpening, cleaning, and storage for longevity].
How do I know when my compression bit is dull?
If you start seeing “fuzzing” or splintering on the top and bottom of your plywood, the transition zone of your compression bit is likely rounded over. You can also perform the “light reflection test” we detailed in the [The Ultimate Guide to CNC Router Bits: Selection, Speeds, and Materials] to see if the edge is reflecting light (a sign of dullness).
Are these bits interchangeable for Aluminum or Acrylic?
Generally, no. While you can use an upcut bit for metal, it is better to use specialized geometry. Aluminum is “gummy” and requires the single-flute clearance found in [Aluminum Cutting with CNC: Single-flute secrets and lubrication]. For plastics, a standard wood bit may generate too much heat and melt the material; instead, use [O-Flute Bits for Plastics and Acrylics: Managing heat and preventing melting].
Leave a Reply