Choosing the right tool for the job is the difference between a professional finish and a wasted sheet of expensive Baltic Birch. While many beginners treat CNC bits as “one-size-fits-all,” experienced makers know that wood-specific geometry is the secret to high-speed, high-quality production.
In this guide, we are breaking down the best CNC bits for plywood and hardwoods, explaining the mechanical physics of why certain geometries succeed where others fail. If you are just getting started, make sure to bookmark our [The Ultimate Guide to CNC Router Bits: Selection, Speeds, and Materials] as your foundational reference for all tooling terminology and chip load formulas.
1. The Plywood Physics: Why Standard Bits Fail
Plywood is a “composite” material made of alternating layers of Plywood is a “composite” material made of alternating layers of wood grain and glue. This creates two distinct challenges for a CNC router that solid lumber does not present: inter-laminar shear and veneer fragility.
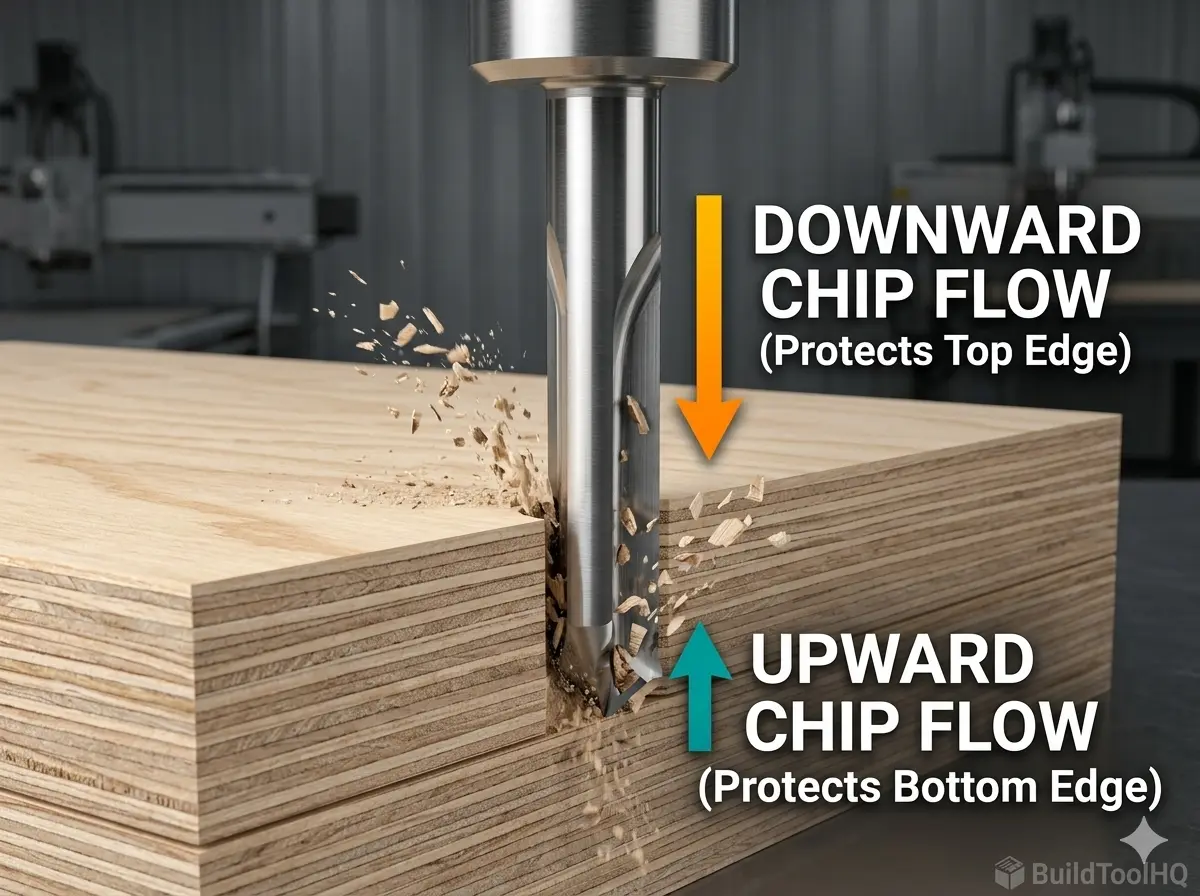
- Top-Layer Tear-out: The fragile veneer on the top surface is prone to lifting because it has no support from above.
- Bottom-Layer Splintering: As the bit exits the material, the downward force of the tool can blow out the bottom veneer.
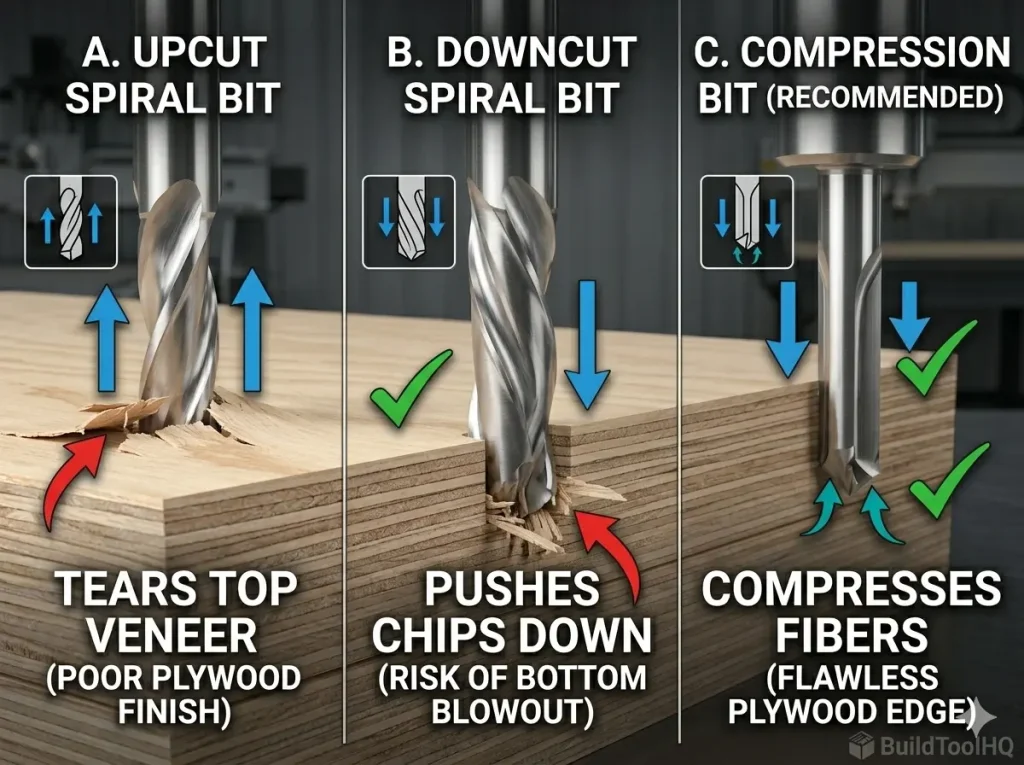
Standard upcut bits act like a hook on plywood veneers, pulling them upward and away from the core. Conversely, a downcut bit protects the top but can cause “blowout” on the bottom as it pushes chips into the wasteboard. To solve this, we move toward Compression Geometry. If you haven’t seen the visual difference in action, check out our deep dive on [Upcut vs. Downcut vs. Compression Bits: When to use each for edge finish].
2. Top Recommendations for the Best CNC Bits for Plywood
For high-volume production or high-end cabinetry, these three tools are essential in your kit to ensure a zero-sanding finish.
A. The Compression Bit (The Gold Standard)
This is the undisputed king of plywood. By combining an upcut tip with a downcut shank, it “compresses” the wood fibers toward the center of the board.
- The Secret: It creates a “shearing” action from both the top and the bottom simultaneously. This results in a “butter-smooth” edge that is ready for edge-banding immediately after the cut.
B. The Mortise Compression Bit (For Thin Sheets)
Standard compression bits often have an upcut section (the “toe”) that is too long for $1/4″$ ($6mm$) or $12mm$ plywood. This causes the upcut portion to reach the top surface, causing the very tear-out you were trying to avoid.
- The Solution: A Mortise Compression bit has a significantly shorter upcut section (usually around $3mm$ to $5mm$). This allows the downcut portion of the bit to engage the top veneer even on thin material.
C. The Straight Flute Bit (The Cost-Effective Workhorse)
While spiral flutes are popular for high-speed clearing, straight flute bits are excellent for plywood because they exert zero vertical force. They don’t pull up, and they don’t push down. While they struggle with chip evacuation compared to [O-Flute Bits for Plastics and Acrylics: Managing heat and preventing melting], they are a fantastic, budget-friendly choice for simple profile cuts and nesting.
3. Mastering Hardwoods: Oak, Maple, and Walnut
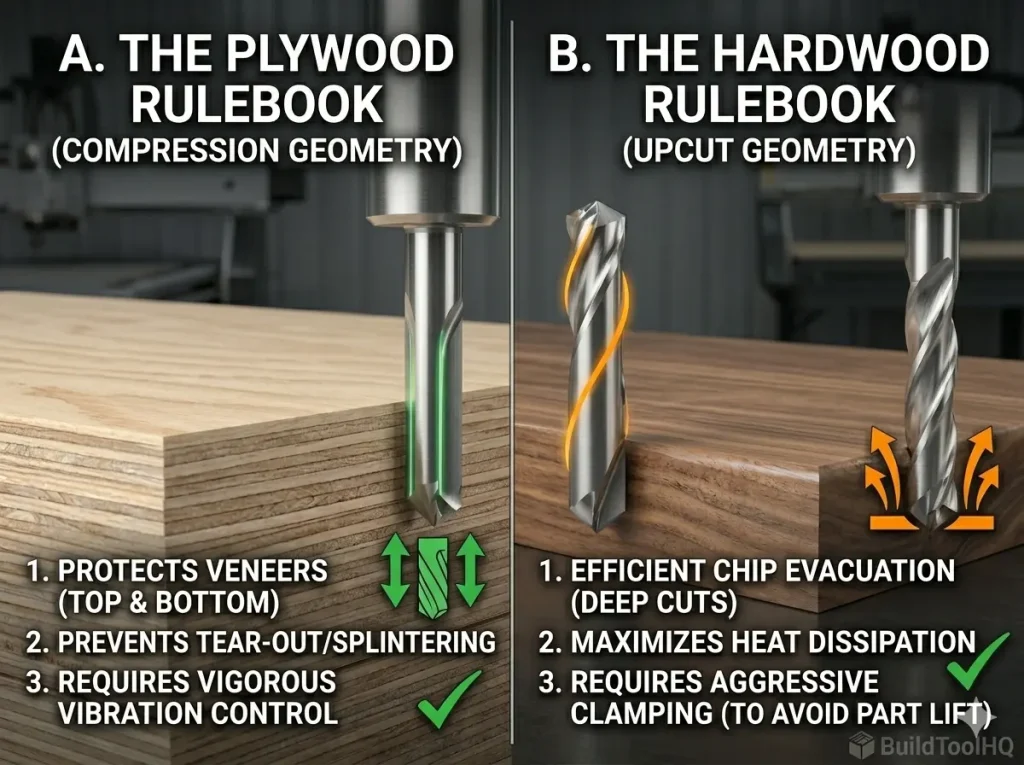
While plywood requires compression to save the veneers, solid hardwoods demand heat management and grain awareness. Solid wood is a cellular structure, and the way your bit interacts with those cells determines your finish quality.
Chip Evacuation in Deep Pockets
When carving deep mortises in hardwood, heat is your primary enemy. An Upcut Spiral bit pulls chips out of the hole rapidly. This prevents the bit from “re-cutting” sawdust. Re-cutting chips is the primary cause of friction, which leads to tool burn and ruins the temper of your carbide.
Roughing vs. Finishing Strategies
For complex hardwood projects, we recommend a two-tool strategy:
- The Roughing Pass: Use a large $1/4″$ or $1/2″$ Upcut Spiral to clear bulk material quickly.
- The Finishing Pass: Use a [Ball Nose vs. Tapered Ball Nose: The nuances of 3D carving and finishing passes] bit to “clean up” the final $0.5mm$ of material for a glass-like finish.
4. Nested Manufacturing: Maximizing Your Sheet Goods
Not every wood project is a simple square cut. Depending on your design, you may need to pivot to specialized tools:
- Detail and Lettering: For crisp text in Walnut or Cherry, you must use [V-Carve Bits and Sign Making: Achieving crisp detail and sharp corners].
- Slab Leveling: If you are working with live-edge slabs, a standard end mill is too slow. You need the wide-diameter clearing power of [Surfacing and Slab Leveling Bits: Mastering large-area clearing].
- Exotic & Abrasive Woods: For resin-heavy woods or stabilized burls, standard carbide can dull in minutes. Look into the durability of [Diamond Coated & Specialized Bits: For composites and abrasive materials].
5. Technical Diagnostic: Troubleshooting Your Wood Cuts
If you are seeing poor results, use this checklist to diagnose the issue:
Bit “Screaming”? This is often a sign of tool deflection or a chip load that is too small. Re-check your math in the [The Ultimate Guide to CNC Router Bits: Selection, Speeds, and Materials].
Burning on Hardwood? Your feed rate is too slow. The bit is rubbing instead of cutting. This is common when using the same speeds for wood as you would for [Aluminum Cutting with CNC: Single-flute secrets and lubrication]. You must increase your IPM (Inches Per Minute) to keep the carbide cool.
Fuzzing on Plywood Top? Your upcut “toe” is reaching the top surface. Switch to a Mortise Compression bit or increase your depth of cut on the first pass.
6. Maintenance: Protecting Your Carbide Investment
Even the best bits will fail if they are covered in “pitch” (dried sap and resin). Pitch buildup increases friction, which increases heat, which kills the razor edge of your tool.
- Clean After Every Run: Use a dedicated citrus-based cleaner or a blade-and-bit soak.
- Check for “Blueing”: If your bit looks blue or rainbow-colored, it has overheated. This softens the carbide.
- Storage: Carbide is brittle. If two bits “clink” together, the edges can micro-chip. For a full storage and cleaning protocol, see our guide on [CNC Bit Maintenance: Sharpening, cleaning, and storage for longevity].
Final Summary for BuildToolHQ Readers
Building a “topical authority” in your workshop means matching thBuilding a “topical authority” in your workshop means matching the tool to the fiber:
- For Cabinetry & Plywood: Invest in a high-quality $1/4″$ Compression bit.
- For Solid Hardwood Furniture: Use Upcut Spirals for bulk removal and Ball Nose for detail.
- For Thin Veneered Panels: Always reach for the Mortise Compression.
By understanding wood-specific geometry, you drastically reduce your post-processing time. Remember: Five minutes of tool selection saves five hours of sanding.
Can I use a compression bit for every plywood cut?
While compression bits are the gold standard, they have a “minimum depth” requirement. For the compression effect to work, the upcut portion (the tip) must be fully buried in the material so the downcut portion can engage the top veneer. If you are doing shallow decorative grooves, a compression bit will act like an upcut bit and cause tear-out. For shallow work, reach for a dedicated downcut spiral.
Why does my hardwood keep burning even with a sharp bit?
Burning is usually a symptom of a low chip load. If your RPM is too high and your feed rate is too slow, the bit “rubs” the wood fibers instead of slicing them. This friction generates heat that chars the wood.
The Solution: Increase your travel speed (IPM) or lower your spindle RPM. For the exact math, revisit our [The Ultimate Guide to CNC Router Bits: Selection, Speeds, and Materials].
What is the difference between a “Mortise” compression and a standard one?
A Mortise Compression bit has a much shorter upcut “toe” (usually $3mm$ to $5mm$). This is designed specifically for thin sheet goods ($1/4″$ or $1/2″$). If you use a standard compression bit on thin plywood, the upcut flutes will reach the top surface and splinter the veneer.
Should I use a single-flute or double-flute bit for hardwood?
For most woodworking, a two-flute bit is the standard as it provides a cleaner finish. However, if you are cutting extremely “gummy” woods or need to move very fast, a single-flute (similar to what we use in [Aluminum Cutting with CNC: Single-flute secrets and lubrication]) can help with heat dissipation.
Is it okay to use “Downcut” bits for deep pockets in Oak or Maple?
We generally advise against this. Because downcut bits push chips into the bottom of the cut, they can cause heat to build up rapidly in deep pockets, which may lead to smoke or even fire. For deep clearing in hardwoods, always use an upcut spiral to ensure chips are evacuated safely.
How do I prevent “fuzzies” when cutting softwoods like Pine?
Softwoods have long, flexible fibers that tend to bend rather than cut cleanly. Using a downcut bit is the best way to “trap” those fibers against the grain and shear them off. If you’re still seeing fuzz, ensure you aren’t using a bit meant for harder materials, like those found in [Diamond Coated & Specialized Bits: For composites and abrasive materials], as they may not be sharp enough for soft fibers.
Leave a Reply